Contents
Previous Next
Adding Virtual Disks to a Virtual Machine
Virtual disks are stored as files on the host computer or on a network file server. It does not matter whether the disk that holds the files is IDE or SCSI. A virtual IDE drive can be stored on an IDE drive or on a SCSI drive. So can a virtual SCSI drive.
Use the virtual machine settings editor to add a new virtual disk to your virtual machine. The virtual machine should be powered off before you begin. If it is not, shut down the guest operating system normally, then click Power Off on the VMware Virtual Machine Console toolbar.
Note: If you have a Windows NT 4.0 guest with a SCSI virtual disk, you cannot add both an additional SCSI disk and an IDE disk to the configuration.
Adding a New Virtual Disk from the Console
1. Open the virtual machine settings editor (VM > Settings) and click Add. The Add Hardware Wizard guides you through the steps to create your virtual disk. Click Next to start configuring the virtual disk.
2. Click Hard Disk, then click Next.
3. Select Create a new virtual disk, then click Next.
4. Choose the type of virtual disk. The wizard recommends whether to use SCSI or IDE, based on the guest operating system installed in the virtual machine.
5. Set the capacity for the new virtual disk.
You can set a size between 0.1GB (100MB) and 256GB for a SCSI virtual disk or 128GB for an IDE virtual disk. The default is 4GB.
By default, Allocate all disk space now is checked.
Allocating all the space at the time you create the virtual disk gives somewhat better performance, but it requires as much disk space as the size you specify for the virtual disk.
If you deselect this option, the virtual disk's files start small and grow as needed, but they can never grow larger than the size you set here.
You may also specify whether you want the virtual disk created as one large file or split into a set of 2GB files. If you want to split the disk, select Split disk into 2GB files. You should split the virtual disk if it is stored on a FAT32 file system or on a file system that cannot support files larger than 2GB, such as FAT16.
6. Accept the default filename and location for the virtual disk file, or change it if you want to use a different name or location. To find a different folder, click Browse.
If you want to specify a device node for your virtual disk, click Advanced.
On the advanced settings screen, you can also specify a disk mode. This is useful in certain special-purpose configurations in which you want to exclude disks from the snapshot. For more information on snapshots, see
Taking Snapshots. You can choose between a normal disk and an independent disk.
Normal disks are included in snapshots. This is the default setting for a new disk.
Independent disks are not included in snapshots. If you select Independent, you must further select one of the following modes:
Persistent — changes are immediately and permanently written to the disk.
Nonpersistent — changes to the disk are discarded when you power off or revert to the snapshot.
When you have set the filename and location you want to use and have made any selections you want to make on the advanced settings screen, click Finish.
7. The wizard creates the new virtual disk. It appears to your guest operating system as a new, blank hard disk. Use the guest operating system's tools to partition and format the new drive.
Adding an Existing Virtual Disk from the Console
1. Open the virtual machine settings editor (VM > Settings) and click Add. The Add Hardware Wizard guides you through the steps to create your virtual disk. Click Next to start configuring the virtual disk.
2. Click Hard Disk, then click Next.
3. Select Use an existing virtual disk, then click Next.
4. Click Browse, then browse to the virtual disk (.vmdk) you want to use.
5. To associate the virtual disk with a specific device node, click Advanced and select the device node in the Virtual device node list.
On the advanced settings screen, you can also specify a disk mode. This is useful in certain special-purpose configurations in which you want to exclude disks from the snapshot. For more information on the snapshot feature, see
Taking Snapshots. You can choose between a normal disk and an independent disk.
Normal disks are included in snapshots. This is the default setting for a new disk.
Independent disks are not included in snapshots. If you select Independent, you must further select one of the following modes:
Persistent — changes are immediately and permanently written to the disk.
Nonpersistent — changes to the disk are discarded when you power off or revert to the snapshot.
When you have set the filename and location you want to use and have made any selections you want to make on the advanced settings screen, click Finish. The wizard adds the virtual disk to the virtual machine.
Adding a New Virtual Disk from the Management Interface
To add a new virtual disk to a virtual machine, make sure the virtual machine is powered off, then complete the following steps.
1. On the Hardware page, click Add Device. The Add Device Wizard starts.
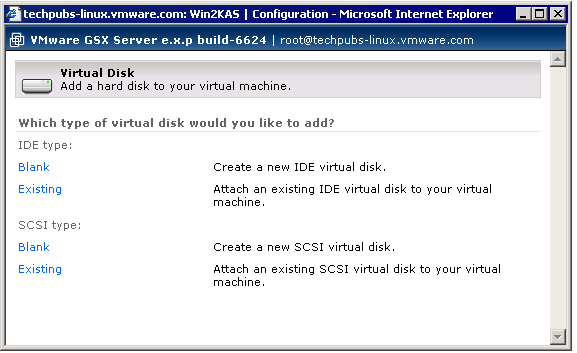
2. Click Hard Disk. The virtual disk type page appears.
3. To create a new virtual disk, decide whether you want the disk to be IDE or SCSI. The wizard suggests the recommended type. Then under IDE type or SCSI type, click Blank. The Virtual Disk Configuration page appears.
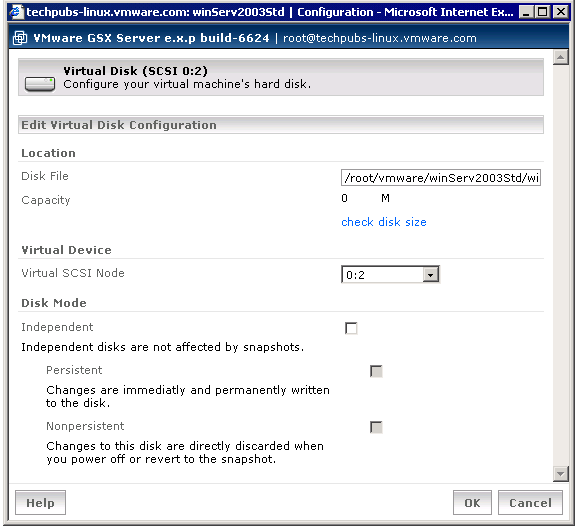
4. In the Disk File field, enter the location and name of the virtual disk. Make sure the virtual disk has a .vmdk extension.
5. In the Capacity field, specify the size of the virtual disk in megabytes (MB). By default, GSX Server preallocates the space for the virtual disk when you create it.
The virtual disk can be as small as 0.1GB (100MB). A SCSI virtual disk can be as large as 256GB; an IDE virtual disk can be as large as 128GB. The default is 4GB.
6. Specify the virtual device node in the Virtual IDE Node or Virtual SCSI Node list, as appropriate.
7. Decide if you want to make this virtual disk an independent disk. Under Disk Mode, check Independent, then check Persistent or Nonpersistent.
Independent disks are not included in snapshots.
Note: The independent disk option should be used only by advanced users who need it for special-purpose configurations.
You have two options for an independent disk. You can make the disk Persistent, which means that changes are immediately and permanently written to the disk. Or you can make the disk Nonpersistent, which means that changes to the disk are discarded when you power off or reset the virtual machine.
8. Decide if you want to preallocate the virtual disk space. Allocating all the space at the time you create the virtual disk gives somewhat better performance and ensures you do not run out of disk space on the host, but it requires as much disk space as the size you specify for the virtual disk. You cannot shrink a preallocated disk. To preallocate the virtual disk, select Allocate all disk space now.
If you do not preallocate the disk, the virtual disk's files start small and grow as needed, but they can never grow larger than the size you set here.
You may also specify whether you want the virtual disk created as one large file or split into a set of 2GB files. You should split the virtual disk if it is stored on a FAT32 file system or a file system that cannot support files larger than 2GB, such as FAT16. To do this, check Split into 2GB files.
9. Click OK to add the virtual disk.
Adding an Existing Virtual Disk from the Management Interface
To add an existing virtual disk to a virtual machine, make sure the virtual machine is powered off, then complete the following steps.
1. On the Hardware page, click Add Device. The Add Device Wizard starts.
2. Click Hard Disk. The virtual disk type page appears.
3. To add an existing virtual disk, choose the correct disk type — whether the disk is IDE or SCSI. Then under IDE type or SCSI type, click Blank. The Virtual Disk Configuration page appears.
4. In the Disk File field, enter the location for the virtual disk.
5. Specify the virtual device node in the Virtual IDE Node or Virtual SCSI Node list, as appropriate.
6. Decide if you want to make this virtual disk an independent disk. Under Disk Mode, check Independent, then check Persistent or Nonpersistent.
Independent disks are not included in snapshots.
Caution: The independent disk option should be used only by advanced users who need it for special-purpose configurations.
You have two options for an independent disk. You can make the disk Persistent, which means that changes are immediately and permanently written to the disk. Or you can make the disk Nonpersistent, which means that changes to the disk are discarded when you power off or reset the virtual machine.
7. Click OK to add the virtual disk.
Configuring a Virtual Disk from the Management Interface
To configure the virtual machine's virtual disk, complete the following steps.
1. In the Hardware page, under Virtual Disk, click Edit. The Virtual Disk page appears.
2. Change any of the following:
Change the virtual device node in the Virtual IDE Node or Virtual SCSI Node list, as appropriate.
Decide whether you want to make this virtual disk an independent disk. Under Disk Mode, check Independent, then check Persistent or Nonpersistent.
3. Click OK to save your changes and close the window.