- 5.1 Installing the Finer Life Database Demo Reader
The Demo Reader is installed in your PalmPilot the same way as other applications. Using the Palm Desktop Install utility (see your PalmPilot User Manual for details), select the file FineDemo.prc for installation. After the next HotSync, the Demo Reader will be installed. After installation, you should have the icon shown in Figure 1 in your set of Applications. Figure 1 - Demo Reader Icon
- 5.2 Installing The Finer Life Website Databases
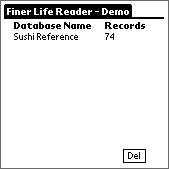
Data files on the PalmPilot will have the extension .pdb. The Demo Reader included a Finer Life database. To install this database or another Finer Life database, select the database file for installation using the PalmPilot Desktop Install utility (see your PalmPilot User Manual for details) and install it in the same way as you installed the Demo Reader. After the next HotSync, the newly installed Finer Life database will be listed in the database list on the Demo Reader on the main view screen (see Figure 2). 
Figure 2 - Demo Reader Main Screen
- 5.3. Deleting a Database
Databases can be deleted from the Demo Reader's main screen. Tap "Del" in the lower right corner of the screen (see Figure 2). The "Del" button will become highlighted. Tapping a database will select that database for removal. To exit Delete Database mode without deleting a database, tap the "Del" button a second time without tapping a database name.
- 5.4 Using the Demo Reader with Flash ROM
You can move the Demo Reader and/or one or more Finer Life Website Databases to Flash ROM. This requires version 2.10 or later of TRG Products Flash Builder application. TRG Products can be reached through the web at www.trgnet.com or by email at SuperPilot@trgnet.com. Note that in order to delete a database from your PalmPilot, it must be in RAM. Following the procedure in Section 5.3 will not work for databases in Flash ROM. Important Note: if you put a Finer Life Website Database into Flash ROM, filtering and finding data will work as it does with the database in RAM, but the database can not be sorted. If sorting is attempted on a database in Flash ROM, the error shown in Figure 3 will be displayed.
Figure 3 - Flash ROM Error
- The sections below describe the various functions available in the Demo Reader.
- 6.1 Application Preferences
In the App Prefs menu, you can enable or disable whether to confirm the deletion of a database (see Figure 4). Figure 4 - Demo Reader Preferences
- 6.2 Viewing a Database
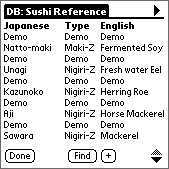
While on the main view screen, tap on the title of the database you would like to view. A new screen comes up, with the title indicating which database you selected (see Figure 5). In addition to the software "line at a time" up/down arrow buttons provided by the Demo Reader, you can also use the hardware "scroll" buttons provided on your PalmPilot (just below the data entry area) to move the Demo Reader data up and down a full page at a time.
Note that every other record is replaced with DEMO in the Demo version of the Reader.

Figure 5 - Database Records
- 6.3 Horizontal Scrolling
- The first column in each database is a non-scrollable column and any other visible column can be scrolled left and right through the available fields. Use the arrows at the upper right side of the PalmPilot screen to scroll horizontally (see Figure 5).
- 6.4 Viewing a Record in a Database
To view all of the fields of a record in a database, tap on the record of interest in the Database View screen (see Figure 5). The data will be displayed with each field visible (see Figure 6). If the data can not be displayed on a single screen, scroll buttons will appear in the lower right corner of the screen. Figure 6 - Record Details
- 6.5 Setting the Field Width
When viewing the contents of a record, there are choices on Menu:Options for increasing or decreasing the width of the data field (see Figure 7). The Finer Life Website Databases have this width preset for optimal viewing, but the data field width can be changed to suit the user’s preference.
Figure 7 - Setting Field Width
- 6.6 Finding Data in a Database
In the database columns view, tapping the "Find" button on the lower part of the screen will allow you to search for a particular text string in the database. Tapping "Find" will display a screen that allows selection of the filed to search and entry of the text string to find (see Figure 8). The "Find" screen has a pull-down menu that allows the choice of which field to search, including "All Fields" (see Figure 9). Once the string is entered and the field chosen, tapping "Find It" will take you to the first record in the database that matches the search criteria. That record will be at the top of the list of records. Pressing "+" on the lower part of the screen will move to the next record that matches the search criteria. This next record will now be at the top of the list of records. Pressing "+" repeatedly will keep moving to the next record that matches the "Find" criteria.
Figure 8 - "Find" Screen
Figure 9 - "Find" Field Menu
- 6.7 Sorting a Database (Simple)
In the database columns view, tapping the column heading will present a drop list with choices to sort the database by that particular column/field (see Figure 10). You can sort in forward or reverse alphabetical order. See Section 6.10 ("Sorting a Database (Advanced)") for advanced sorting of the database.
Figure 10 - Column Menu
- 6.8 Setting Up Column Widths
In the database columns view, tapping the column heading will present a drop-down list with one of the choices being to change the Column Width for that column (see Figure 10). Selecting this option will present a screen that allows you to change the width of that column (see Figure 11). The number that you enter into this box (0-160) will be the number of pixels allotted on the screen to that column. Making a column 0 width will make the column "hidden", and you will need to use the Menu:Tools:Show Hidden Columns menu item to bring them back into view (see Figure 12). Note that column 1 is a static column, and will not scroll left and right. Figure 11 - Column Width
- 6.9 Navigating the Database
There are three menu options that allow direct movement within the database. Selecting Menu:Tools:Goto Top of DB (see Figure 12) will move to the first record of the database. Selecting Menu:Tools:Goto Bottom of DB will move to the last record of the database. Selecting Menu:Jump # of Records will move down or up the number of records entered into the displayed screen. Figure 12 - Tools Menu
- 6.10 Sorting a Database (Advanced)
A menu option to sort the database with secondary and tertiary sort fields is available. Select Menu:Tools:Sort Items (see Figure 12). This will present a screen that allows you to select up to three sort criteria, each allowing both forward or reverse sorting (see Figure 13). Figure 13 - Sort Menu
- 6.11 Filtering a Database
Selecting Menu:Tools:Filter Records will allow the database to be filtered (see Figure 12). Once the database is filtered, only records that match the filter criteria will be shown. The Filter menu (see Figure 14) allows filtering by particular fields and also allows the filter to exclude records that match the criteria. Like the "Find" command, the "Filter" screen has a pull-down menu that allows the choice of which field to search, including "All Fields". Selecting Menu:Tools:Show All Records will once again display all the records in the database when filtering is no longer desired (see Figure 12).
Figure 14 - Filter Menu