


The Storage Manager application contains two tools, Disk Manager and File System Manager, that enable you to manage disk configurations and file systems on servers that are on your network.
This is a list of the step-by-step instructions in this appendix.
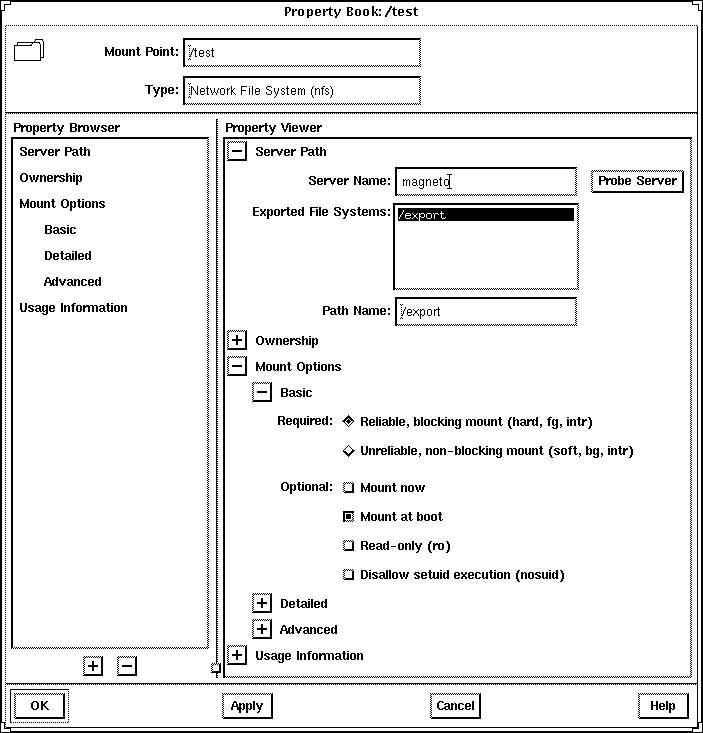
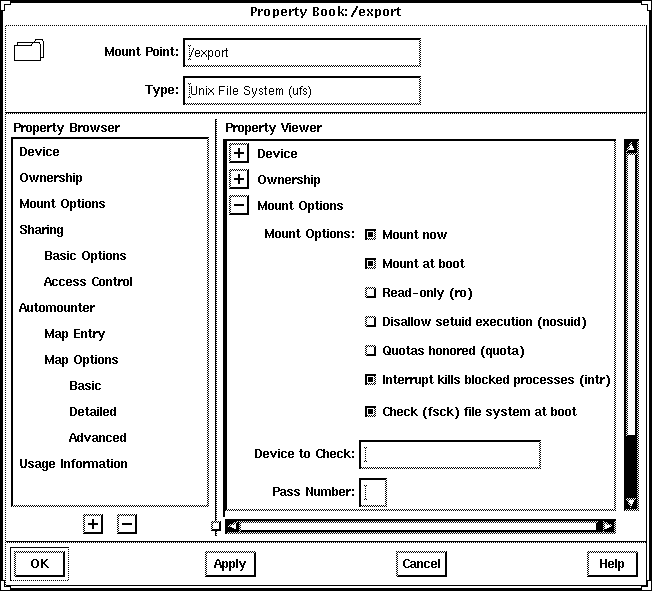
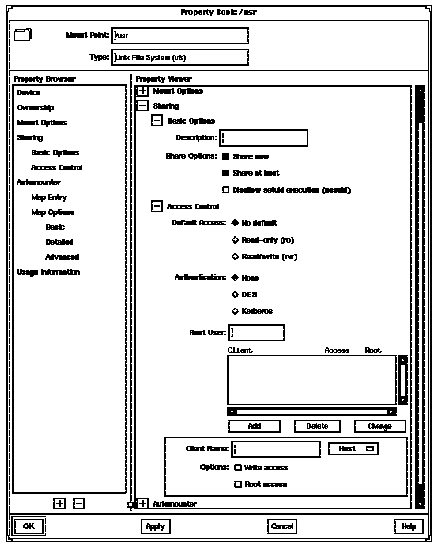
Storage Manager introduces the concept of a property book. A property book is the mechanism by which you identify, view, and modify the properties of editable objects, such as disks or file systems. A property book, using a book metaphor, contains a list of chapters that represent properties for the object. You can expand each chapter to view or modify the properties.
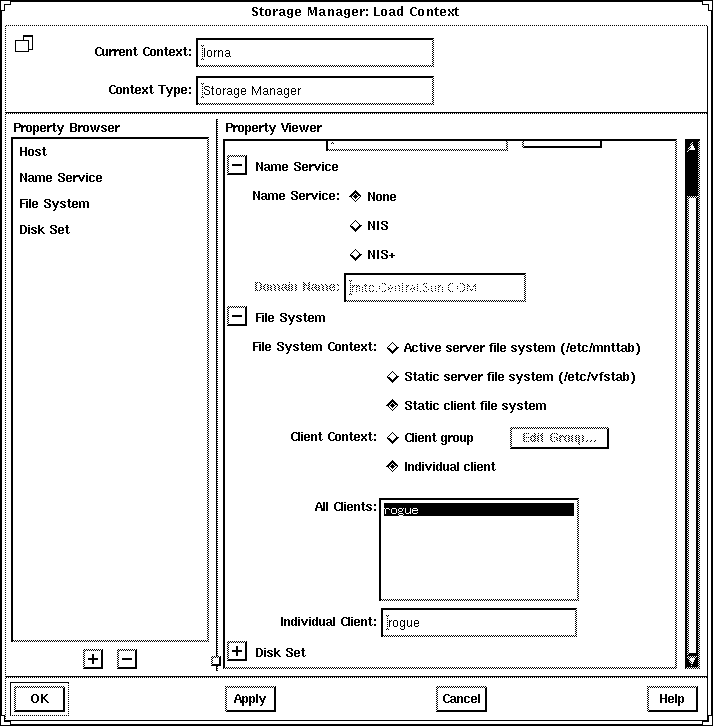
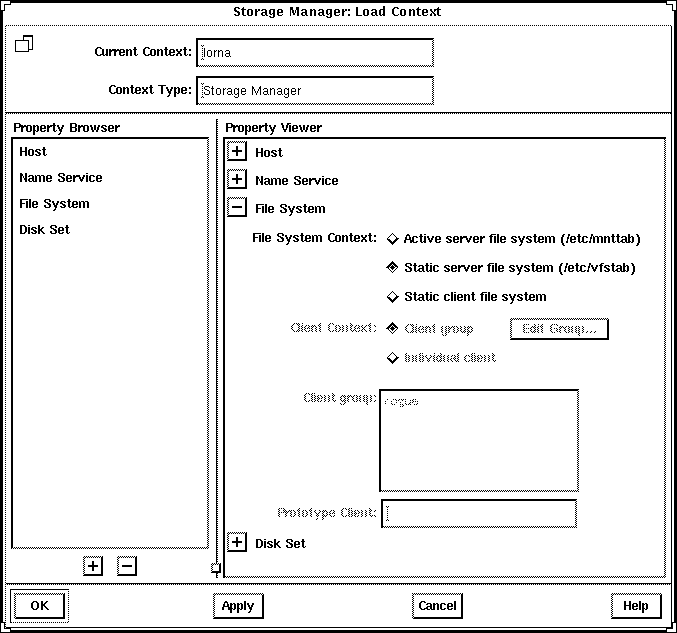
The purpose of the Load Context Property Book is for you to set the context in which Storage Manager will operate. Generally, a context is the way to manage the properties of an object. In the case of File System Manager, the context includes which host to manage, what name service to modify or how to view and modify the file systems on a server. In the case of Disk Manager, the context includes what diskset (a logical grouping of disks) to modify if you have DiskSuite software installed.
The Load Context Property Book is displayed when you start Storage Manager from the Solstice Launcher. If you start either Disk Manager or File System Manager from the DiskSuite Tool Tools menu, you can also display this window by choosing Load from the File menu, or by clicking on the Load Context icon in either tool bar. Figure A-1 shows the Storage Manager's Load Context Property Book.
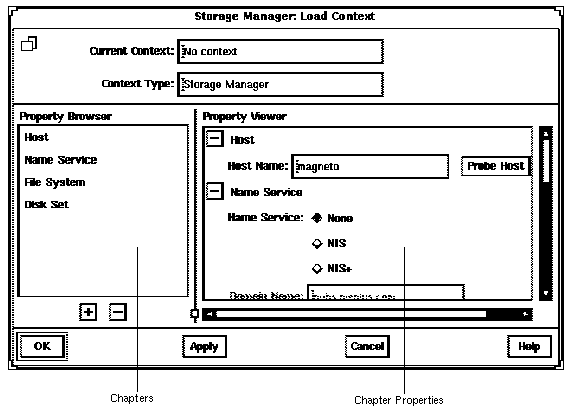
Figure A-1 Storage Manager's Load Context Property Book
Here are some brief descriptions of the areas within Storage Manager's Load Context Property Book:
Clicking on a chapter in the Property Browser causes the corresponding chapter in the Property Viewer to become visible, if it is not already visible. Double-clicking on a chapter in the Property Browser first makes the chapter visible in the Property Viewer, and then expands or collapses the chapter in the Property Viewer.
The buttons that appear next to chapter names in property books also perform an expand all or collapse all function, but only on the selected chapter.
For more reference information on the chapters that are available from the Load Context Property Book (Host, Name Service, File System, Disk Set), refer to online help.
This procedure assumes that the Load Context window is displayed as a result of clicking on the Storage Manager icon in the Solstice Launcher, or by choosing Load from the File menu in either File System Manager or Disk Manager.
A System Discovery window is displayed, indicating that information is being updated from the specified host.
A System Discovery window is displayed, indicating that Storage Manager is validating context parameters as well as discovering devices, directories, and mount points on the specified host.
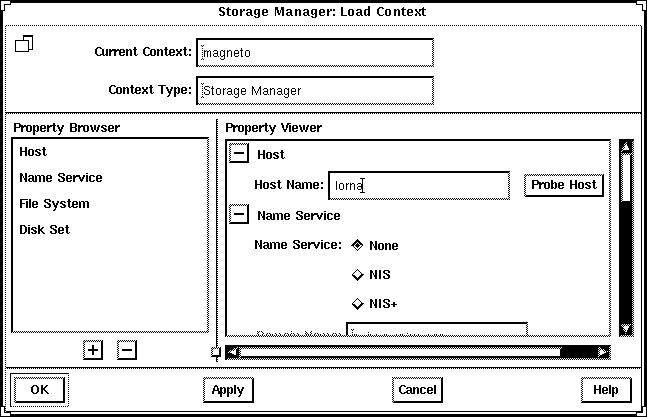
This procedure assumes that Storage Manager has an active current context (that is, the File System Manager main window or Disk Manager main window is open).
The Load Context window is displayed, with the current context's host name displayed in the Host chapter.
A System Discovery window is displayed, indicating that information is being updated from the specified host.
A System Discovery window is displayed, indicating that Storage Manager is validating context parameters as well as discovering devices, directories, and mount points on the specified host.
File System Manager is a tool that enables you to create and modify file systems, mount points, and directories using two types of windows, the main window and a Property Book. The main window displays a hierarchical view of directories and file systems, as well as the mount points and shared resources for the current context. The Property Book displays the chapters and their properties for a selected directory or file system that you can view or modify.
Specifically, File System Manager is a tool that enables you to complete the following tasks:
For step-by-step instructions on how to complete these tasks, refer to Figure A-4. Also, these instructions are included in the online help provided with the File System Manager tool.
Figure A-2 shows the important areas of the File System Manager's main window.
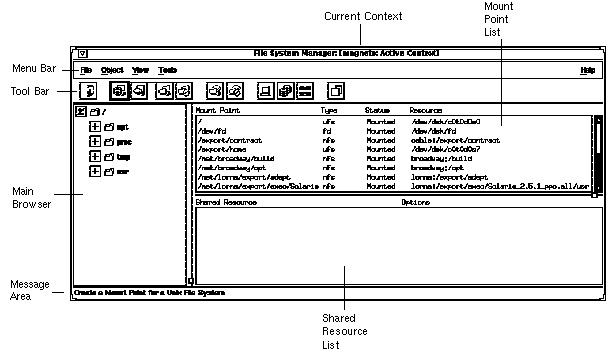
Figure A-2 File System Manager's Main Window
Here are some brief descriptions of the areas within File System Manager's main window:
The +/- state means that the corresponding entry is only partially expanded or collapsed. Clicking on a button in this state will further expand the entry.
There are three ways to open the File System Manager Property Book.
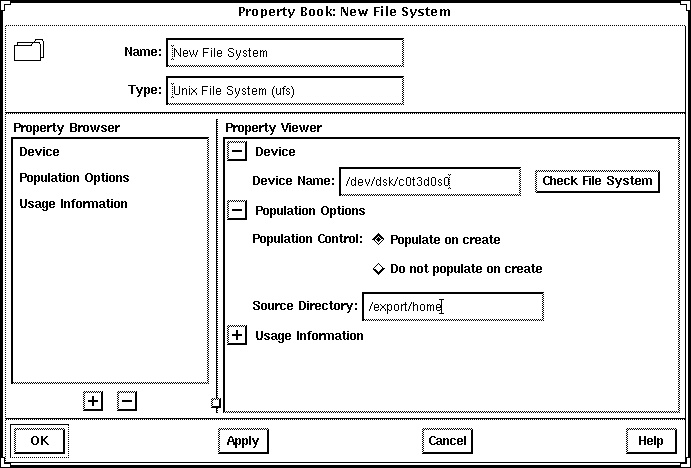
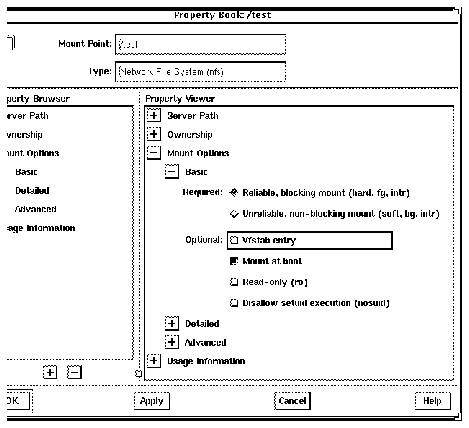
Figure A-3 shows the important features of the File System Manager Property Book.
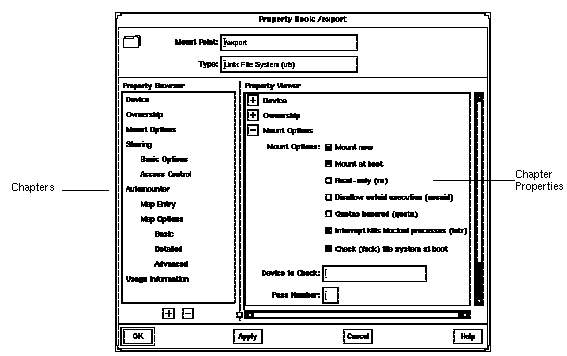
Figure A-3 File System Manager Property Book
Double-clicking on a chapter expands the chapter in the Property Viewer and displays the subchapters (if any) or the object properties. Double-clicking on a subchapter expands that subchapter in the Property Viewer.
The buttons that appear next to chapter names in property books also perform an expand all or collapse all function, but only on the selected chapter.
Chapter Properties - Specifies the properties that you can view or modify for the object. There can be one or more properties in a chapter.
For more reference information on the chapters that are available from the File System Manager Property Book, refer to the online help.
| Activity | Description | Go To ... |
|---|---|---|
| Create a UFS File System | Create a new file system on a specified device. | How to Create a UFS File System |
| Create a Mount Point | Create a local (UFS) or remote (NFS) mount point. | How to Create a Mount Point |
| Modify the Properties of a Mount Point or Directory | Mount or unmount a file system, share or unshare a directory, or modify an automounter map | How to Modify the Properties of a Directory Mount Point or Directory |
| Mount or Unmount a File System | Mount or unmount a file system. | How to Mount or Unmount a File System |
| Share or Unshare a Directory | Share or unshare a directory. | How to Share or Unshare a Directory |
| View Static Client File Systems | View the file systems that are mounted and directories that are shared at boot time on the server's diskless clients and AutoClient systems. | How to View Static Client File Systems |
| View Active Server | View the file systems that are currently mounted and the directories that are shared on the server. | How to View Active Server File Systems |
| View Static File Server | View the server's file systems that are mounted and directories that are shared at boot time on the server. | How to View Static Server File Systems |
| Remove a Mount Point From /etc/vfstab file | Remove a mount point from the /etc/vfstab file. | How to Remove a Mount Point From the /etc/vfstab File |
The New File System property book is displayed.
You can either type the name of a device, or drag and drop a slice from Disk Manager or a metadevice from DiskSuite Tool.
The Mount Point Name window appears.
The property book for the mount point is displayed.
A list of exported file systems is displayed in the Exported File Systems list.
You can either type the name of a device or drag and drop a slice from Disk Manager.
For example, in the Mount Options chapter you can choose to mount now and/or mount at boot time.
The mount point appears in the Mount Point list.
You can select a directory or mount point from the main browser, the Mount Point list, or the Shared Resource list.
Note - Once you select a mount point or directory, the Object menu may allow you to automatically mount a file system, unmount a file system, share a directory, or unshare a directory. If you want to complete one of these tasks, it is faster to use the Object menu rather than make the change using the Property Book.
The property book for the file system or directory is displayed.
Click Help in the property book to see detailed information about each chapter.

Note - Once you select a mount point, the Object menu may allow you to automatically mount or unmount a file system. This method is faster than making the change using the Property Book.
The property book for the file system is displayed.
Note - Once you select a directory or mount point, the Object menu may allow you to automatically share or unshare it. This method is faster than making the change using the Property Book.
The property book for the file system is displayed.
Static client file systems are those file systems that will be mounted on a server's AutoClient or diskless clients when they boot.
The Load Context property book is displayed.
Note - This button is only active if there are AutoClient systems or diskless clients configured on the system.
The Client Context field is activated.
The file systems that will be mounted at boot time for the clients are displayed in the Mount Point list on the main window.
The directories that will be shared at boot time for the clients are displayed in the Shared Resources list on the main window.
Active server file systems are the file systems on a server that are currently mounted or shared. This is the same information as contained in the /etc/mnttab file.
The Load Context property book is displayed.
The file systems that are currently mounted on the server are displayed in the Mount Point list on the main window.
The directories that are currently shared on the server are displayed in the Shared Resources list on the main window.

Static server file systems are the file systems on a server that will be mounted or shared at boot time. This is the same information as contained in the /etc/vfstab file.
The Load Context property book is displayed.
The file systems that will be mounted at boot time on the server are displayed in the Mount Point list on the main window.
The directories that will be shared at boot time on the server are displayed in the Shared Resources list on the main window.
The property book for the file system is displayed.
You are toggling (deselecting) this property.
The mount point no longer appears in the Mount Point list.
Disk Manager is a tool that enables you to view and edit fdisk partitions and slices using two types of windows, the main window and a Property Book. The main window displays the controllers, targets, disks, and slices for the current context. The Property Book displays the chapters and their properties for the selected disk(s), and it is at this level that you can view and edit disk properties.
Specifically, you can complete the following tasks with Disk Manager.
Note - Before modifying fdisk partitions and slices, you might want to back up critical data.
For step-by-step instructions on how to complete these tasks, refer to Figure A-7. Also, these instructions are included in the online help provided with the Disk Manager tool.
Figure A-5 shows the important areas of the Disk Manager's main window.
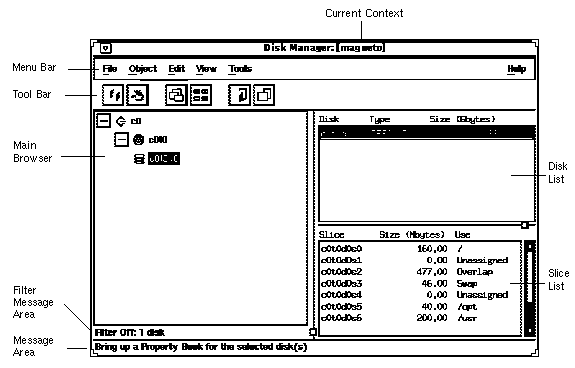
Figure A-5 Disk Manager's Main Window
Here are some brief descriptions of the areas within Disk Manager's main window:
The +/- state means that the corresponding entry is only partially expanded or collapsed. Clicking on a button in this state will further expand the entry.
If you have multiple disks that are the same vendor type and have the same physical geometry, you can perform an operation on them simultaneously. This is called batch editing or batching. To select more than one disk in the main browser or disk list, click SELECT (by default, the left mouse button) on the first disk. Then select each subsequent disk by pressing the Shift key and clicking SELECT.
There are three ways to open the Disk Manager Property Book.
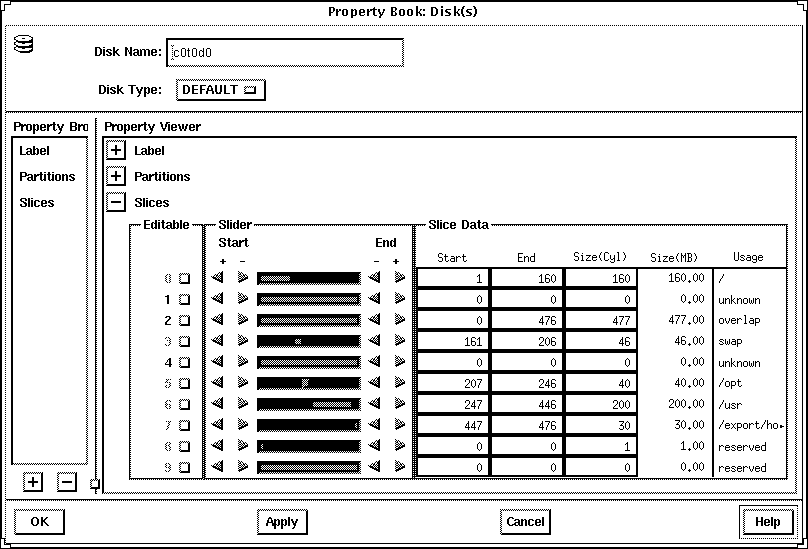
Figure A-6 shows the important features of the Disk Manager Property Book.
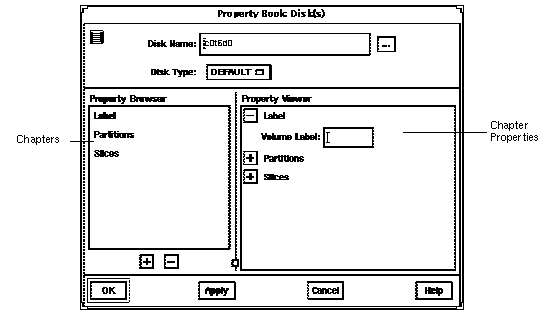
Figure A-6 Disk Manager Property Book
Here are some brief descriptions of the areas within Disk Manager's main window:
Double-clicking on a chapter expands the chapter in the Property Viewer and displays the subchapters (if any) or the object properties.
The buttons that appear next to chapter names in property books also perform an expand all or collapse all function, but only on the selected chapter.
For more reference information on the chapters that are available from the Disk Manager Property Book, see online help.
Figure A-7 Task Map: Managing Disks With Disk Manager
| Activity | Description | Go To ... |
|---|---|---|
| Specify a Viewing Filter | Specify the attributes of the disk(s) that you want to view in the Disk Manager main browser. | How to Specify a Viewing Filter |
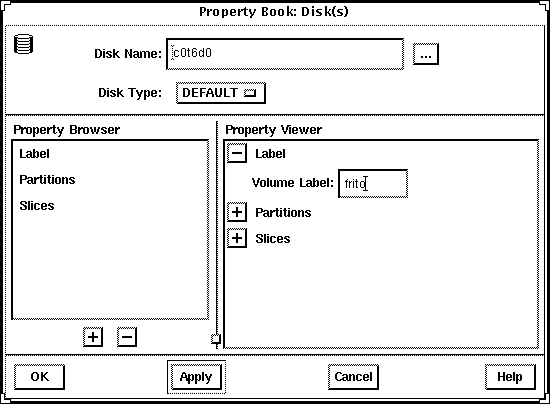
| Specify a Volume Label | Assign a name to a disk. | How to Specify a Volume Label |
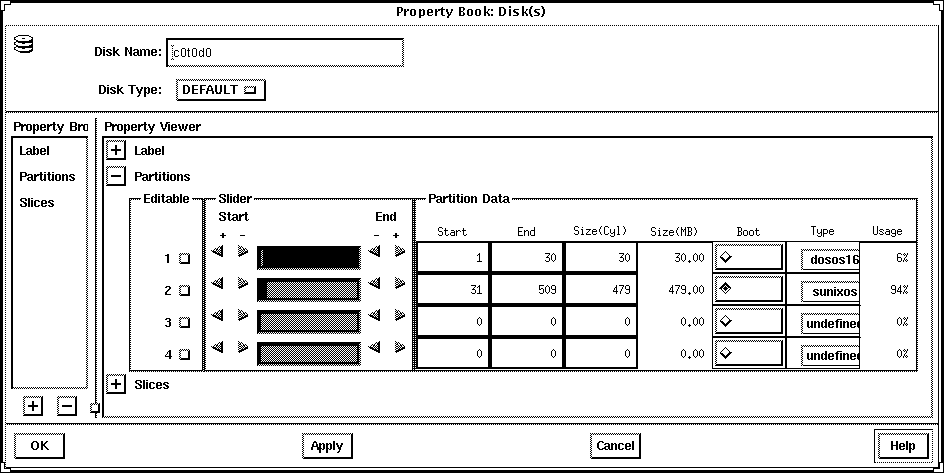
| Modify fdisk Partitions | Select an active fdisk partition, modify fdisk partition sizes, or modify the type of fdisk partitions. | How to Modify fdisk Partitions |
| Modify Slice Geometry | Modify slice sizes. | How to Modify Slice Geometry |
| Clone a Disk | Copy a disk's characteristics onto other disks of the same type. | How to Clone a Disk |
The Filter Disks and Slices window appears with a list of the available disk attributes in the Available Attributes list.
Note - Clicking on the All > button moves the entire list of attributes in the Available Attributes list to the Show Disks list. Clicking on the All << button, moves the entire list of attributes in the Show Disks list to the Available Attributes list.
The main window refreshes, displaying only the disks that match the criteria specified in the Show Disks list. The message area below the main browser displays the number of filtered disks.
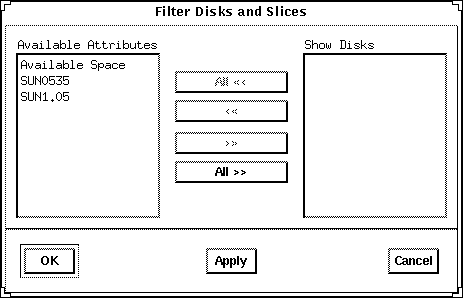
The Available Attributes section contains an entry for each disk type present in the current context, and an entry called "Available Space" that corresponds to all disks and slices with free space. The Show Disks section lists the attributes of the disks displayed in the main window. By default, this section is empty because filtering is turned off.
For more information see "Disk Manager Property Book."
The Property Book window appears.
For more information see "Disk Manager Property Book."
For more information see "Disk Manager Property Book."
The Property Book window appears.
For more information see "Disk Manager Property Book."
Size the Property Book window so that the entire partition layout is visible.
For reference information, see online help.
Note - For x86 platforms, fdisk Solaris partitions must start at cylinder 1 or higher and they may not overlap.
Choose the appropriate type using the menus in the Type column.
For more information see "Disk Manager Property Book."
The Property Book window appears.
For more information see "Disk Manager Property Book."
Size the Property Book window so that the entire slice layout is visible.
For reference information, see online help.
Note - For x86 platforms, slices must start at cylinder 1 or higher and may not overlap.
Note - An alternate method to performing the tasks described in Step 2 to Step 4 is to press ADJUST (by default the middle mouse key) over the disk you want to copy, drag the cursor onto the disk of the same type, and release the ADJUST button.