


This chapter provides a high-level overview of DiskSuite's graphical user interface, DiskSuite Tool. For information on the command line interface, see the man pages.
Use the following table to proceed directly to the section that provides the information you need.
| Overview of DiskSuite Tool |
| Screen Descriptions for DiskSuite Tool |
| Tool Registry |
| Event Notification |
DiskSuite Tool is a graphical user interface for setting up and administering a DiskSuite configuration. DiskSuite Tool provides a graphical view of DiskSuite objects - metadevices, hot spares, and disk slices. DiskSuite Tool uses drag and drop manipulation of DiskSuite objects, enabling you to quickly configure your disks or change an existing configuration. It also provides performance information on metadevices and physical devices.
DiskSuite Tool provides graphical views of both physical devices and metadevices, helping simplify storage administration. You can also perform specific SPARCstorage Array maintenance tasks using DiskSuite Tool.
To start DiskSuite Tool, make sure you are root and enter the command:
---------------------------------------------------

# /usr/opt/SUNWmd/sbin/metatool [-s diskset] &

---------------------------------------------------
For more information, see the metatool(1M) man page.
In some instances, DiskSuite Tool and the command line utilities provide slightly different functionality. You must use the command line interface for some operations (for example, creating disksets), and DiskSuite Tool for others. Table 4-1 shows where you will need to use either DiskSuite Tool or the command line to perform certain functions.
Table 4-1 DiskSuite Tool vs. the Command Line
| Functionality | Provided by DiskSuite Tool? | Provided by the DiskSuite Command Line? |
|---|---|---|
| Adding/removing disks to/from disksets | No | Yes |
| Adding/removing hosts to/from disksets | No | Yes |
| Creating/removing disksets | No | Yes |
| Switching metadevice names. (You can rename a metadevice with both DiskSuite Tool and the command line.) | No | Yes |
| Monitoring metadevice performance | Yes | No, but you could use the iostat(1M) command. |
| Maintaining SPARCstorage Arrays | Yes | No, but many functions can be accomplished with the ssaadm(1M) command. |
Table 4-2 explains how the mouse works in DiskSuite Tool.
Table 4-2 DiskSuite Tool Mouse Model
| This Button... | Is Used To... |
|---|---|
|
SELECT (Default is left) | Select objects with a single click. By holding down the Control key and clicking the left button, you can select multiple objects. By holding down the Control key and clicking the left button, you can deselect objects that are selected. You can also drag objects by holding down the left button. |
|
ADJUST (Default is Middle) | Drag selected objects and keeps the objects selected, or, if an object is not selected, drag that object. You can drop the object on an appropriate target. If a target is not appropriate, the international "no" sign displays while the cursor is over the target. |
|
MENU (Default is Right) | Display pull-down menus when the cursor is pointing at any title in the menu bar, or display a pop-up menu when the cursor is pointing inside an object on the canvas. |
When you start DiskSuite Tool, the Metadevice Editor window is displayed, as shown in Figure 4-1.

Figure 4-1 DiskSuite Tool Metadevice Editor Window
The Metadevice Editor window is the main window for DiskSuite Tool, enabling access to other parts of DiskSuite Tool. The following describes the areas within the Metadevice Editor window.
Note - DiskSuite Tool grays out menu items and user interface elements when you cannot use them in a specific context.
Note -
You can configure DiskSuite Tool to display a "Tools menu" (see Solstice
DiskSuite 4.1 User's Guide, or the metatool-toolsmenu(4) man page). The
Tools menu can be used to launch other applications, such as AdminSuite
Note - You must select an object before clicking either the Commit button or the Put Away button.
You can select and drag objects in the Objects List to the canvas. Or you can double-click an object in the Objects List to display it on the canvas.
Colored objects indicate a problem:
Gray scale monitors display problem status information in gray scales.
On monochrome monitors, you must horizontally scroll the device list to view the status associated with the objects.
The template icons are sources for empty DiskSuite objects (templates). Once you have a template displayed on the canvas, you can then build metadevices from it by dropping slices or other metadevices into it. To work with a template, you can either single-click it or drag it to the canvas.
When you place the cursor over an area of the Metadevice Editor window, the message line displays a message about that area.
You can drag DiskSuite objects from the Disk View window, the Objects list, and the Templates to the canvas. Clicking an object on the canvas selects the object.
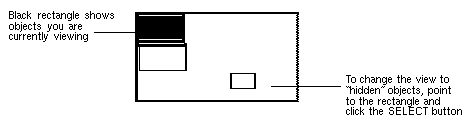
Figure 4-2 Panner
Pointing inside the Panner and clicking the SELECT button changes the current view. You can also point to the black rectangle, press and hold down the ADJUST button, and drag the view area to a new location.
Figure 4-3, the Disk View window, shows how metadevices correspond to physical devices, and also serves as a drag-and-drop source for slices and a drag-and-drop target for metadevices. The following describes the areas within the Disk View window.
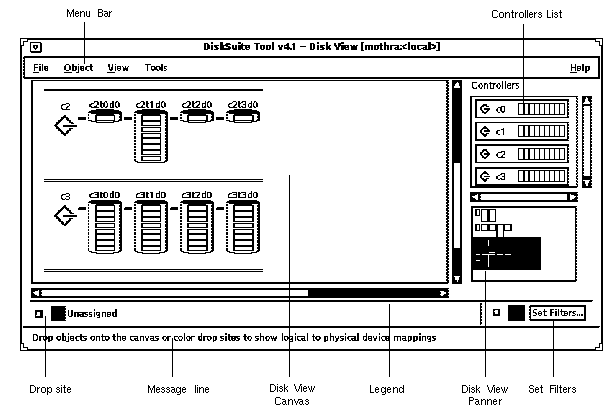
Figure 4-3 Disk View Window
Note - You can configure DiskSuite Tool to display a "Tools menu" (see Solstice DiskSuite 4.1 User's Guide, or the metatool-toolsmenu(4) man page). The Tools menu can be used to launch other applications, such as Solstice Storage Manager, from DiskSuite Tool.
Clicking a toggle button displays that controller on the Disk View canvas. Clicking again removes the controller from the canvas.
Figure 4-4 shows the color drop sites.
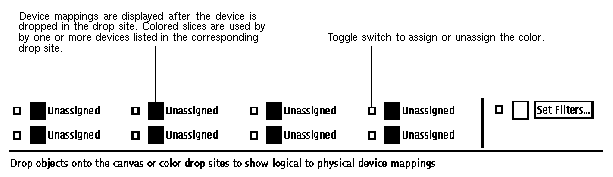
Figure 4-4 Color Drop Sites
Dropping a metadevice object onto a color drop site assigns a color to that metadevice object. The color, in turn, shows up on the Disk View window canvas, enabling you to see physical-to-logical device relations.
Each drop site has a pop-up menu that contains:
You can change the colors for each of the eight color drop sites. Edit the
X resource file, /usr/opt/SUNWmd/lib/X11/app-defaults/Metatool.
It contains a list of all the X resources used by metatool(1M). See Solstice
DiskSuite 4.1 User's Guide for more information on editing this file.
A monochrome monitor will show only one drop site, black.
When you place the cursor over an area of the Disk View Canvas, the message line displays a message about that area.
To select a disk on the Disk View canvas, click the top of the disk. To select a slice, click inside the slice rectangle. You can drag the object, whether selected or not, to a template on the Metadevice Editor canvas and add or replace slices in that template.
The canvas is also a destination for drag and drop. When devices are dropped on the canvas from the Metadevice Editor window, they take on the next available color. If all drop sites are in use, a window is displayed that enables you to select a drop site. Also, if any object is selected on the editor canvas and the Disk View window is invoked, the objects will automatically take on the color of the next available drop site.
The graphical representations of objects on the Disk View canvas are shown in Figure 4-5.
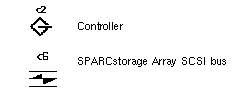
Figure 4-5 Disk View Objects
The legend region of the Disk View window can be turned on and off by choosing Show Legend from the View menu.
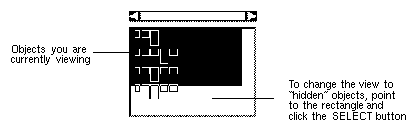
Figure 4-6 Disk View Panner
Pointing inside the Disk View Panner and clicking the SELECT button changes the current view. You can also point to the black rectangle, press and hold down the ADJUST button, and drag the view area to a new location.
You can view slices that are available to be Metadevice Components, Hot Spares, Replicas, Trans Logs, or Anything. The default value is Metadevice Components. You can also view slices currently in use as a file system, swap, Metadevices, Hot Spares, Replicas, Trans Logs, or Anything. Clicking the Don't Care button tells DiskSuite Tool not to filter by usage. Regular expressions can also be used to filter slices in this window.
Figure 4-7 shows the Statistics Graph window (Grapher window). The Grapher window functions as a visual log of reported statistics utilizing a graph for each device. The Grapher window displays a subset of the information derived by the iostat(1M) interface. You can drag and drop metadevices and disks from any of DiskSuite Tool's windows to the Statistics Graphs window. This includes the Metadevice Editor canvas, the Metadevice Editor Objects list, the Slice window, and the Disk View window. An explanation of the Grapher window follows.
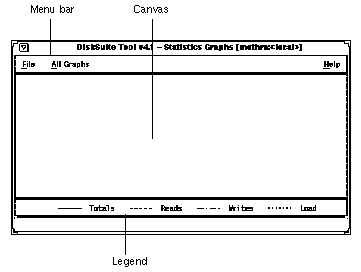
Figure 4-7 Statistics Graphs Window (Grapher Window)
When you add a device to the Grapher window, a button bar appears. If you continue to add devices on the canvas, they appear in individual rows with a control area and graph. Figure 4-8 shows the Grapher window with a metadevice. An explanation of the buttons follows.
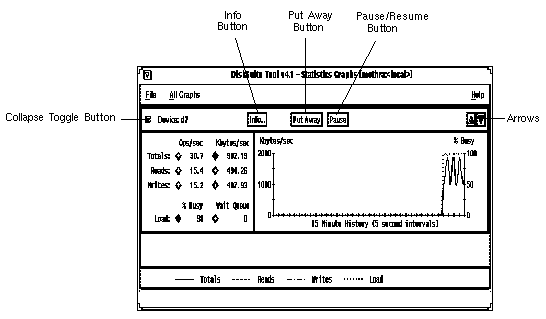
Figure 4-8 Grapher Window with Metadevice
Several information windows are present in DiskSuite Tool. These information windows include:
By pointing to a disk on the Disk View canvas and pressing the MENU button, a menu enables you to bring up an information window. Shown in Figure 4-9, the read-only Disk Information window provides information about a disk and its slices.
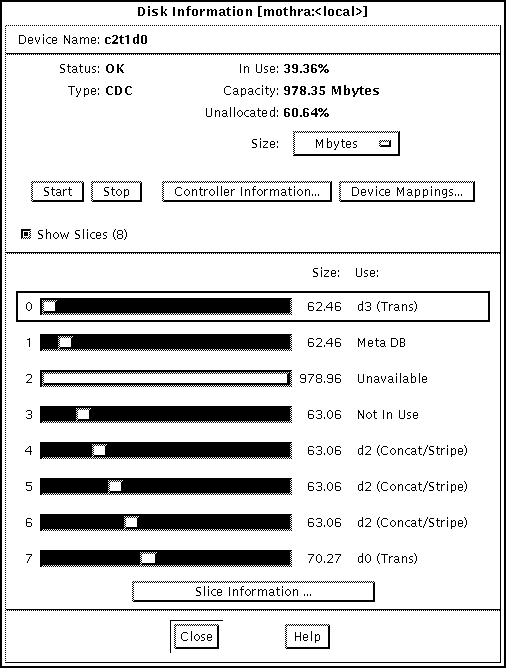
Figure 4-9 Disk Information Window
Table 4-3 lists the functionality provided by the Disk Information window.
Table 4-3 Disk Information Window Functionality
--------------------------------------------------------------------------------------


Field         Functions
--------------------------------------------------------------------------------------
Device name   The device name, for example, c2t1d0.

Status        The status is reported as OK, Reserved if the disk is reserved by
              another host, Failed, or Spun Down if this is a SPARCstorage Array
              disk and it is spun down.

Type          The type of the disk as listed in the /etc/format.dat file, for
              example SUN0535, SUN1.05, or DEFAULT.

In Use        The percentage of the disk that is currently in use as a metadevice,
              metadevice state database replica, or a mounted file system.

Capacity      Shows the usable capacity of the disk. The usable capacity of the
              disk is the disk capacity less any space taken by state database
              replicas or the disk label.

Unallocated   The percentage of the disk available for use.

Size          A pop-up menu that changes the size units represented in the
              capacity field and the information under the Size column in the Slice
              region. Choices include: Gbytes, Mbytes, Kbytes, Sectors, and
              Cylinders. The default is Mbytes.

Start         A button to start a stopped disk. (DiskSuite Tool shows the disk
              state only for SPARCstorage Array disks. A down arrow beneath a
              SPARCstorage Array disk indicates it is currently stopped.)

Stop          A button to stop a disk. (DiskSuite Tool shows the disk state only for
              SPARCstorage Array disks.)

Controller    A button that brings up the Controller Information window. See
Information   Figure 4-20.

Device        Displays the Physical to Logical Device Mappings window. (The
Mappings      Physical to Logical Device Mappings window is not dynamically
              updated when new mappings are created.)

Show Slices   A toggle button that expands and collapses the slice view. The
              number of non-zero size slices on the disk is shown in parentheses
              on the button.

Slice         A button that brings up the Slice Information window for each
Information   selected slice. Point to the slice area and click the SELECT button to
              select a slice. To select multiple slices, either press and hold down
              the Control key while pointing to the slices and clicking the SELECT
              button or hold down the SELECT button and drag the cursor over
              slices.

--------------------------------------------------------------------------------------
Table 4-4 lists additional functionality that appears for SPARCstorage Array disks.
----------------------------------------------------------------------------------


Field       Functions
----------------------------------------------------------------------------------
Vendor      Displays the vendor name.

Product ID  Displays the product identification number.

Firmware    Displays the product firmware revision information.
Rev.

Fast Write  Radio buttons that enable fast writes or synchronous fast writes, or
            disable fast writes.

----------------------------------------------------------------------------------
The Slice Information window, shown in Figure 4-10, displays information about a specific slice. There are three ways to display this window:
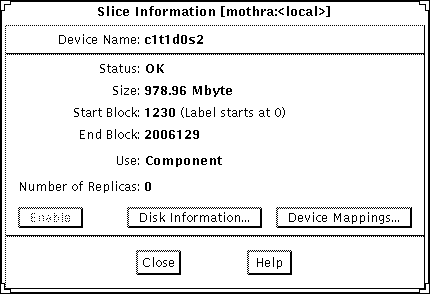
Figure 4-10 Slice Information Window
Table 4-5 explains the Slice Information window.
Table 4-5 Slice Information Window Functionality
----------------------------------------------------------------------------------------


Field             Functions
----------------------------------------------------------------------------------------
Device name       The device name, for example, c1t1d0s2.

Status            The status is reported as OK, Resyncing, Enabled, Critical,
                  Spared, Urgent, or Attention.

Size              The total size of the slice.

Start block       The block on which the slice begins. If the slice has a label, there
                  will be additional information about the label in this field.

End block         The block on which the slice ends.

Use               The current use of the slice, for example, file system or swap. If
                  the use is hot spare, a Show Hot Spare Pools button is available
                  on the right side of the Use field. This button opens a dialog that
                  shows a list of Hot Spare Pools with which the slice is associated.

Number of         The number of replicas, if any, contained in the slice.
Replicas

Enable            This button enables the slice. The button is available only if the
                  data on the slice is replicated in a mirror or RAID5 metadevice,
                  or if the slice is used as a hot spare that is currently "broken."

Disk Information  Opens the Disk Information window.

Device Mappings   Displays the Physical to Logical Device Mappings window. (The
                  Physical to Logical Device Mappings window is not dynamically
                  updated when new mappings are created.)

----------------------------------------------------------------------------------------
The Device Statistics window, shown in Figure 4-11, displays a "snap-shot" of statistical information about a specific metadevice or physical disk. There are two ways to display this window:
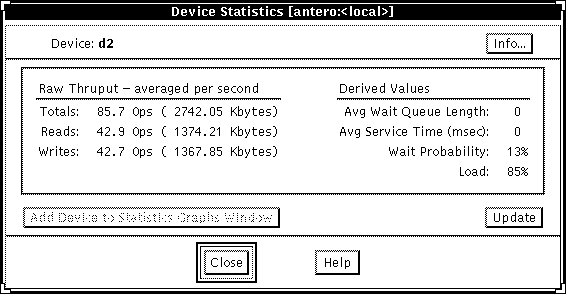
Figure 4-11 Device Statistics Window
Table 4-6 explains the Device Statistics Window.
Table 4-6 Device Statistics Window Functionality
-----------------------------------------------------------------------------------------


Field               Functions
-----------------------------------------------------------------------------------------
Device              This field displays the device name, for example, d63.

Info                This button brings up the device's Information window.

Raw Thruput         This information displays reads, writes, total reads and writes,
                    averaged per second.

Derived Values      This information displays average wait queue length, average
                    service time, wait probability, and load.

Add Device to       This button adds the device to the Statistics Graphs window. The
Statistics Graphs   graph area is blank until you select which statistics to graph. The
Window              default is Percent Busy.

Update              This button presents a new snap-shot of the statistical
                    information.

-----------------------------------------------------------------------------------------
There are three ways to display the Concat Information window shown in Figure 4-12:
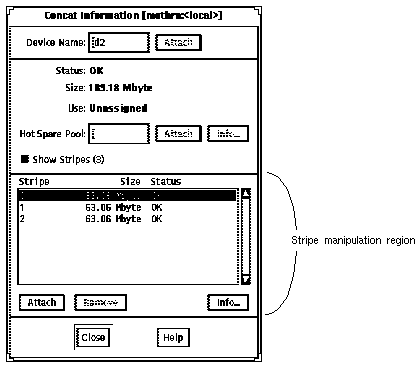
Figure 4-12 Concat Information Window
Table 4-7 lists the functionality associated with the regions of the Concat Information window.
Table 4-7 Concat Information Window Functionality
-----------------------------------------------------------------------------------


Field           Functions
-----------------------------------------------------------------------------------
Device Name     The metadevice name of the concatenation. As long as the device
                is not "open," you can change the name by typing a new one and
                clicking Attach.

Status          Description of the concatenation's status.

Size            The size of the concatenation.

Use             How the concatenation is currently used (for example,
                submirror).

Hot Spare Pool  The entry field for specifying the name of a Hot Spare Pool to be
                associated with the concatenation. To attach a hot spare pool
                enter the name in the field and click on the Attach button. The
                Hot Spare Pool Information window is displayed when you
                enter a hot spare pool name and click on the Info button.

Show Stripes    This toggle button enables you to turn on and off the stripe
                manipulation region. The number of stripes in the concatenation
                are shown in parentheses on the button.

Stripe          The following functionality is available in this region:
manipulation
region          List of stripes  -  Provides the size and status of each stripe
                included in the concatenation.

                Attach  -  Attaches a new and empty stripe to the concatenation.

                Remove  -  Removes the selected stripe from the concatenation.

                Info  -  Brings up the Stripe Information window for the selected
                (highlighted) stripes.

-----------------------------------------------------------------------------------
There are three ways to display the Stripe Information window shown in Figure 4-13:
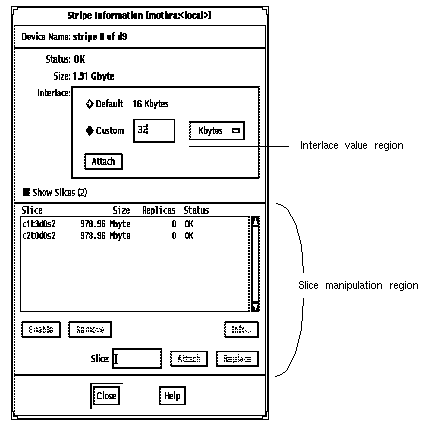
Figure 4-13 Stripe Information Window
Table 4-8 lists the functionality associated with the regions of the Stripe Information window.
Table 4-8 Stripe Information Window Functionality
----------------------------------------------------------------------------------------


Field             Functions
----------------------------------------------------------------------------------------
Device Name       The metadevice name of the stripe, such as d5.

Status            Description of the stripe's status.

Size              The size of the stripe.

Interlace value   The default interlace value is 16 Kbytes. To change the interlace
region            value, click the Custom button and type the value in the field.
                  The menu button to the right of the field enables you to specify
                  the units used. The values on the menu are Gbytes, Mbytes,
                  Kbytes, and Sectors. The default is Kbytes. After the Custom
                  field is complete, the Attach button is used to assign the interlace
                  value to the stripe. After a stripe is committed, the interlace
                  value cannot be changed.

Show Slices       This toggle button enables you to turn on and off the slice
                  manipulation region. The number of slices in the stripe are
                  shown in parentheses on the button.

Slice             The following functionality is available in this region:
manipulation
region            Scrolling List  -  Shows slices included in the stripe. The
                  information in this region includes the name of the slice, size,
                  number of state database replicas on the slice, and the status.

                  Enable  -  Enables the selected slices if they are disabled.

                  Remove  -  Removes the selected slices.

                  Slice  -  Specifies a new slice to be attached to the stripe or
                  replaces the selected slice. If no slice is selected, the button is
                  unavailable.

                  Attach  -  Attaches the slice specified in the Slice field to the
                  stripe. This button is active only when a slice name is entered in
                  the field.

                  Replace  -  Replaces the selected stripe with the slice entered in
                  the Slice field. This button is active only when a slice name has
                  been entered in the field and a slice is selected on the scrolling
                  list.

                  Info  -  Displays the Slice Information window for the selected
                  (highlighted) slice.

----------------------------------------------------------------------------------------
DiskSuite provides several options to optimize mirror performance. These options deal with the read and write policy for mirrors, and the order in which mirrors are resynced during reboot. You set these and other options using choices on the Mirror Information window, as shown in Figure 4-14 . There are three ways to display the Mirror Information winow:
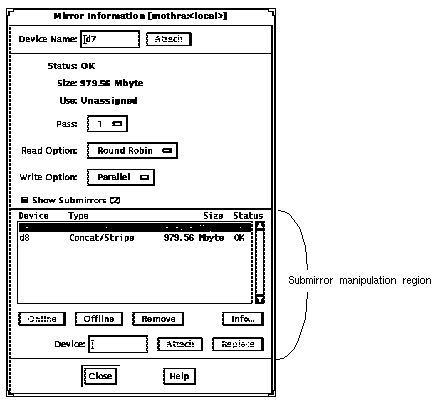
Figure 4-14 Mirror Information Window
The Mirror object must be committed before the policy changes take effect.
Table 4-9 lists the functionality associated with the regions of the Mirror Information window.
Table 4-9 Mirror Information Window Functionality
---------------------------------------------------------------------------------------


Field            Functions
---------------------------------------------------------------------------------------
Device Name      The metadevice name of the mirror. As long as the device is not
                 "open," you can change the name by typing a new one and
                 clicking Attach.

Status           Description of the mirror's status.

Size             The total size of the mirror.

Use              Shows how the mirror is currently used, for example, file system,
                 swap, or shared log. If the use is shared log, a button labeled
                 Show Trans is displayed. The Show Trans button opens a Sharing
                 Information window that shows the Trans devices that share the
                 Mirror.

Show Submirrors  This toggle button enables you to turn on and off the submirror
                 manipulation region. The number of submirrors in the mirror are
                 shown in parentheses on the button.

 Pass            A pass number in the range 0-9 can be assigned to a mirror using
                 the Pass button menu. The pass (resync) number determines the
                 order in which that mirror is resynced during a system reboot.
                 The default is 1. Smaller pass numbers are resynced first. If 0 is
                 chosen, the resync is skipped. A 0 should only be used for
                 mirrors mounted as read-only. If different mirrors have the same
                 pass number, they are resynced concurrently.

Read Option      There are three kinds of read options associated with mirrors:
                 Round Robin, Geometric, and First. The default read option is
                 Round Robin, also called balanced load.


                 When set to Round Robin, all reads are made in a round robin
                 order from all the submirrors in the mirror. That is, the first read
                 comes from the first submirror, the next read comes from the
                 second submirror, and so forth.


                 The Geometric option provides faster performance on sequential
                 reads or when you are using disks with track buffering.
                 Geometric reads allow read operations to be divided among
                 submirrors on the basis of a logical disk block address. For
                 instance, with a three-way mirror the disk space on the mirror is
                 divided into three (equally sized) logical address ranges. Reads
                 from the three regions are then performed by separate
                 submirrors (for example, reads to the first region are performed
                 by the first submirror).


                 The First option specifies reading from only the first submirror.
                 This would be specified only if you have a second submirror that
                 has poor read I/O characteristics.

 Write Option    A button that enables you to set parallel or serial writes to the
                 submirror.


                 Parallel writes are the default action of the metadisk driver,
                 meaning the writes are dispatched to all submirrors
                 simultaneously.


                 Serial writes specify that writes to one submirror must complete
                 before the next submirror write is started.

Submirror        The following functionality is available in this region:
manipulation
region           Show Submirrors  -  This toggle button enables showing or
                 hiding the list of submirrors.

                 Scrolling List  -  Shows submirrors included in the mirror. The
                 information in this region includes the name, type, size, and
                 status. Click on the submirror to select it. When submirrors are
                 selected, actions can be performed on them.

                 Online  -  Brings selected submirrors back online. This button is
                 active only when the selected submirror is offline.

                 Offline  -  Takes selected submirrors offline. This button is active
                 only when the selected submirror is online.

                 Remove  -  Detaches the selected submirrors.

                 Info  -  Opens the Concat Information window for the selected
                 submirror.

                 Device  -  Specifies a new submirror in the field to attach or
                 replace. The field is cleared when you click on the Attach or
                 Replace buttons.

                 Attach  -  Adds the specified submirror. This button is active only
                 when a submirror or device is entered in the Device field.

                 Replace  -  Replaces the selected submirror with the submirror
                 entered in the field. This button is active only when a submirror
                 or device is entered in the field and one in the list is selected.

---------------------------------------------------------------------------------------
The Trans Information window enables you to view and modify the attributes and components of a specific trans metadevice. Figure 4-15 shows the Trans Information window. There are three ways to display the Trans Information window:
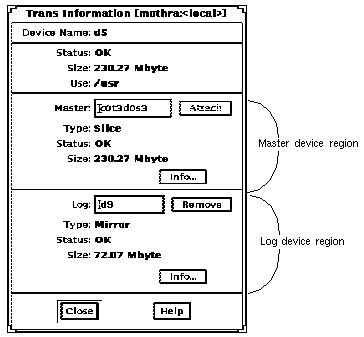
Figure 4-15 Trans Information Window
The Trans object must be committed before the changes take effect.
Table 4-10 lists the functionality associated with the regions of the Trans Information window.
Table 4-10 Trans Information Window Functionality
-------------------------------------------------------------------------------------


Field              Functions
-------------------------------------------------------------------------------------
Device Name        The metadevice name of the Trans device. As long as the device
                   is not "open," and no logging device is attached, you can change
                   the name by typing a new one and clicking Attach.

Status             Description of the Trans device status.

Size               The total size of the Trans device.

Use                How the Trans device is currently used (for example, file
                   system).

Master device      A region that contains the device name of the master device. The
region             Attach button toggles between Attach and Remove. Other
                   information in the region includes:

                   Type  -  The type of device used as the master.

                   Status  -  Shows the description of the master's status.

                   Size  -  Displays the size of the master device.

                   Info  -  Displays the information form for the master device.

Log device region  A region that contains the device name where the log device is
                   located. The Remove button toggles between Attach and
                   Remove. Other information in the region includes:

                   Type  -  The type of device used as the log.

                   Status  -  Shows the description of the log's status.

                   Size  -  Displays the size of the log device.

                   Info  -  Displays the information form for the log device.

-------------------------------------------------------------------------------------
The Hot Spare Information window enables you to view and modify the attributes and components of a specific hot spare. Figure 4-16 shows the Hot Spare Information window. There are three ways to display the Hot Spare Information window:
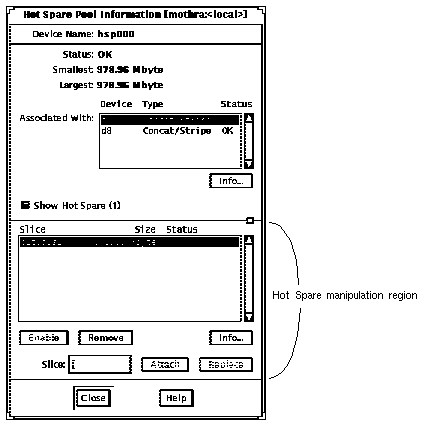
Figure 4-16 Hot Spare Information Window
The Hot Spare Pool object must be committed before the changes take effect.
Table 4-11 lists the functionality associated with the regions of the Hot Spare Pool Information window.
-----------------------------------------------------------------------------------------


Field            Functions
-----------------------------------------------------------------------------------------
Device Name      The name of the Hot Spare Pool, such as hsp000.

Status           Description of the Hot Spare Pool's status.

Smallest         The size of the smallest slice in the Hot Spare Pool.

Largest          The size of the largest slice in the Hot Spare Pool.

Associated With  A scrolling list that displays the device names, types, and status
                 of all metadevices associated with the Hot Spare Pool. To display
                 information about the object either click the object then click Info
                 or point to the object and double-click.

Info             Displays the Concatenation Information window for the selected
                 (highlighted) Concat/Stripe in the Associated With region.

Hot Spare        Contains a list of all the slices included in the Hot Spare Pool.
manipulation     New slices can be added. Existing slices can be manipulated. The
region           functions of the buttons include:

                 Show Hot Spare  -  A toggle button that shows or hides the
                 bottom portion of the window.

                 List of slices  -  A scrolling list of the slices included in the Hot
                 Spare Pool.

                 Enable  -  Enables selected slices that are disabled.

                 Remove  -  Removes the selected slices from the Hot Spare Pool.

                 Info  -  Displays the Slice Information window for the selected
                 (highlighted) slice.

                 Slice  -  Specifies a new slice to attach or replace the selected slice.

                 Attach  -  Attaches the slice specified in the Slice field to the Hot
                 Spare Pool. This button is active only when a slice name has
                 been entered in the field.

                 Replace  -  Replaces the selected spare slice with the slice entered
                 in the field. This button is active only when a slice name has
                 been entered in the field and a slice is selected on the list of
                 slices.

-----------------------------------------------------------------------------------------
These methods display the RAID Information window (see Figure 4-17):
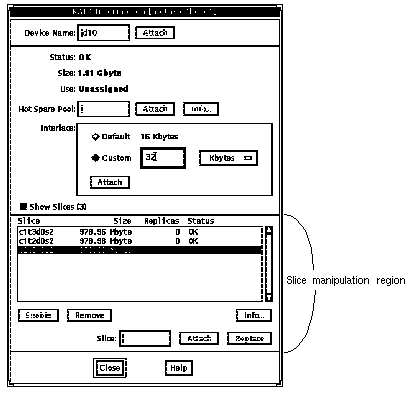
Figure 4-17 RAID Information Window
The RAID5 metadevice must be committed before the changes take effect.
Table 4-12 lists the functionality associated with the regions of the RAID Information window.
Table 4-12 RAID Information Window Functionality
----------------------------------------------------------------------------------------


Field             Functions
----------------------------------------------------------------------------------------
Device Name       The metadevice name of the RAID5 metadevice. As long as the
                  device is not "open," you can change the name by typing a new
                  one and clicking Attach.

Status            Description of the RAID5 metadevice's status.

Size              The size of the usable disk space. This does not include the size
                  set aside for parity.

Use               The use of the RAID5 metadevice, for example, file system or
                  swap. If the use of the RAID5 metadevice is a Trans Log, a Show
                  Trans button is positioned to the right of the field.

Hot Spare Pool    This field enables assigning a Hot Spare Pool to the RAID5
                  metadevice. It has the following functions:

                  Attach/Detach  -  Attaches or detaches the specified Hot Spare
                  Pool to the RAID5 metadevice.

                  Info  -  Displays the Hot Spare Pool Information window for the
                  specified Hot Spare Pool.

Interlace value   The default interlace value is 16 Kbytes. To change the interlace
region            value, click on the Custom button and type the value in the field.
                  The menu button to the right of the field enables you to specify
                  the units used. The values on the menu are Gbytes, Mbytes,
                  Kbytes, and Sectors. The default is Kbytes. After the Custom
                  field is complete, the Attach button is used to assign the interlace
                  value to the RAID5 metadevice. After a RAID5 metadevice is
                  committed, the interlace value cannot be changed.

Slice             The following functionality is available in this region:
manipulation
region            Show Slices  -  A toggle button that shows or hides the scrolling
                  list of components at the bottom of the window.

                  Scrolling List  -  A list of the slices included in the RAID5
                  metadevice. The information in this region includes the name of
                  the slice, size, number of state database replicas on the slice and
                  the status.

                  Enable  -  Enables the selected slices if they are disabled.

                  Remove  -  Removes the selected slices.

                  Slice  -  Specifies a new slice to attach to the RAID5 metadevice or
                  replaces the selected slice.

                  Attach  -  Attaches the slice specified in the Slice field to the
                  RAID5 metadevice. This button is active only when a slice name
                  is entered in the field.

                  Replace  -  Replaces the selected RAID5 slice with the slice
                  entered in the Slice field. This button is active only when a slice
                  name has been entered in the field and a slice is selected from
                  the scrolling list.

                  Info  -  Displays the Slice Information window for the selected
                  (highlighted) slice.

----------------------------------------------------------------------------------------
There are three ways to display the Metadevice State Database Information window shown in Figure 4-18:
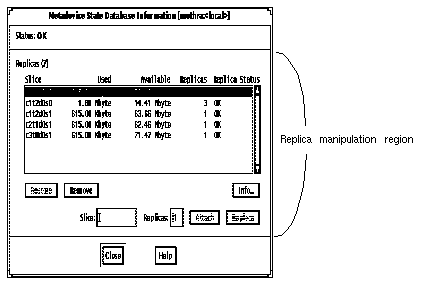
Figure 4-18 Metadevice State Database Information Window
The MetaDB object must be committed before the changes take effect.
Table 4-13 lists the functionality associated with the regions of the Metadevice State Database Information window.
-----------------------------------------------------------------------------------------


Field          Functions
-----------------------------------------------------------------------------------------
Status         Description of the metadevice state database's status.

Replica        This region shows the following information and allows for
manipulation   manipulation.
region
               Replicas  -  Shows the number of replicas.

               Scrolling List  -  A scrolling list of the slices that contain replicas.
               The information in this field includes the name of the slice, the
               amount of space used, space available, number of replicas on the
               slice and the replica status.

               Restore  -  Restores the selected slices if they are in error.

               Remove  -  Removes the selected slices.

               Info  -  Displays the Slice Information window for the selected
               (highlighted) slice.

               Slice  -  This field is used to specify a new slice to attach to the
               MetaDB or replace the selected slice.

               Replicas  -  Shows the number of replicas that will be created on
               the slice. This value is set to one by default.

               Attach  -  Adds the slice entered in the slice field to the Replica
               list. This button is available only when a slice name is entered.

               Replace  -  Replaces the selected slice with the slice entered in the
               Slice field.

-----------------------------------------------------------------------------------------
The Tray Information window, as seen in Figure 4-19, displays information about a specific SPARCstorage Array tray. To display the Tray Information window, point to a SPARCstorage Array Tray on the Disk View canvas. Press and hold the MENU button to display the pop-up menu then select the Info option.
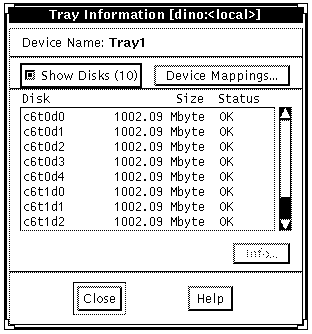
Figure 4-19 Tray Information Window
Table 4-14 lists the functionality associated with the Tray Information window.
Table 4-14 Tray Information Window Functionality
------------------------------------------------------------------------------------------


Field              Functions
------------------------------------------------------------------------------------------
Device Name        Names the tray (for example, Tray1).

Show Disks         Toggles on and off the disk information pane.

Device Mappings    Displays the Physical to Logical Device Mapping window. (The
                   Physical to Logical Device Mappings window is not dynamically
                   updated when new mappings are created.)

Disk information   Contains a scrolling list of all disks, their size and status, on the
region             tray.

Info               Selecting a disk in the disk information pane and clicking the
                   Info button displays the Disk Information window for that disks.

------------------------------------------------------------------------------------------
The Controller Information window, as seen in Figure 4-20, displays information about a disk's controller. To display the Controller Information window, point to a controller on the Disk View canvas. Press and hold the MENU button to display the pop-up menu then select the Info option.
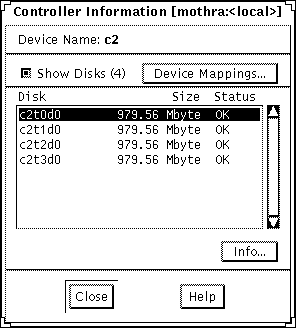
Figure 4-20 Controller Information Window
Table 4-15 lists the functionality associated with the Controller Information window.
Table 4-15 Controller Information Window Functionality
------------------------------------------------------------------------------------------


Field              Functions
------------------------------------------------------------------------------------------
Device Name        Names the controller (for example, c0).

Show Disks         Toggles on and off the disk information pane.

Device Mappings    Displays the Physical to Logical Device Mappings window. (The
                   Physical to Logical Device Mappings window is not dynamically
                   updated when new mappings are created.)

Disk information   Contains a scrolling list of all disks, their size and status, on the
scrolling list     controller.

Info               Selecting a disk in the disk information pane and clicking the
                   Info button displays the Disk Information window for that disk.

------------------------------------------------------------------------------------------
Table 4-16 lists additional functionality for SPARCstorage Arrays.
-----------------------------------------------------------------------


Field           Functions
-----------------------------------------------------------------------
Fan Status      Displays the current fan status (for example, Failed).

Battery Status  Displays the current battery status.

Vendor          Displays the vendor name.

Product ID      Displays the product identification number.

Product Rev     Displays the product revision number.

Firmware Rev    Displays the product firmware revision information.

-----------------------------------------------------------------------
Three browsers can be accessed from the Browse menu on the Metadevice Editor window. These include:
The browsers provide similar functionality, enabling you to view all information about the slices, metadevices, and hot spare pools and drag these objects to the Metadevice Editor's canvas for manipulation. The only noticeable differences are found in some of the information displayed and in the Set Filter windows.
The Slice Browser window is show in Figure 4-21.
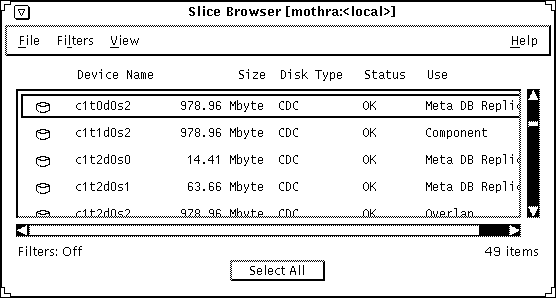
Figure 4-21 Slice Browser Window
The Slice, Metadevice, and Hot Spare Pool browsers all have the same window title bar and choices on the menu bar. The File menu enables you to exit the browser. The Filters menu enables you to set the filters and turn them on and off. The View menu enables you to change the order in which information is displayed in the device list. However, there are some subtle differences in the dialog boxes used to set the filters.
The device list varies in the following ways:
Table 4-17 Slice Browser Device List Information
--------------------------------------------------------------------------------


Field        Function
--------------------------------------------------------------------------------
Device Name  The device name, for example, c0t3d0s0.

Size         The total size of the device.

Disk Type    The type of the disk as listed in the /etc/format.dat file, for
             example SUN0535, SUN1.05, or DEFAULT.

Status       Reported as OK, Resyncing, Enabled, Critical, Spared, Urgent,
             or Attention.

Use          Contains one of the following values: Unassigned, Trans Log,
             Trans Master, MetaDB Replica, Component, File System
             currently mounted on slice, Overlap, or Hot Spare.

--------------------------------------------------------------------------------
Table 4-18 Metadevice Browser Device List Information
----------------------------------------------------------------------------------


Field   Function
----------------------------------------------------------------------------------
Name    The metadevice is represented as dn, where the default value for n is
        a number in the range 0 to 127.

Status  The status is reported as OK, Critical, Urgent, or Failed.

Size    The total size of the metadevice.

Use     The use is either Unassigned, Submirror of dn, name of a file system,
        Master of dn, or Trans Log.

Type    The type is reported as either Trans, Concat/Stripe, Mirror, or RAID.

----------------------------------------------------------------------------------
Table 4-19 Hot Spare Pool Device List Information
--------------------------------------------------------------------


Field          Function
--------------------------------------------------------------------
Name           The name of the hot spare pool is displayed as hspnnn, where
               nnn is a number in the range 000 to 999.

Status         The status is OK, Empty (there are no slices in the hot spare pool
               ), Broken (if all slices in the hot spare pool are broken), or
               Attention (if one or more slices are in use).

Smallest       The size of the smallest slice in the hot spare pool.

Largest        The size of the largest slice in the hot spare pool.

Spares         The number of hot spares in the pool.

Spares in Use  The number of hot spares currently in use.

--------------------------------------------------------------------
All objects in the device list of any of the three browsers can be moved to the Metadevice Editor's canvas for manipulation.
The three browsers have configurable Filter windows that are available using the Set Filters choice in the Filter item on the menu bar. The filters are used to change the way information is displayed in the device list. Figure 4-22 shows the Slice Filters window.
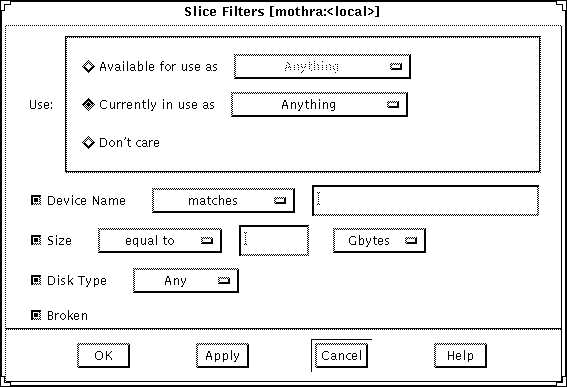
Figure 4-22 Slice Filter Window
Table 4-20 explains the items in the Slice Filter window.
Table 4-20 Slice Filter Window Items
---------------------------------------------------------------------------------------


Window Region         Function
---------------------------------------------------------------------------------------
Use                   Three radio buttons in this region enable you to filter the
                      display to only show the following:

                      Available for use as  -  The menu selections here include:
                      Anything, Hot Spare, Replica, Metadevice, or Trans Log.
                      Anything is the default.

                      Currently in use as  -  The menu selections here include:
                      Anything, File System, Swap, Replica, Metadevice, Hot
                      Spare, or Trans Log. Anything is the default.

                      Don't care  -  The filter is ignored.

Device Name toggle    Turning on the name toggle button enables you to specify a
button                device name. The two choices on the menu enable you to
                      search for names that match or do not match. Wildcard
                      character support includes both the asterisk (*) and question
                      mark (?), which match any number of characters and any
                      single character respectively. Matches is the default.

Size toggle button    Turning on the size toggle button enables you to specify a
                      size for the filter. The menu button selections include: from
                      (a field is added for specifying a "to" range), greater than,
                      less than, equal to, and not equal to. The default is equal to.
                      A size menu button enables you to specify Gbytes, Mbytes,
                      Kbytes, and Sectors.

Disk Type toggle      Turning on the Disk Type toggle button enables you to select
button                the types of disks you wish to have displayed in the
                      browser. The menu always enables you to select Any, but
                      the other selections depend on the types of disks attached to
                      your system.

Broken toggle button  Searches only for slices that have a "broken" status.

---------------------------------------------------------------------------------------
The Finder is used to locate an object in the Metadevice Editor Window, or to locate the device associated with a specified mount point. The Finder is accessed from the Browse menu on the Metadevice Editor window.
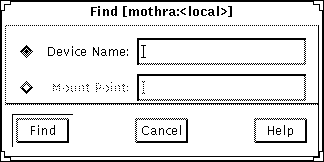
Figure 4-23 Finder Window
DiskSuite Tool displays feedback via four different types of dialog boxes at various times. You must respond to a dialog box before you can perform any other action in DiskSuite Tool.
Caution -

An example of a warning dialog box is shown in Figure 4-24.
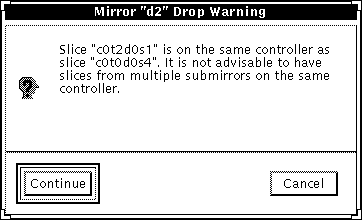
Figure 4-24 Example Dialog Box
The types of dialog boxes and the information they display are shown in Table 4-21.
Table 4-21 Dialog Boxes
-------------------------------------------------------------------------------


Type          Information Presented
-------------------------------------------------------------------------------
Error         When you attempt to perform an action that will result in an
              error, an error dialog box appears with a notification of the
              error.

Warning       When you attempt to perform an action that results in a
              warning, you are given the opportunity to cancel the action.
              Appendix A,  "DiskSuite Error Messages," offers a listing of
              the error messages and the corrective action.

Confirmation  These provide a way for you to confirm an action that has been
              selected. These will appear when an action you initiated cannot
              be undone. The message string in each dialog varies according
              to the operation.

Information   These provide a helpful message. These dialog boxes appear
              with a large "i" on the left side of the message.

-------------------------------------------------------------------------------
The Configuration Log window, as shown in Figure 4-25, provides a history of all top-level DiskSuite operations. Each item on the list is given a time stamp.
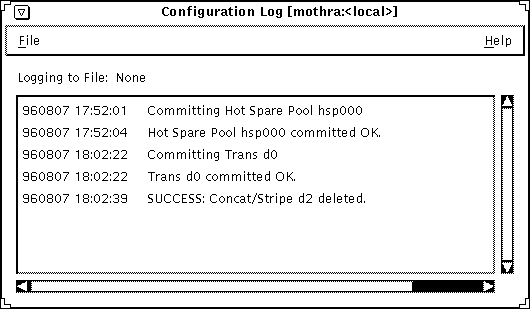
Figure 4-25 Configuration Log Window
Selections on the Configuration Log window's File menu enable you to clear the scrolling list, log the messages to a user-designated file, and close the window. Double-clicking an entry in the list brings up the information dialog window for the device and opens the device on the Metadevice Editor's canvas.
The Problem List window contains a scrolling list of the current metadevice problems. The list does not provide a history of the problems that have been encountered. The list is updated each time DiskSuite Tool learns of a change in status. Each item on the list is given a time stamp.

Figure 4-26 Problem List Window
Selections on the Problem List window's File menu enable you to log the messages to a user-designated file and close the window. The text field on the right side of the button displays the date and time of the most recent update.
Double-clicking an entry in the list brings up the information window for the device and places the device on the Metadevice Editor's canvas.
Note - When DiskSuite Tool is minimized, its icon flashes when there is a critical problem.
The DiskSuite Tool online help program provides detailed information about the DiskSuite Tool and the functionality it provides.
The DiskSuite Tool help utility is shown in Figure 4-27.
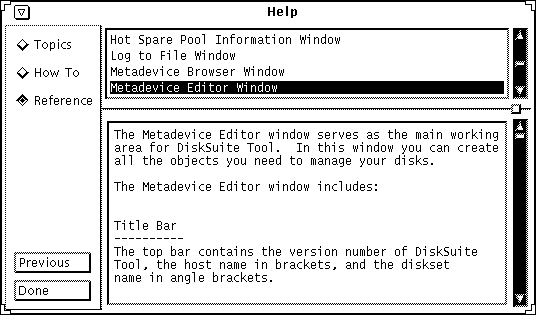
Figure 4-27 DiskSuite Tool Help Utility
The Help titles displayed in the top window pane identify the list of subjects available for each level of help.
The text in the bottom window pane describes information about using the current menu or command.
Use the scrollbars to the right of each pane to scroll through the help information displayed.
On the left side of the Help utility are buttons used to find information and navigate through the help system. The buttons are described in Table 4-22 .
Table 4-22 DiskSuite Tool Help Buttons
--------------------------------------------------------------------------------


Button     Click On This Button To ...              Then ...
--------------------------------------------------------------------------------
Topics     Display a glossary of DiskSuite terms    Click on a title in the top
                                                    window pane to view the
How To     Display instructions for using the help  accompanying help text.

Reference  Display screen-level help

Previous   Return to the last-accessed help topic   The help viewer returns
                                                    to the previous screen.

Done       Exit the online help system              The help system is
                                                    closed.

--------------------------------------------------------------------------------
This is an application registry file used by DiskSuite Tool to initialize its "Tools" menu selection. Refer to the metatool-toolsmenu(4) man page for more information.
Event notification is a feature that keeps you aware of dynamic state changes, such as creation of a metadevice, a change in a metadevice status, or device errors. Event notification takes care of the following:
Note - Though you can run multiple instances of DiskSuite Tool on the same host, it is best to avoid doing so.
Note - DiskSuite Tool provides the same functionality as the ssaadm(1M) command to start and stop a disk. However, do not use DiskSuite Tool and the ssaadm(1M) together. Doing so could cause DiskSuite Tool to incorrectly display a disk`s status. Always use one or the other to both stop and start a disk.