

This chapter introduces the DiskSuite software, and describes the steps to take to get a new configuration up and running. The high-level tasks for getting started are:
| Planning Your Configuration |
| Creating Initial State Database Replicas |
If you are merely upgrading an existing DiskSuite installation, you don`t need to read this chapter. Instead, refer to the Solstice DiskSuite 4.1 Product Installation and Release Notes to upgrade to Solstice DiskSuite 4.1.
The prerequisites for the tasks in this chapter are:
Solstice DiskSuite 4.1 is a software product that enables you to manage large numbers of disks and the data on those disks.
Although there are many ways to use DiskSuite, most tasks center around increasing:
DiskSuite uses virtual disks to manage physical disks and their associated data. In DiskSuite, a virtual disk is called a metadevice. A metadevice is functionally identical to a physical disk in the view of an application. DiskSuite converts I/O requests directed at a metadevice into I/O requests to the underlying member disks.
DiskSuite's metadevices are built from slices (disk partitions). An easy way to build metadevices is to use the graphical user interface, DiskSuite Tool, that comes with DiskSuite. DiskSuite Tool presents you with a view of all the slices available to you. By dragging slices onto metadevice objects, you can quickly assign slices to metadevices.
If, for example, you want to create more storage capacity, you could use DiskSuite to "fool" the system into thinking that a collection of many small slices is one physical disk. After you have created a metadevice from these slices, you can immediately begin using it just as any "real" disk.
DiskSuite can also increase the availability of data by using mirrors and RAID5 metadevices . Mirrors and RAID5 metadevices replicate data so that it is not destroyed if the disk on which it is stored fails.
For a more detailed discussion of metadevices, and for more information on all of DiskSuite's tools, refer to Solstice DiskSuite 4.1 Reference.
Reading Solstice DiskSuite 4.1 Reference is an essential starting point for understanding how DiskSuite works, and how you can best use its features.
The Glossary located at the end of Solstice DiskSuite 4.1 Reference explains DiskSuite terminology, which may be unfamiliar to you.
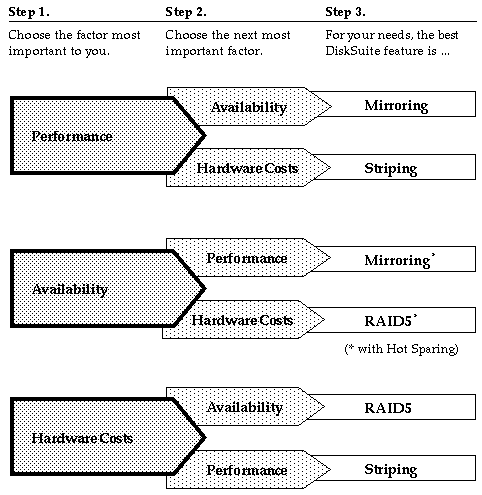
Use the following high-level decision tree to determine the best fit for DiskSuite in your environment.
Example: If your most important factor is lower hardware costs, followed by availability, your needs would be best served by using RAID5 metadevices.
Note - For a complete discussion of how to plan for DiskSuite, refer to Solstice DiskSuite 4.1 Reference.
This section describes how to create initial state database replicas based on your system configuration.
| Number of Hard Drives | Number of State Database Replicas to Create |
|---|---|
| One | Three, all on one slice |
| Two - Four | Two on each drive |
| Five or more | One on each drive |
Note - In a two-drive configuration, always create two state database replicas on each drive. For example, assume you create two state database replicas on one slice and only one state database replica on the other. If the slice with two state database replicas fails, DiskSuite will not function because the remaining slice only has one state database replica. Refer to Solstice DiskSuite 4.1 Reference for more information on the operation of state database replicas.
Use one of the following three methods to create your initial state database replicas . The methods depend on how the slices on your system are configured. If your system has no available slices, or if you cannot repartition existing slices, you will not be able to use DiskSuite software.
If you have a new system, refer to "How to Create Initial State Database Replicas From Scratch (DiskSuite Tool)."
Note - When you combine state database replicas and metadevices on the same slice, DiskSuite detects the state database replica and adjusts the starting address and size of the metadevice accordingly. The advantage to this method is that you don't have to do anything extra, such as repartitioning a slice, and you don't have to worry about wasting space on a slice by having to dedicate it to just the state database replica.
You may find, however, that the state database replicas are relatively small (517 KB, or 1034 sectors), so you don`t want to dedicate a large slice just to hold the small state database replica. You may have to make some slices smaller than they currently are.
If you have existing, unused slices, refer to "How to Create Initial State Database Replicas on Existing Unused Slices (DiskSuite Tool)."
This procedure directs you to use three windows in DiskSuite Tool to identify and view your configuration, and then put state database replicas on slices.
---------------

# metatool &

---------------

Use the ADJUST mouse button (by default, the middle button) to drag the object.
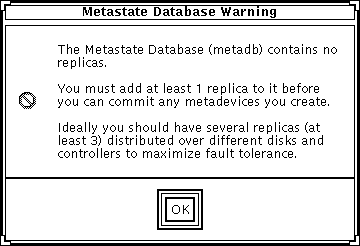
Note - The MetaDB object represents or "contains" all the state database replica s in your configuration. Because you are starting from scratch, the MetaDB object has a "Critical" label on it to show you that you need to add state database replicas to it.
This shows your storage configuration: controllers, disks, and slices. You may want to use the View menu on the Disk View window to set the view to 50, 100, or 200 percent viewing. The default is 100 percent.
This window shows the status and current use of slices. (The Disk View window's status line also displays this information when you position the cursor over the slice.)
As long as the MetaDB object was selected when you opened the Disk View window, when a slice is put into the MetaDB object, the Disk View window colors the slice (blue on color screens, black on monochrome screens) that contains the state database replica. This helps you see where state replicas are located, for example, across controllers.
Try to balance state database replicas across controllers to achieve redundancy. For configurations with many disks, put a state database replica on each disk. (You can also click the Set Filters button in the Disk View window to filter for slices that are not in use.)
This method does not enable you to "change" the number of state database replicas on a slice, only to initially specify them.
Select Configuration Log from the Browse menu.
This example shows a committed MetaDB object consisting of six slices, each containing one state database replica. The status of the MetaDB object is "OK," indicating that the state database replicas are spread across at least three controllers.
This task is the equivalent of the previous one. It demonstrates the use of the command line utilities to create state database replicas.
After checking the prerequisites, and the preliminary information, use the metadb(1M) command to create state database replicas. Refer to the metadb(1M) man page for more information.
Note - When you run the metadb(1M) command for the first time, the system displays a warning message that no state database replicas exist for this host. Ignore this message. It appears only when you create the state database replica s for the first time.
---------------------------------------------------------------------------The -a and -f options are used together to create the initial state database replicas . Five initial state database replicas, one on each of five slices, are created. By spreading the state database replicas across controllers, you can increase metadevice performance and reliability. The metadb command checks that the replicas are active, as indicated by the a flag.
# metadb -a -f c0t1d0s3 c1t1d0s3 c2t1d0s3 c3t1d0s3 c4t1d0s3 # metadb flags first blk block count a u 16 1034 /dev/dsk/c0t1d0s3 a u 16 1034 /dev/dsk/c1t1d0s3 a u 16 1034 /dev/dsk/c2t1d0s3 a u 16 1034 /dev/dsk/c3t1d0s3 a u 16 1034 /dev/dsk/c4t1d0s3 ---------------------------------------------------------------------------
---------------------------------------------------------------------------

# metadb -a -f -c 2 c0t1d0s3 c1t1d0s3 c2t1d0s3
# metadb
        flags         first blk      block count
     a        u         16              1034            /dev/dsk/c0t1d0s3
     a        u         1050            1034            /dev/dsk/c0t1d0s3
     a        u         16              1034            /dev/dsk/c1t1d0s3
     a        u         1050            1034            /dev/dsk/c1t1d0s3
     a        u         16              1034            /dev/dsk/c2t1d0s3
     a        u         1050            1034            /dev/dsk/c2t1d0s3

---------------------------------------------------------------------------
The -a and -f options are used together to create the initial state database replicas
. The -c 2 option puts two state database replicas on each specified
slice, creating a total of six replicas. By spreading the state database replicas
across controllers, you can increase metadevice performance and reliability.
The metadb command checks that the replicas are active, as indicated by the
a flag.
---------------------------------------------------------------------------

# metadb -a -f -c 3 c0t0d0s3
# metadb
        flags         first blk      block count
     a        u         16              1034            /dev/dsk/c0t0d0s3
     a        u         1050            1034            /dev/dsk/c0t0d0s3
     a        u         2084            1034            /dev/dsk/c0t0d0s3

---------------------------------------------------------------------------
The system in this example consists of only one disk. (DiskSuite is being installed for its UFS logging feature.) The -a and -f options are used together to create the initial state database replicas. The -c 3 option creates three state database replicas on the same slice on the system's only disk. The metadb command checks that the replicas are active, as indicated by the a flag.
Caution -
Use a one-disk configuration for state database replicas as a last resort, as it creates a single point-of-failure.In this procedure, you will resize slices to hold state database replicas. Most slices are likely to be much larger than what is required for a state database replica . To prevent the waste of large amounts of disk space, you can take space from one slice and allocate it to an unused slice name or a new slice.
Note - Make sure that the disk space assigned to the slice you are creating for the metadevice state database is not shared with another slice.
Use this procedure if you have no unused slices on which to put state database replica s. Even if you have no unused slices, you can create a new slice by taking space from the end of the swap partition and assigning it to an unused slice name.
------------------------------------------------------------------

# halt
...
ok boot -s
...
INIT: SINGLE USER MODE
Type Ctrl-d to proceed with normal startup,
(or give root password for system maintenance):<root-password>
Entering System Maintenance Mode
Mar 12 16:52:38 su: 'su root' succeeded for root on /dev/syscon
Sun Microsystems Inc.   SunOS 5.5       Generic November 1995

------------------------------------------------------------------
----------------------------------------------

# swap -l
swapfile           dev  swaplo blocks   free
/dev/dsk/c0t2d0s1 32,17      8 205624 192704

----------------------------------------------
----------------------------

# swap -d /dev/dsk/slice
# swap -l

----------------------------
You will delete cylinders from the swap slice, then add the cylinders to a new slice name that is not being used.
-----------------------------

# prtvtoc /dev/rdsk/slice

-----------------------------
Using the Metadevice State Database Info window, create three state database replicas on the slice that you created by repartitioning swap.
This example shows a committed MetaDB object with three state database replica s on the same slice. Notice that the object indicates three state database replicas even though it contains only one slice. The status of the MetaDB object is "Attention," because the replicas are not spread across at least three controllers.
Now you are ready to use DiskSuite to manage your configuration. Use the procedures in Chapter 2, "Creating DiskSuite Objects," to create DiskSuite objects , such as metadevices and hot spare pools.


