In this document
- How Property Animation Works
- Animating with ValueAnimator
- Animating with ObjectAnimator
- Choreographing Multiple Animations with AnimatorSet
- Animation Listeners
- Using a TypeEvaluator
- Using Interpolators
- Specifying Keyframes
- Animating Layout Changes to ViewGroups
- Animating Views
- Declaring Animations in XML
Key classes
Related samples
The property animation system is a robust framework that allows you to animate almost anything. You can define an animation to change any object property over time, regardless of whether it draws to the screen or not. A property animation changes a property's (a field in an object) value over a specified length of time. To animate something, you specify the object property that you want to animate, such as an object's position on the screen, how long you want to animate it for, and what values you want to animate between.
The property animation system lets you define the following characteristics of an animation:
- Duration: You can specify the duration of an animation. The default length is 300 ms.
- Time interpolation: You can specify how the values for the property are calculated as a function of the animation's current elapsed time.
- Repeat count and behavior: You can specify whether or not to have an animation repeat when it reaches the end of a duration and how many times to repeat the animation. You can also specify whether you want the animation to play back in reverse. Setting it to reverse plays the animation forwards then backwards repeatedly, until the number of repeats is reached.
- Animator sets: You can group animations into logical sets that play together or sequentially or after specified delays.
- Frame refresh delay: You can specify how often to refresh frames of your animation. The default is set to refresh every 10 ms, but the speed in which your application can refresh frames is ultimately dependent on how busy the system is overall and how fast the system can service the underlying timer.
How Property Animation Works
First, let's go over how an animation works with a simple example. Figure 1 depicts a
hypothetical object that is animated with its x property, which represents its
horizontal location on a screen. The duration of the animation is set to 40 ms and the distance
to travel is 40 pixels. Every 10 ms, which is the default frame refresh rate, the object moves
horizontally by 10 pixels. At the end of 40ms, the animation stops, and the object ends at
horizontal position 40. This is an example of an animation with linear interpolation, meaning the
object moves at a constant speed.

Figure 1. Example of a linear animation
You can also specify animations to have a non-linear interpolation. Figure 2 illustrates a hypothetical object that accelerates at the beginning of the animation, and decelerates at the end of the animation. The object still moves 40 pixels in 40 ms, but non-linearly. In the beginning, this animation accelerates up to the halfway point then decelerates from the halfway point until the end of the animation. As Figure 2 shows, the distance traveled at the beginning and end of the animation is less than in the middle.

Figure 2. Example of a non-linear animation
Let's take a detailed look at how the important components of the property animation system would calculate animations like the ones illustrated above. Figure 3 depicts how the main classes work with one another.
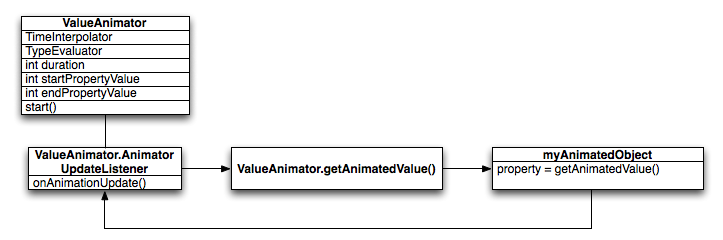
Figure 3. How animations are calculated
The ValueAnimator object keeps track of your animation's timing,
such as how long the animation has been running, and the current value of the property that it is
animating.
The ValueAnimator encapsulates a TimeInterpolator, which defines animation interpolation, and a TypeEvaluator, which defines how to calculate values for the property being
animated. For example, in Figure 2, the TimeInterpolator used would be
AccelerateDecelerateInterpolator and the TypeEvaluator would be IntEvaluator.
To start an animation, create a ValueAnimator and give it the
starting and ending values for the property that you want to animate, along with the duration of
the animation. When you call start() the animation
begins. During the whole animation, the ValueAnimator calculates an elapsed fraction
between 0 and 1, based on the duration of the animation and how much time has elapsed. The
elapsed fraction represents the percentage of time that the animation has completed, 0 meaning 0%
and 1 meaning 100%. For example, in Figure 1, the elapsed fraction at t = 10 ms would be .25
because the total duration is t = 40 ms.
When the ValueAnimator is done calculating an elapsed fraction, it
calls the TimeInterpolator that is currently set, to calculate an
interpolated fraction. An interpolated fraction maps the elapsed fraction to a new
fraction that takes into account the time interpolation that is set. For example, in Figure 2,
because the animation slowly accelerates, the interpolated fraction, about .15, is less than the
elapsed fraction, .25, at t = 10 ms. In Figure 1, the interpolated fraction is always the same as
the elapsed fraction.
When the interpolated fraction is calculated, ValueAnimator calls
the appropriate TypeEvaluator, to calculate the value of the
property that you are animating, based on the interpolated fraction, the starting value, and the
ending value of the animation. For example, in Figure 2, the interpolated fraction was .15 at t =
10 ms, so the value for the property at that time would be .15 X (40 - 0), or 6.
The com.example.android.apis.animation package in the API
Demos sample project provides many examples on how to use the property
animation system.
How Property Animation Differs from View Animation
The view animation system provides the capability to only animate View
objects, so if you wanted to animate non-View objects, you have to implement
your own code to do so. The view animation system is also constrained in the fact that it only
exposes a few aspects of a View object to animate, such as the scaling and
rotation of a View but not the background color, for instance.
Another disadvantage of the view animation system is that it only modified where the View was drawn, and not the actual View itself. For instance, if you animated a button to move across the screen, the button draws correctly, but the actual location where you can click the button does not change, so you have to implement your own logic to handle this.
With the property animation system, these constraints are completely removed, and you can animate any property of any object (Views and non-Views) and the object itself is actually modified. The property animation system is also more robust in the way it carries out animation. At a high level, you assign animators to the properties that you want to animate, such as color, position, or size and can define aspects of the animation such as interpolation and synchronization of multiple animators.
The view animation system, however, takes less time to setup and requires less code to write. If view animation accomplishes everything that you need to do, or if your existing code already works the way you want, there is no need to use the property animation system. It also might make sense to use both animation systems for different situations if the use case arises.
API Overview
You can find most of the property animation system's APIs in android.animation. Because the view animation system already
defines many interpolators in android.view.animation, you can use
those interpolators in the property animation system as well. The following tables describe the main
components of the property animation system.
The Animator class provides the basic structure for creating
animations. You normally do not use this class directly as it only provides minimal
functionality that must be extended to fully support animating values. The following
subclasses extend Animator:
Table 1. Animators
| Class | Description |
|---|---|
ValueAnimator |
The main timing engine for property animation that also computes the values for the
property to be animated. It has all of the core functionality that calculates animation
values and contains the timing details of each animation, information about whether an
animation repeats, listeners that receive update events, and the ability to set custom
types to evaluate. There are two pieces to animating properties: calculating the animated
values and setting those values on the object and property that is being animated. ValueAnimator does not carry out the second piece, so you must listen
for updates to values calculated by the ValueAnimator and
modify the objects that you want to animate with your own logic. See the section about
Animating with ValueAnimator for more information. |
ObjectAnimator |
A subclass of ValueAnimator that allows you to set a target
object and object property to animate. This class updates the property accordingly when
it computes a new value for the animation. You want to use
ObjectAnimator most of the time,
because it makes the process of animating values on target objects much easier. However,
you sometimes want to use ValueAnimator directly because ObjectAnimator has a few more restrictions, such as requiring specific
acessor methods to be present on the target object. |
AnimatorSet |
Provides a mechanism to group animations together so that they run in relation to one another. You can set animations to play together, sequentially, or after a specified delay. See the section about Choreographing multiple animations with Animator Sets for more information. |
Evaluators tell the property animation system how to calculate values for a given
property. They take the timing data that is provided by an Animator
class, the animation's start and end value, and calculate the animated values of the property
based on this data. The property animation system provides the following evaluators:
Table 2. Evaluators
| Class/Interface | Description |
|---|---|
IntEvaluator |
The default evaluator to calculate values for int properties. |
FloatEvaluator |
The default evaluator to calculate values for float properties. |
ArgbEvaluator |
The default evaluator to calculate values for color properties that are represented as hexidecimal values. |
TypeEvaluator |
An interface that allows you to create your own evaluator. If you are animating an
object property that is not an int, float, or color,
you must implement the TypeEvaluator interface to specify how
to compute the object property's animated values. You can also specify a custom TypeEvaluator for int, float, and color
values as well, if you want to process those types differently than the default behavior.
See the section about Using a TypeEvaluator for more
information on how to write a custom evaluator. |
A time interpolator defines how specific values in an animation are calculated as a
function of time. For example, you can specify animations to happen linearly across the whole
animation, meaning the animation moves evenly the entire time, or you can specify animations
to use non-linear time, for example, accelerating at the beginning and decelerating at the
end of the animation. Table 3 describes the interpolators that are contained in android.view.animation. If none of the provided interpolators suits
your needs, implement the TimeInterpolator interface and create your own. See Using interpolators for more information on how to write a custom
interpolator.
Table 3. Interpolators
| Class/Interface | Description |
|---|---|
AccelerateDecelerateInterpolator |
An interpolator whose rate of change starts and ends slowly but accelerates through the middle. |
AccelerateInterpolator |
An interpolator whose rate of change starts out slowly and then accelerates. |
AnticipateInterpolator |
An interpolator whose change starts backward then flings forward. |
AnticipateOvershootInterpolator |
An interpolator whose change starts backward, flings forward and overshoots the target value, then finally goes back to the final value. |
BounceInterpolator |
An interpolator whose change bounces at the end. |
CycleInterpolator |
An interpolator whose animation repeats for a specified number of cycles. |
DecelerateInterpolator |
An interpolator whose rate of change starts out quickly and and then decelerates. |
LinearInterpolator |
An interpolator whose rate of change is constant. |
OvershootInterpolator |
An interpolator whose change flings forward and overshoots the last value then comes back. |
TimeInterpolator |
An interface that allows you to implement your own interpolator. |
Animating with ValueAnimator
The ValueAnimator class lets you animate values of some type for the
duration of an animation by specifying a set of int, float, or color
values to animate through. You obtain a ValueAnimator by calling one of
its factory methods: ofInt(), ofFloat(), or ofObject(). For example:
ValueAnimator animation = ValueAnimator.ofFloat(0f, 1f);
animation.setDuration(1000);
animation.start();
In this code, the ValueAnimator starts calculating the values of the
animation, between 0 and 1, for a duration of 1000 ms, when the start() method
runs.
You can also specify a custom type to animate by doing the following:
ValueAnimator animation = ValueAnimator.ofObject(new MyTypeEvaluator(), startPropertyValue, endPropertyValue);
animation.setDuration(1000);
animation.start();
In this code, the ValueAnimator starts calculating the values of the
animation, between startPropertyValue and endPropertyValue using the
logic supplied by MyTypeEvaluator for a duration of 1000 ms, when the start() method runs.
The previous code snippets, however, has no real effect on an object, because the ValueAnimator does not operate on objects or properties directly. The most likely thing
that you want to do is modify the objects that you want to animate with these calculated values. You do
this by defining listeners in the ValueAnimator to appropriately handle important events
during the animation's lifespan, such as frame updates. When implementing the listeners, you can
obtain the calculated value for that specific frame refresh by calling getAnimatedValue(). For more information on listeners,
see the section about Animation Listeners.
Animating with ObjectAnimator
The ObjectAnimator is a subclass of the ValueAnimator (discussed in the previous section) and combines the timing
engine and value computation of ValueAnimator with the ability to
animate a named property of a target object. This makes animating any object much easier, as you
no longer need to implement the ValueAnimator.AnimatorUpdateListener,
because the animated property updates automatically.
Instantiating an ObjectAnimator is similar to a ValueAnimator, but you also specify the object and the name of that object's property (as
a String) along with the values to animate between:
ObjectAnimator anim = ObjectAnimator.ofFloat(foo, "alpha", 0f, 1f);
anim.setDuration(1000);
anim.start();
To have the ObjectAnimator update properties correctly, you must do
the following:
- The object property that you are animating must have a setter function (in camel case) in the form of
set<propertyName>(). Because theObjectAnimatorautomatically updates the property during animation, it must be able to access the property with this setter method. For example, if the property name isfoo, you need to have asetFoo()method. If this setter method does not exist, you have three options:- Add the setter method to the class if you have the rights to do so.
- Use a wrapper class that you have rights to change and have that wrapper receive the value with a valid setter method and forward it to the original object.
- Use
ValueAnimatorinstead.
- If you specify only one value for the
values...parameter in one of theObjectAnimatorfactory methods, it is assumed to be the ending value of the animation. Therefore, the object property that you are animating must have a getter function that is used to obtain the starting value of the animation. The getter function must be in the form ofget<propertyName>(). For example, if the property name isfoo, you need to have agetFoo()method. - The getter (if needed) and setter methods of the property that you are animating must
operate on the same type as the starting and ending values that you specify to
ObjectAnimator. For example, you must havetargetObject.setPropName(float)andtargetObject.getPropName(float)if you construct the followingObjectAnimator:ObjectAnimator.ofFloat(targetObject, "propName", 1f)
- Depending on what property or object you are animating, you might need to call the
invalidate()method on a View force the screen to redraw itself with the updated animated values. You do this in theonAnimationUpdate()callback. For example, animating the color property of a Drawable object only cause updates to the screen when that object redraws itself. All of the property setters on View, such assetAlpha()andsetTranslationX()invalidate the View properly, so you do not need to invalidate the View when calling these methods with new values. For more information on listeners, see the section about Animation Listeners.
Choreographing Multiple Animations with AnimatorSet
In many cases, you want to play an animation that depends on when another animation starts or
finishes. The Android system lets you bundle animations together into an AnimatorSet, so that you can specify whether to start animations
simultaneously, sequentially, or after a specified delay. You can also nest AnimatorSet objects within each other.
The following sample code taken from the Bouncing
Balls sample (modified for simplicity) plays the following Animator
objects in the following manner:
- Plays
bounceAnim. - Plays
squashAnim1,squashAnim2,stretchAnim1, andstretchAnim2at the same time. - Plays
bounceBackAnim. - Plays
fadeAnim.
AnimatorSet bouncer = new AnimatorSet();
bouncer.play(bounceAnim).before(squashAnim1);
bouncer.play(squashAnim1).with(squashAnim2);
bouncer.play(squashAnim1).with(stretchAnim1);
bouncer.play(squashAnim1).with(stretchAnim2);
bouncer.play(bounceBackAnim).after(stretchAnim2);
ValueAnimator fadeAnim = ObjectAnimator.ofFloat(newBall, "alpha", 1f, 0f);
fadeAnim.setDuration(250);
AnimatorSet animatorSet = new AnimatorSet();
animatorSet.play(bouncer).before(fadeAnim);
animatorSet.start();
For a more complete example on how to use animator sets, see the Bouncing Balls sample in APIDemos.
Animation Listeners
You can listen for important events during an animation's duration with the listeners described below.
Animator.AnimatorListeneronAnimationStart()- Called when the animation starts.onAnimationEnd()- Called when the animation ends.onAnimationRepeat()- Called when the animation repeats itself.onAnimationCancel()- Called when the animation is canceled. A cancelled animation also callsonAnimationEnd(), regardless of how they were ended.
ValueAnimator.AnimatorUpdateListener-
onAnimationUpdate()- called on every frame of the animation. Listen to this event to use the calculated values generated byValueAnimatorduring an animation. To use the value, query theValueAnimatorobject passed into the event to get the current animated value with thegetAnimatedValue()method. Implementing this listener is required if you useValueAnimator.Depending on what property or object you are animating, you might need to call
invalidate()on a View to force that area of the screen to redraw itself with the new animated values. For example, animating the color property of a Drawable object only cause updates to the screen when that object redraws itself. All of the property setters on View, such assetAlpha()andsetTranslationX()invalidate the View properly, so you do not need to invalidate the View when calling these methods with new values.
-
You can extend the AnimatorListenerAdapter class instead of
implementing the Animator.AnimatorListener interface, if you do not
want to implement all of the methods of the Animator.AnimatorListener
interface. The AnimatorListenerAdapter class provides empty
implementations of the methods that you can choose to override.
For example, the Bouncing
Balls sample in the API demos creates an AnimatorListenerAdapter
for just the onAnimationEnd()
callback:
ValueAnimatorAnimator fadeAnim = ObjectAnimator.ofFloat(newBall, "alpha", 1f, 0f);
fadeAnim.setDuration(250);
fadeAnim.addListener(new AnimatorListenerAdapter() {
public void onAnimationEnd(Animator animation) {
    balls.remove(((ObjectAnimator)animation).getTarget());
}
Animating Layout Changes to ViewGroups
The property animation system provides the capability to animate changes to ViewGroup objects as well as provide an easy way to animate View objects themselves.
You can animate layout changes within a ViewGroup with the LayoutTransition class. Views inside a ViewGroup can go through an appearing
and disappearing animation when you add them to or remove them from a ViewGroup or when you call
a View's setVisibility() method with VISIBLE, android.view.View#INVISIBLE}, or GONE. The remaining Views in the
ViewGroup can also animate into their new positions when you add or remove Views. You can define
the following animations in a LayoutTransition object by calling setAnimator() and passing in an Animator object with one of the following LayoutTransition constants:
APPEARING- A flag indicating the animation that runs on items that are appearing in the container.CHANGE_APPEARING- A flag indicating the animation that runs on items that are changing due to a new item appearing in the container.DISAPPEARING- A flag indicating the animation that runs on items that are disappearing from the container.CHANGE_DISAPPEARING- A flag indicating the animation that runs on items that are changing due to an item disappearing from the container.
You can define your own custom animations for these four types of events to customize the look of your layout transitions or just tell the animation system to use the default animations.
The LayoutAnimations sample in API Demos shows you how to define animations for layout transitions and then set the animations on the View objects that you want to animate.
The
LayoutAnimationsByDefault and its corresponding layout_animations_by_default.xml
layout resource file show you how to enable the default layout transitions for ViewGroups in XML.
The only thing that you need to do is to set the android:animateLayoutchanges
attribute to true for the ViewGroup. For example:
<LinearLayout
    android:orientation="vertical"
    android:layout_width="wrap_content"
    android:layout_height="match_parent"
    android:id="@+id/verticalContainer"
    android:animateLayoutChanges="true" />
Setting this attribute to true automatically animates Views that are added or removed from the ViewGroup as well as the remaining Views in the ViewGroup.
Using a TypeEvaluator
If you want to animate a type that is unknown to the Android system, you can create your own
evaluator by implementing the TypeEvaluator interface. The types that
are known by the Android system are int, float, or a color, which are
supported by the IntEvaluator, FloatEvaluator, and ArgbEvaluator type
evaluators.
There is only one method to implement in the TypeEvaluator
interface, the evaluate() method. This allows
the animator that you are using to return an appropriate value for your animated property at the
current point of the animation. The FloatEvaluator class demonstrates
how to do this:
public class FloatEvaluator implements TypeEvaluator {

    public Object evaluate(float fraction, Object startValue, Object endValue) {
        float startFloat = ((Number) startValue).floatValue();
        return startFloat + fraction * (((Number) endValue).floatValue() - startFloat);
    }
}
Note: When ValueAnimator (or ObjectAnimator) runs, it calculates a current elapsed fraction of the
animation (a value between 0 and 1) and then calculates an interpolated version of that depending
on what interpolator that you are using. The interpolated fraction is what your TypeEvaluator receives through the fraction parameter, so you do
not have to take into account the interpolator when calculating animated values.
Using Interpolators
An interpolator define how specific values in an animation are calculated as a function of time. For example, you can specify animations to happen linearly across the whole animation, meaning the animation moves evenly the entire time, or you can specify animations to use non-linear time, for example, using acceleration or deceleration at the beginning or end of the animation.
Interpolators in the animation system receive a fraction from Animators that represent the
elapsed time of the animation. Interpolators modify this fraction to coincide with the type of
animation that it aims to provide. The Android system provides a set of common interpolators in
the android.view.animation package. If none of these suit your
needs, you can implement the TimeInterpolator interface and create your
own.
As an example, how the default interpolator AccelerateDecelerateInterpolator and the LinearInterpolator calculate interpolated fractions are compared below.
The LinearInterpolator has no effect on the elapsed fraction. The AccelerateDecelerateInterpolator accelerates into the animation and
decelerates out of it. The following methods define the logic for these interpolators:
AccelerateDecelerateInterpolator
public float getInterpolation(float input) {
    return (float)(Math.cos((input + 1) * Math.PI) / 2.0f) + 0.5f;
}
LinearInterpolator
public float getInterpolation(float input) {
    return input;
}
The following table represents the approximate values that are calculated by these interpolators for an animation that lasts 1000ms:
| ms elapsed | Elapsed fraction/Interpolated fraction (Linear) | Interpolated fraction (Accelerate/Decelerate) |
|---|---|---|
| 0 | 0 | 0 |
| 200 | .2 | .1 |
| 400 | .4 | .345 |
| 600 | .6 | .8 |
| 800 | .8 | .9 |
| 1000 | 1 | 1 |
As the table shows, the LinearInterpolator changes the values
at the same speed, .2 for every 200ms that passes. The AccelerateDecelerateInterpolator changes the values faster than LinearInterpolator between 200ms and 600ms and slower between 600ms and
1000ms.
Specifying Keyframes
A Keyframe object consists of a time/value pair that lets you define
a specific state at a specific time of an animation. Each keyframe can also have its own
interpolator to control the behavior of the animation in the interval between the previous
keyframe's time and the time of this keyframe.
To instantiate a Keyframe object, you must use one of the factory
methods, ofInt(), ofFloat(), or ofObject() to obtain the appropriate type of Keyframe. You then call
the ofKeyframe() factory method to
obtain a PropertyValuesHolder object. Once you have the object, you can
obtain an animator by passing in the PropertyValuesHolder object and
the object to animate. The following code snippet demonstrates how to do this:
Keyframe kf0 = Keyframe.ofFloat(0f, 0f);
Keyframe kf1 = Keyframe.ofFloat(.5f, 360f);
Keyframe kf2 = Keyframe.ofFloat(1f, 0f);
PropertyValuesHolder pvhRotation = PropertyValuesHolder.ofKeyframe("rotation", kf0, kf1, kf2);
ObjectAnimator rotationAnim = ObjectAnimator.ofPropertyValuesHolder(target, pvhRotation)
rotationAnim.setDuration(5000ms);
For a more complete example on how to use keyframes, see the MultiPropertyAnimation sample in APIDemos.
Animating Views
The property animation system allow streamlined animation of View objects and offerse a few advantages over the view animation system. The view animation system transformed View objects by changing the way that they were drawn. This was handled in the container of each View, because the View itself had no properties to manipulate. This resulted in the View being animated, but caused no change in the View object itself. This led to behavior such as an object still existing in its original location, even though it was drawn on a different location on the screen. In Android 3.0, new properties and the corresponding getter and setter methods were added to eliminate this drawback.
The property animation system
can animate Views on the screen by changing the actual properties in the View objects. In
addition, Views also automatically call the invalidate()
method to refresh the screen whenever its properties are changed. The new properties in the View class that facilitate property animations are:
translationXandtranslationY: These properties control where the View is located as a delta from its left and top coordinates which are set by its layout container.rotation,rotationX, androtationY: These properties control the rotation in 2D (rotationproperty) and 3D around the pivot point.scaleXandscaleY: These properties control the 2D scaling of a View around its pivot point.pivotXandpivotY: These properties control the location of the pivot point, around which the rotation and scaling transforms occur. By default, the pivot point is located at the center of the object.xandy: These are simple utility properties to describe the final location of the View in its container, as a sum of the left and top values and translationX and translationY values.alpha: Represents the alpha transparency on the View. This value is 1 (opaque) by default, with a value of 0 representing full transparency (not visible).
To animate a property of a View object, such as its color or rotation value, all you need to do is create a property animator and specify the View property that you want to animate. For example:
ObjectAnimator.ofFloat(myView, "rotation", 0f, 360f);
For more information on creating animators, see the sections on animating with ValueAnimator and ObjectAnimator.
Animating with ViewPropertyAnimator
The ViewPropertyAnimator provides a simple way to animate several
properties of a View in parallel, using a single underlying Animator
object. It behaves much like an ObjectAnimator, because it modifies the
actual values of the view's properties, but is more efficient when animating many properties at
once. In addition, the code for using the ViewPropertyAnimator is much
more concise and easier to read. The following code snippets show the differences in using multiple
ObjectAnimator objects, a single
ObjectAnimator, and the ViewPropertyAnimator when
simultaneously animating the x and y property of a view.
Multiple ObjectAnimator objects
ObjectAnimator animX = ObjectAnimator.ofFloat(myView, "x", 50f);
ObjectAnimator animY = ObjectAnimator.ofFloat(myView, "y", 100f);
AnimatorSet animSetXY = new AnimatorSet();
animSetXY.playTogether(animX, animY);
animSetXY.start();
One ObjectAnimator
PropertyValuesHolder pvhX = PropertyValuesHolder.ofFloat("x", 50f);
PropertyValuesHolder pvhY = PropertyValuesHolder.ofFloat("y", 100f);
ObjectAnimator.ofPropertyValuesHolder(myView, pvhX, pvyY).start();
ViewPropertyAnimator
myView.animate().x(50f).y(100f);
For more detailed information about ViewPropertyAnimator, see the corresponding Android Developers
blog
post.
Declaring Animations in XML
The property animation system lets you declare property animations with XML instead of doing it programmatically. By defining your animations in XML, you can easily reuse your animations in multiple activities and more easily edit the animation sequence.
To distinguish animation files that use the new property animation APIs from those that use the
legacy view animation framework,
starting with Android 3.1, you should save the XML files for property animations in the res/animator/ directory (instead of res/anim/). Using the animator directory name
is optional, but necessary if you want to use the layout editor tools in the Eclipse ADT plugin (ADT
11.0.0+), because ADT only searches the res/animator/ directory for property animation
resources.
The following property animation classes have XML declaration support with the following XML tags:
ValueAnimator-<animator>ObjectAnimator-<objectAnimator>AnimatorSet-<set>
The following example plays the two sets of object animations sequentially, with the first nested set playing two object animations together:
<set android:ordering="sequentially">
    <set>
        <objectAnimator
            android:propertyName="x"
            android:duration="500"
            android:valueTo="400"
            android:valueType="intType"/>
        <objectAnimator
            android:propertyName="y"
            android:duration="500"
            android:valueTo="300"
            android:valueType="intType"/>
    </set>
    <objectAnimator
        android:propertyName="alpha"
        android:duration="500"
        android:valueTo="1f"/>
</set>
In order to run this animation, you must inflate the XML resources in your code to an AnimatorSet object, and then set the target objects for all of the animations
before starting the animation set. Calling setTarget() sets a single target object for all children of the AnimatorSet as a convenience. The following code shows how to do this:
AnimatorSet set = (AnimatorSet) AnimatorInflater.loadAnimator(myContext,
    R.anim.property_animator);
set.setTarget(myObject);
set.start();
For information about the XML syntax for defining property animations, see Animation Resources.