The Gimp-Print Graphical User Interface
Now that the GIMP is displaying your picture, put your mouse over the picture and click the right mouse button. A menu will appear. Choose the File->Print menu option. This will cause the Gimp-Print GUI window to appear (see Figure 2-3). Move the mouse cursor over the various parts of the Gimp-Print GUI window, and notice that if you leave your mouse in one place for a short time without clicking any buttons, a small box appears. This box contains helpful text. These small boxes are called "tooltips" and are intended to remind you about the function of each part of the graphical interface.
The next several sections will continuously refer to Figure 2-3 and Figure 2-4. The difference between the two figures can be seen in the top right corner of the window. Notice that there are two tabs, one which reads Printer Settings and another which reads Image/Output Settings. Notice also that the window is divided into several major sections which directly map to the major sections of this document:
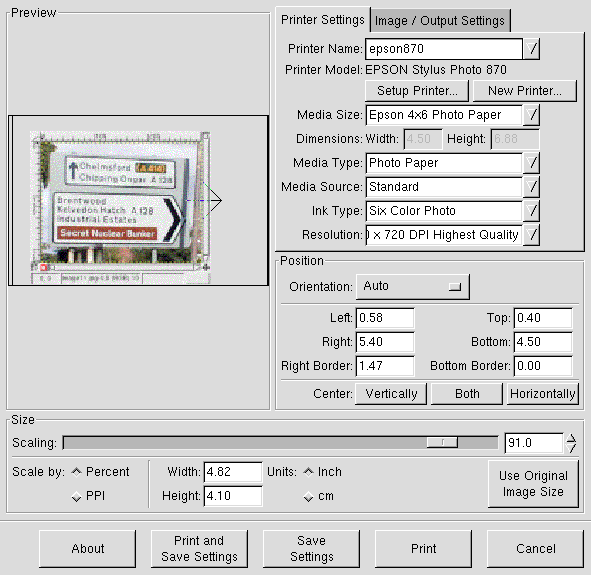
Printer Settings
Printer
Click on the Printer Settings tab near the top right hand corner of the window (see Figure 2-3). Then, click on the downward facing arrow to the right of the Printer combo box to see a list of the system printer queues. Select the queue to which you would like the printed image to be sent. One may also print the image directly to a file by selecting File. In this event, the user will be prompted for the filename when either the Print button or the Print and Save Settings button is clicked.
When either the Print and Save Settings button or the Save Settings button is clicked, the settings are saved in a file called ~/.gimp-1.2/printrc. The user is cautioned about hand editing this file since it is generated by Gutenprint (although it was the only way that the author found for removing bogus entries created while playing with the New Printer button).
Setup Printer
Before any useful printing can occur, the user needs to associate the named printer with the actual make and model of the printer. Click the Setup Printer button in the Printer section of the window (the upper right, and just below the Printer display box). When this is done, the following window appears:

Scroll through the Printer Model section of the window until you find a printer which matches yours. If you cannot find the precise model, pick something close and hope for the best. There are selections for a wide array of Postscript, inkjet, and laser printers. After you have selected a printer, you will see the printer command displayed.
The Gutenprint software does all of the necessary conversion of the image to be printed into the language of your printer. It is unnecessary and undesirable for any other sofware to manipulate this data. (This is why the command contains the "-l" switch or the "-o raw" switch). Please use care if you feel the need to edit this command. Once you are satisfied with your selection, click the OK button.
New Printer
In the previous sections, the user selected an existing printer queue and associated a particular type of printer to that queue. For most cases, this is probably all that is required. However, some situations might require more detailed control over the handling of the printer data.
Click the New Printer button to tell the software that you wish to create a new name. In this case, the new name may actually be an existing printer with different settings that you wish to save, or it may simply be a name associated with a particular command for handling the printer data. A window will appear thus:
Type a name into the window and click OK (or Cancel if you wish not to do this). Notice that the new name now appears as the selected Printer. As you change settings in the rest of the Gimp-Print GUI, they will be associated with this printer name. When the settings are saved, they can be recovered easily by simply selecting this named printer from the Printer combo box.
One example where this feature might be used is as follows. The author frequently prints photos on Epson 4x6 photo paper. Note that this paper is physically larger than 4x6 and it has perforations on all four sides. The author dislikes printing part of the image on the perforated parts of the paper which will be removed after printing the photo. By selecting the proper scaling percentage, printing can be constrained to the 4x6 part of the paper which will remain after the perforated sections are removed. The author has saved this setting using this feature of the Gutenprint software.
Media Size
The term media refers to paper, card stock, envelopes, or whatever you have put into your printer onto which something will be printed. Click the arrow to the right of the Media Size box to see a long list of different sizes of media. Choose the size that matches the media which you have loaded into your printer. Once you have made your choice, the drop down menu will disappear, and your choice will be shown in the Media Size box. The available paper sizes will vary depending upon the printer model you have selected.
Some printers support arbitrary (within limits!) paper sizes. These printers will let you select Custom or Roll paper sizes. When you select such a printer, one or both of the Dimensions boxes will let you enter your paper size (in inches or centimetres). The boxes will not let you enter sizes that your printer cannot handle.
Media Type
The type of media onto which your image will be printed should be selected here. Click on the arrow to the right of the Media Type box to see a long list of the different types of media onto which you may print your image. Media types include such things as plain paper, postcards, photo quality paper, transparencies, and more! Once you have made your choice, the drop down menu will disappear, and your choice will be shown in the Media Type box. The choices available will vary depending upon the printer model you have selected.
Media Source
The Media Source box allows the user to choose the paper source, sometimes called Input Slot, that the paper will be fed from. Many printers only have one available input source (such as the standard paper tray), in which case this entry will be grayed out. If your printer does support multiple input sources, you may specify the source of your choice here. Some Epson printers offer a roll feed option in addition to the standard paper tray, and many HP LaserJet printers have multiple paper trays.
Ink Type
Some printers offer a choice of different types of ink or ink cartridges. Many Canon and Lexmark printers support various combinations of cartridges, such as black only, black and color, photo color, and so forth. Most Epson printers let you choose between three and four color printing (three color uses only color ink, while four color uses black ink as well). Epson printers that support six color photo printing allow you to choose five and six color printing as well.
Resolution
Click on the arrow to the right of the Resolution box to see a long list of resolutions at which you can print your image. The list is written with the lowest resolution at the top, with increasing resolution (and generally improved printing quality) as you approach the bottom of the list. Different printers support different resolution options, and many printers support different quality choices using the same basic resolution. In this menu are a few terms which may be unfamiliar to you, and they will now be explained.
DPI
DPI is an acronym which stands for Dots Per Inch. This term refers to the number of dots that your printer will print in a space of one inch (approximately 2.54 cm). This is highly dependent upon the capability of your printer. Resolutions below 300 DPI are used for draft quality. For general purpose printing, select 300 - 360 DPI. Higher quality printing can be achieved by selecting 600 - 720 DPI. Settings higher than this are used for the highest possible quality for printing photographs and other high quality graphics. Experiment with your printer and these settings with different types of graphics and photographs to see what results you can obtain with your printer. High resolutions (large numbers of dots per inch) require substantial image processing time, and the print files can be very large; it's not uncommon for a full page, 1440x720 DPI image to require 100 MB of temporary storage!
Draft or Fast Economy Draft
When this text appears next to the resolution, it refers to the fact that the quality will be relatively low, but suitable for rough drafts. Draft quality is higher than fast economy draft. These options will give you the fastest printing speed. Economy Draft uses less ink, and as a result the image will be pale. These modes are generally not very useful for printing photographs.
Unidirectional
When printing an image, you have probably noticed the print head inside the printer moving back and forth across the print media. Many printers are capable of putting ink on the page regardless of which direction the print head is moving. However, quality can sometimes be improved by only putting ink on the page when the printer head is moving in one direction. The Unidirectional setting instructs the software to only place ink on the page when the print head is moving one way. When the print head returns, it will not place ink on the page. On many printers, the print quality is better, at the expense of printing speed.
High(est) Quality
With lower quality print modes, one may see an effect where the printed image looks like it has rows of stripes with a small separation between the stripes. This effect is called "banding" and is undesirable. In the high and highest quality modes, the printer will make more passes over the same part of the page in order to improve quality and (reduce or) eliminate banding. This requires more temporary disk space and prints more slowly, but does not require significantly more processing time.
DMT
DMT is an acronym which stands for Dot Modulation Technology. This term refers to a print mode used by certain Canon printers to improve the quality of the printed output. Unfortunately, at this time, all of the available DMT modes do not work correctly. The cases which do work correctly will offer significantly improved printing quality.
Preview
Notice in the upper left of the window is a preview of your image. This preview is a representation of where your picture will print on the selected media, and approximately what it will look like. This preview will be updated as you modify selections in the Position, Size, Media Size, and Output Type portions of the window. You may also select the image with your mouse and move it manually if you wish. In doing so, you will note that the Position settings are updated accordingly. Take note of the arrow, which points toward the top of the media, where top is the first part of the media to enter the printer.
The preview may be moved around the page as follows:
Clicking and dragging the left (primary) mouse button moves the image around the page as you would expect; the image moves with the mouse.
Clicking and dragging the middle mouse button moves the image around the page in a finer fashion, such that each pixel of mouse movement moves the image by one point (1/72 inch). This allows very fine placement of the image on the page.
Clicking and dragging the right (secondary) mouse button moves the image around the page much the same as with the left button, but the image will only move in units of the image size. Thus, if the image is one inch wide and two inches tall, the image will not move at all until you have moved the mouse far enough so that the image would be moved one inch vertically and two inches horizontally. This is handy if you wish to print multiple images of the same size on one piece of paper.
If you hold down the shift key on the keyboard when you click and drag the mouse, the image will only move in the horizontal or vertical direction (depending upon which way you first move the mouse). This allows you to constrain motion to the horizontal or vertical.
If you click another button while dragging the mouse, the image will immediately return to the position it was in before you clicked the mouse the first time. This allows you to not move the image if you have started moving it and have decided that you don't want to move it. The preview will not respond to the mouse until you release all of the mouse buttons and click and drag afresh.
Position
Orientation
The Orientation menu allows the user to choose the orientation of the paper. The menu selections are Auto, Portrait, Landscape, Upside down, and Seascape. Click on the rectangular tab to see these choices and make your selection. When you have done so, the pulldown menu will have disappeared, and your choice will appear. Also, note that the preview image will have changed accordingly.
When set to Auto, the software will make an intelligent choice of orientation based on the dimensions of the image to be printed. Portrait orients the print media with the longest edge going from top to bottom, while Landscape orients the paper with the longest edge going from side to side. Upside down and Seascape orient the paper the same as Portrait and Landscape respectively, with the difference being that the image is rotated 180 degrees.
Automatic Centering
There are three buttons that deal with centering an image. The leftmost button is the Vertically button, the middle button is the Both button, and the rightmost button is the Horizontally button. Use the Both button to center your image both horizontally and vertically. This will cause the top and bottom borders to be equal, and the left and right borders to be equal. If you have placed your image manually by using the mouse button, then you may center the image in the horizontal direction only by clicking on the Horizontally button. Likewise, to adjust the image only in the vertical direction, click on the Vertically button. Note that in each case, the image is centered with regard to the edges of the media, and without regard to the printable portion of the media. Many printers are incapable of printing to each edge of the media. Some media may have edges which detach. Consult your printer documentation for more details regarding your printer's capabilities in this regard.
Manual Settings
You will notice that there are six boxes that contain numbers just below the Orientation menu and just above the GUI buttons related to centering an image. When you move the preview image manually with the mouse, or when you click on one of the centering buttons, the preview image moves and these six boxes get updated.
Left
The number appearing in the Left box denotes the number of units (cm or inches) that the left side of the image will be printed away from the left edge of the media. You may select the units by clicking the Inch or cm buttons in the Units section just below these GUI boxes.
Right
The number appearing in the Right box denotes the number of units (cm or inches) that the right side of the image will be printed away from the left edge of the media. You may select the units by clicking the Inch or cm buttons in the Units section just below these GUI boxes.
Right Border
The number appearing in the Right Border box denotes the number of units (cm or inches) that the right side of the image will be printed away from the right edge of the media. You may select the units by clicking the Inch or cm buttons in the Units section just below these GUI boxes.
Top
The number appearing in the Top box denotes the number of units (cm or inches) that the top side of the image will be printed away from the top edge of the media. You may select the units by clicking the Inch or cm buttons in the Units section just below these GUI boxes.
Bottom
The number appearing in the Bottom box denotes the number of units (cm or inches) that the bottom side of the image will be printed away from the top edge of the media. You may select the units by clicking the Inch or cm buttons in the Units section just below these GUI boxes.
Bottom Border
The number appearing in the Bottom Border box denotes the number of units (cm or inches) that the bottom side of the image will be printed away from the bottom edge of the media. You may select the units by clicking the Inch or cm buttons in the Units section just below these GUI boxes.
Size
Slider Bar and Spin Box
The slider bar can be moved as desired by the user. Notice that while sliding this bar, the preview image changes accordingly. One will also note that several boxes in the Gimp-Print GUI change values when this bar is moved. These boxes are the six position boxes (left, right, right border, top, bottom, bottom border), the two size boxes (width and height), and the spin box to the right of the slider bar.
This slider bar is used to scale the image to a desirable size, but the same effect can be obtained by either clicking an arrow on the spin box to the right of this slider bar, or by manually typing a number into this spin box. Notice that by setting the spin box in this way, the slider bar is also moved. All of the described methods will cause the image to be scaled accordingly.
Scale by Percent or PPI
One may choose to scale the image by a percentage, or by PPI, which means "pixels per inch". Click the radio button next to the word to set the desired scaling factor.
When scaling by a percentage, the number reflected in the spin box next to the slider bar represents the percentage relative to the full size of the selected print medium. For example, with this spin box set to 50, the image will be scaled to 50% of the size of the print medium. When set to 100, the image will attempt to fill the print medium, within the constraints of maintaining the proper aspect ratio and the margins of the selected print medium. This effect can be seen in the preview window.
When scaling by PPI, the number reflected in the spin box next to the slider bar represents the number of pixels that will be printed per inch. For example, if the user is printing a 640x480 image at a size of 6.4x4.8 inches (as measured by the size boxes), the image will be printed at 100 DPI.
Use Original Image Size
By clicking this button, the image will be scaled to as close to the native size of the image as possible. This effect can immediately be seen in the preview image.
The native image size may be found or set in the GIMP by selecting Image/Scale Image in the GIMP. Under the Print Size and Display Unit group in the Scale Image dialog, you can determine (or change) the width and height of the image, or choose the resolution.
Width and Height
These boxes show the size of the printed image in either inches or centimeters (depending on which unit is selected). The user may choose to manually modify these values. When one value is modified, the other value is automatically modified in order to maintain the aspect ratio (the ratio of width to height). This effect can be immediately seen in the preview image.
Units
The units can be set to inches or centimeters by clicking the appropriate radio button next to the desired unit. This setting effects the values printed in the six position boxes (left, right, right border, top, bottom, bottom border) and the two size boxes (width and height).
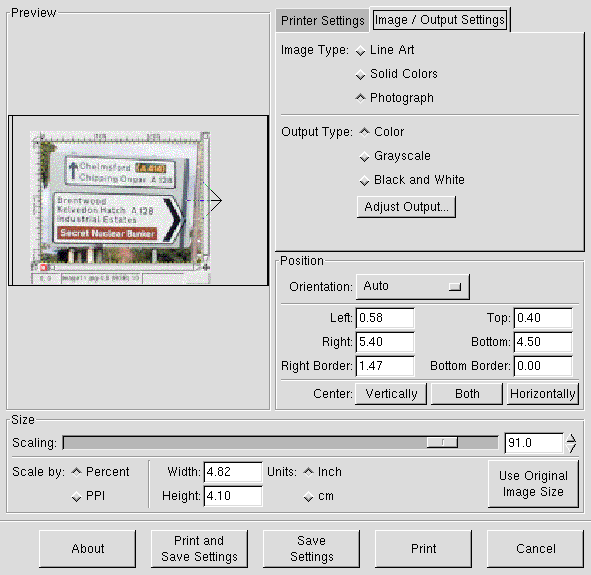
Image/Output Settings
By clicking on the tab labeled Image/Output Settings, the Gimp-Print window will appear as shown in Figure 2-4. Notice that there are two sections to this portion of the window, namely, Image Type and Output Type.
Image Type
Line Art
This setting tells the printer driver to generate color quickly. The color is bold and bright, but color accuracy is not very good. There may also be some unexpectedly sharp transitions in colors. This mode is acceptable for printing text with small amounts of color, and may be acceptable for presentation graphics.
Solid Colors
This mode produces color which is considerably more accurate than the Line Art mode, but with a reduction in performance. In general, hues will be accurate but tonalities may not be accurate. There should be no sharp transitions in colors. This mode is good for printing presentation graphics in most cases.
Photograph
This mode produces the most accurate colors and tonalities at a greater cost in performance. This is the mode to use when printing high quality photographs or other high quality images.
Output Type
The user is given the choice of color, black and white, and grayscale. Color is selected when the desired output is to be in color. Greyscale will result in the printed image having various shades of grey. Black and white is just that. The effect of this setting can be seen in the preview window.
Adjust Output
Clicking on this button causes the Print Color Adjust window to appear (see Figure 2-7). In this window, one will see a representation of the image to be printed as well as several slider bars. These slider bars collectively adjust many different aspects of the image. The values can also be adjusted by clicking the arrows or by typing a value into the appropriate spin box on the right side of each slider bar.

Brightness
Adjust the brightness of the image. A setting of 0.0 gives a fully black image, while a 2.0 setting gives a fully white image. Values greater than 1.0 will result in black not being solid and highlights turning white; values less than 1.0 will result in white not being perfectly clear and shadows turning black.
Contrast
Adjust the contrast of the image. A setting of 0.0 gives a solid gray for the entire image, the exact gray depending upon the brightness chosen.
Cyan, Magenta, Yellow
These three options allow specification of the cyan, magenta, and yellow levels independently, for rebalancing the levels. Normally, these should be adjusted to yield neutral gray, but they can be used for other effects.
Saturation
Adjust the brilliance of colors. A setting of 0.0 results in pure grayscale. A saturation setting of less than 1.0 results in more muted colors. A saturation setting of greater than 1.0 results in more vibrant colors. Very high saturation often results in very strange effects, including posterization and banding that might not be expected. For normal purposes, the saturation should generally be set to a value less than 1.5.
Density
Adjust the amount of ink deposited on the paper. If you have chosen the correct paper type and are getting ink bleeding through the paper or puddling, try reducing the density to the lowest value you can while still achieving solid black. If black is not solid black, even with the contrast and brightness at 1.0, try increasing the density. Note that changes to this setting will not be visible in the image preview.
All of the supported printers actually need less than 100% ink density in most cases, so the actual density is something other than the nominal density setting. The effective density setting cannot go above 100%, so if a value specified will result in an excessively high density level, it will be silently limited to a setting of 1.0.
Gamma
Adjust the gamma of the image, over and above the printer-specific correction. Gamma less than 1.0 will result in a darker image; gamma greater than 1.0 will result in a lighter image. Unlike brightness, gamma adjustment does not change the endpoints; it merely changes the shape of the input->output curve.
Dither Algorithm
The recommended dither algorithm is Adaptive Hybrid (which is the default) for text or other fine black detail, or if this is mixed with continuous tone images. The Ordered dithering algorithm is just as good (and somewhat faster) for pure continuous-tone images and photographs, but may yield poor results with text or other fine detail, particularly at high printing resolutions.
The Fast algorithm gives the fastest results at the expense of color accuracy. It is a simplified ordered dither. On simple four color printers (or other printers used in four color mode), the quality is similar to Ordered, although dark gray rendition is not as good due to a simpler transfer between black and colored ink. With six-color printers, color rendition is somewhat worse, but it should be quite usable in cases where optimum quality is not critical. In black and white, it is an efficient way to render grayscale, but it may not give best results when used with variable dot size printers (modern Epson printers, or Canon printers using DMT). On rare three color printers (CMY only) the results should be identical to ordered dither.
Very Fast is even faster than Fast, with even more loss of quality. Color and grayscale output will show strong patterning that resembles screening, although it isn't. On laser printers, and possibly on certain kinds of text and line art, Very Fast dithering may actually yield the best quality.
Error diffusion algorithms (Hybrid Floyd-Steinberg is such an algorithm) perform very well at high densities, and are capable of rendering very fine detail rather well, but they tend to exhibit artifacts in the form of "waves" or "worms" of dots which results in noticeable texturing in pale areas. Furthermore, pale areas immediately adjacent to white take a while to "build up" sufficient error to print at all. This is sometimes called "tearing" or "waterfalling".
Set Defaults and Close
When the Set Defaults button is clicked, the slider bar settings will return to their default values. The dither algorithm setting is uneffected. The Print Color Adjust window will close when the Close button is clicked.
Printing and Saving Settings
At the bottom of the Gimp-Print window, there are five buttons labeled About, Print and Save Settings, Save Settings, Print, and Cancel. The About button will show information about the Gutenprint software, such as the version number, authors names, project web site, and software licensing. After clicking on the About, read the information, and then close the window by pressing the OK button.
The Print and Save Settings button will save the current settings and then print the desired image. Recall that these settings are saved in ~/.gimp-1.2/printrc. The Save Settings button will only save the settings. The Print button will print the image only. The Cancel will close the Gimp-Print GUI window.