Contents
Previous Next
Connecting an Application on the Host to a Virtual Machine
You can set up the virtual serial port in a virtual machine to connect to an application on the host computer. This is useful, for example, if you want to use an application on the host to capture debugging information sent from the virtual machine's serial port.
To install a direct serial connection between an application on the host and a virtual machine, take the following steps with the virtual machine powered off. You can add the device from the console or from the management interface.
Connecting to an Application from the Console
1. Open the virtual machine settings editor (VM > Settings).
2. Click Add to start the Add Hardware Wizard.
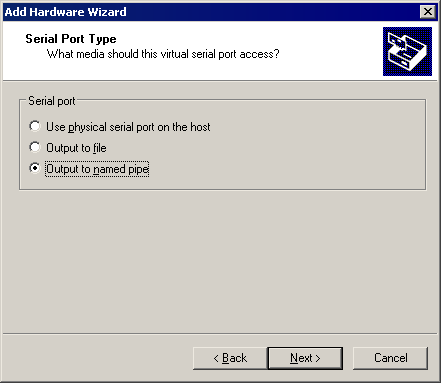
3. Select Serial Port, then click Next. The Serial Port Type screen appears.
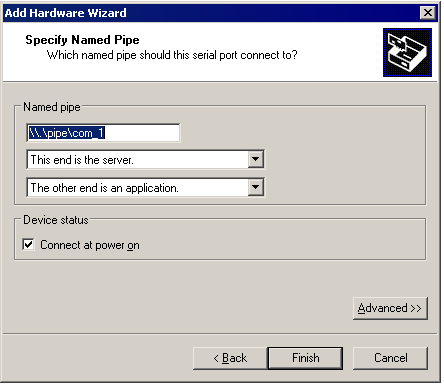
4. Select Output to named pipe, then click Next. The Specify Named Pipe screen appears.
5. Use the default pipe name, or enter another pipe name of your choice.
For a serial pipe on a Windows host, the pipe name must follow the form \\.\pipe\<namedpipe> — that is, it must begin with \\.\pipe\.
For a serial pipe on a Linux host, enter /tmp/<socket> or another Unix socket name of your choice.
Note: If you are using a Windows console to connect to a virtual machine on a remote Linux host, be sure to specify a Linux pipe name here, such as /tmp/<pipe>. If you are using a Linux console to connect to a virtual machine on a remote Windows host, be sure to specify a Windows pipe name here, such as \\.\pipe\<namedpipe>.
6. Select This end is the server or This end is the client. In general, select This end is the server if you plan to start this end of the connection first.
7. Select The other end is an application.
8. The default device status setting is Connect at power on. You may deselect this setting if you wish.
Click
Advanced if you want to configure this serial port to use polled mode. This option is of interest primarily to developers who are using debugging tools that communicate over a serial connection. For more information, see
Special Configuration Options for Advanced Users.
9. Click Finish, then click OK to save your configuration and close the virtual machine settings editor.
10. On your host computer, configure the application that communicates with the virtual machine to use the same pipe or Unix socket name.
Connecting to an Application from the Management Interface
1. On the Hardware page, click Add Device. The Add Device Wizard starts.
2. Click Serial Port. The Serial Port page appears.
3. To connect this virtual machine to the device when the virtual machine is powered on, check Connect at Power On.
4. Connect to a named pipe on the host. In the Device list, select Named Pipe.
5. Enter the location of the file in the Location field.
For a serial pipe on a Windows host, the pipe name must follow the form \\.\pipe\<namedpipe> — that is, it must begin with \\.\pipe\.
For a serial pipe on a Linux host, enter /tmp/<socket> or another Unix socket name of your choice.
Note: If you are using a Windows console to connect to a virtual machine on a remote Linux host, be sure to specify a Linux pipe name here, such as /tmp/<pipe>. If you are using a Linux console to connect to a virtual machine on a remote Windows host, be sure to specify a Windows pipe name here, such as \\.\pipe\<namedpipe>.
6. Select This end is the server or This end is the client. In general, select This end is the server if you plan to start this end of the connection first.
7. Select The other end is an application.
8. Check
Yield CPU on Poll if you want to configure this device to use polled mode. This option is of interest primarily to developers who are using debugging tools that communicate over a serial connection. For more information, see
Special Configuration Options for Advanced Users.
9. Click OK to add the device.