Contents
Previous Next
Adding and Modifying Virtual Network Adapters
You can add new or configure existing virtual network adapters from the VMware Virtual Machine Console and from the VMware Management Interface. If VirtualCenter manages the virtual machines on your GSX Server host, use the management interface to add a new or configure an existing virtual network adapter.
The settings you can configure include the virtual network device to which the virtual machine is bound and the network driver it uses.
When choosing the network driver for a virtual network adapter, you can choose between the vlance driver, which installs automatically, and the vmxnet driver, which provides better network performance. The difference in network performance is most noticeable if the virtual machine is connected to a Gigabit Ethernet card.
Adding and Configuring a Virtual Network Adapter from the Console
To add a new virtual network adapter to a virtual machine, make sure the virtual machine is powered off, then complete the following steps.
1. Open the virtual machine settings editor. Choose VM > Settings.
2. Click Add.
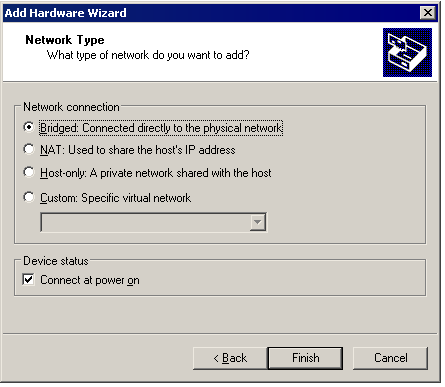
3. The Add Hardware Wizard starts. Select Ethernet Adapter. Click Next. The Network Type screen appears.
4. Specify the type of networking this virtual NIC uses. Select Bridged, NAT, Host-only, Custom or Named.
If you select Custom, choose the VMnet virtual network you want to use for the network from the drop-down list.
Note: Although VMnet0, VMnet1 and VMnet8 are available in this list, they are normally used for bridged, host-only and NAT configurations, respectively. Special steps are required to make them available for use in custom configurations. You should choose one of the other switches.
Note: If the virtual machine is managed by VirtualCenter, select Named and choose a network from the list.
5. Click Finish. The new adapter is added.
6. Click OK to save your configuration and close the virtual machine settings editor.
To change the configuration of an existing virtual network adapter, follow these steps.
1. Open the virtual machine settings editor. Choose VM > Settings.
2. Select the adapter you want to modify.
3. Specify the type of networking this virtual NIC uses. Select Bridged, NAT, Host-only, Custom or Named.
If you select Custom, choose the VMnet virtual network you want to use for the network from the drop-down list.
Note: If the virtual machine is managed by VirtualCenter, select Named and choose a network from the list.
4. Click OK to save your changes and close the virtual machine settings editor.
5. Be sure the guest operating system is configured to use an appropriate IP address on the new network. If the guest is using DHCP, release and renew the lease. If the IP address is set statically, be sure the guest has an address on the correct virtual network.
Adding and Configuring a Virtual Network Adapter from the Management Interface
To add a new virtual network adapter to a virtual machine, make sure the virtual machine is powered off, then complete the following steps.
1. On the Hardware page, click Add Device. The Add Device Wizard starts.
2. Click Network Adapter. The Network Adapter page appears.
3. To connect the virtual NIC when the virtual machine is powered on, check Connect at Power On.
4. In the Virtual Device list, select the network driver you want the virtual machine to use. Choose either the vlance or vmxnet driver.
5. Specify the type of networking this virtual NIC uses. Select Bridged, NAT, Host-only, Custom or Named.
If you selected a custom network, select the specific virtual network from the list.
Note: If the virtual machine is managed by VirtualCenter, select Named and choose a network from the list.
6. Click OK to add the network adapter.
To change the configuration of an existing virtual network adapter, complete the following steps.
1. In the Hardware page, under Network Adapter, click Edit. The Network Adapter page appears.
2. To connect the virtual network adapter when the virtual machine is powered on, check Connect at Power On.
3. In the Virtual Device list, select the network driver you want the virtual machine to use. Choose either the vlance or vmxnet driver.
4. Specify the type of networking this virtual NIC uses. Select Bridged, NAT, Host-only, Custom or Named.
If you selected a custom network, select the specific virtual network from the list.
Note: If the virtual machine is managed by VirtualCenter, select Named and choose a network from the list.
5. Click OK to save your changes and close the window.