Contents
Previous Next
Configuring Bridged Networking Options on a Windows Host
You can view and change the settings for bridged networking on your host. These changes affect all virtual machines using bridged networking on the host.
You can decide which network adapters on your host to use for bridged networking. You can map specific network adapters to specific virtual networks (VMnets).
1. Launch a VMware Virtual Machine Console.
2. Choose Host > Virtual Network Settings.
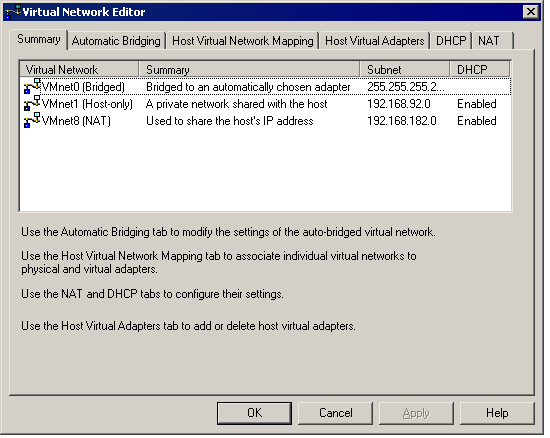
The Virtual Network Editor appears, with the Summary tab active.
3. By default, the VMnet0 virtual network is set up in bridged mode and bridges to one of the active Ethernet adapters on the host computer.
The choice of which adapter it uses is arbitrary. It is a good idea to let GSX Server choose an available physical network adapter for bridging, as it provides fault tolerance. If a network adapter becomes unavailable (for example, if it is unplugged or removed from the host), the network bridge automatically switches to another network adapter on the host.
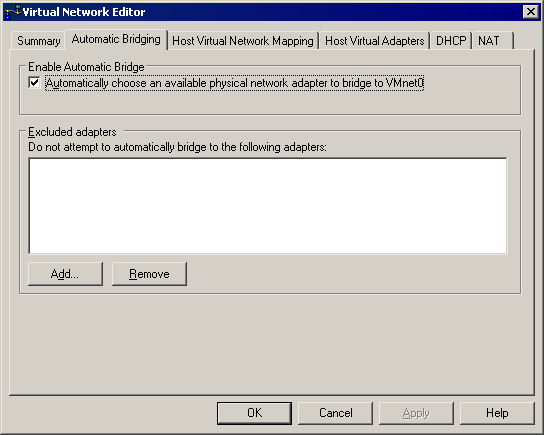
You can restrict the range of choices using options on the Automatic Bridging tab.
(Also shown are VMnet1, the default virtual network for host-only networking, and VMnet8, the default virtual network for NAT, if they are enabled in GSX Server.)
4. To exclude one or more physical Ethernet adapters from the list to which VMnet0 may be bridged, click the Automatic Bridging tab.
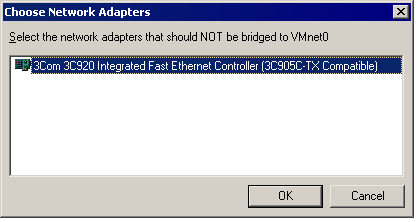
To exclude an Ethernet adapter, click Add to add it to the list of excluded devices.
In the Choose Network Adapters dialog box, select the listing for the adapter you want to exclude, then click OK.
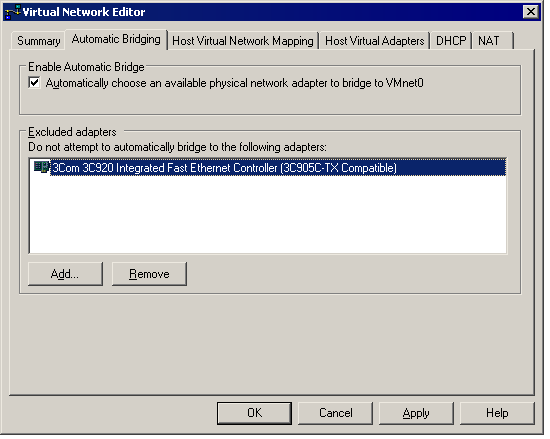
To remove an adapter from the list of excluded adapters, select its name in the list, then click Remove.
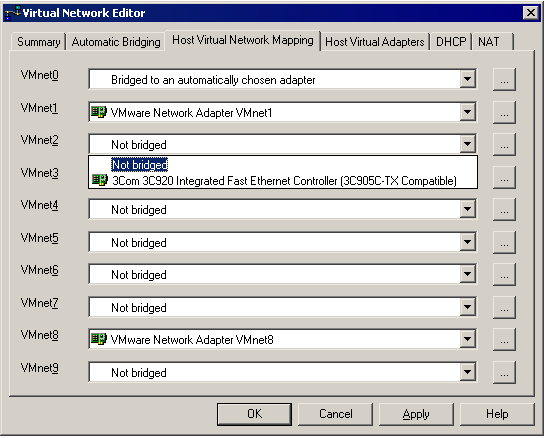
5. To designate a physical Ethernet adapter to be used for bridged networking on virtual switches named VMnet2-VMnet7, click the Host Virtual Network Mapping tab.
Choose an adapter from the drop-down list beside the name of the virtual switch you want to use.
If you are using teamed network adapters on your host, you can choose the teamed NIC for VMnet0.
Caution: Be careful when you change the bridged adapter mappings. If you re-assign a physical Ethernet adapter to a different virtual network, any virtual machine using the original network loses its network connectivity via that network. You must then change the setting for each affected virtual machine's network adapter individually. This can be especially troublesome if your host has only one physical Ethernet adapter and you reassign it to a VMnet other than VMnet0; even though the VMnet still appears to be bridged to an automatically chosen adapter, the only adapter it can use has been assigned to another VMnet.
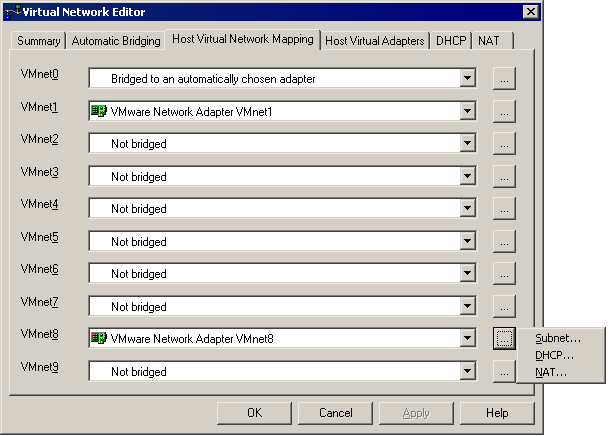
6. To make changes to the subnet or the DHCP settings for a virtual network, click the button on the right that corresponds to the virtual network you want to configure, then choose Subnet or DHCP.
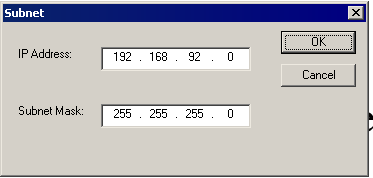
Changing the Subnet
In the Subnet dialog box, you can change the subnet's IP address and the subnet mask.
The address should specify a valid network address that is suitable for use with the subnet mask.
The default subnet mask is 255.255.255.0 (a class-C network). Typically, this means you should modify only the third number in the IP address — for example, x in 192.168.x.0 or 172.16.x.0. In general, you should not change the subnet mask. Certain virtual network services may not work as well with a customized subnet mask.
When you modify the network address or subnet mask, GSX Server automatically updates the IP address settings for other components — such as DHCP, NAT and host virtual adapter — on that virtual network to reflect the new settings. The specific settings that are automatically updated include DHCP lease range, DHCP server address, NAT gateway address and host virtual adapter IP address. However, if you have changed any of these settings from its default value — even if you have later changed the setting back to the default — GSX Server does not update that setting automatically. It presumes that custom settings are not to be modified.
Changing DHCP Settings
In the DHCP settings dialog box, you can change the range of IP addresses provided by the DHCP server on a particular virtual network. You can also set the duration of leases provided to clients on the virtual network.
7. When you have made all the changes you want to make on all tabs of the VMware Network Editor, click OK.