


This chapter describes how to perform system management tasks related to DiskSuite.
Use the following to proceed directly to the section that provides step-by-step instructions for using DiskSuite Tool.
Use the following to proceed directly to the section that provides step-by-step instructions for using the command line interface.
| How to Configure DiskSuite SNMP Support (Command Line) |
| How to Enable DiskSuite to Launch Storage Manager (Command Line) |
The tasks associated with managing systems running DiskSuite include:
For general information on DiskSuite, see Solstice DiskSuite 4.1 Reference.
Here are the prerequisites for the steps in this chapter:
To work with "local" metadevices (metadevices not in a diskset configuration), type:
---------------

# metatool &

---------------
To work with metadevices in a diskset, make sure you are the diskset owner and type:
---------------------------------

# metatool -s diskset_name &

---------------------------------
This section explains how to:
DiskSuite Tool's Disk View window presents a graphical view of the SPARCstorage Array. When you display the Disk View window, the icon for a SPARCstorage Array controller resembles a fibre channel icon, both on the Disk View canvas and in the Controllers window.
Each tray within the SPARCstorage Array is represented by an "etched-in" frame, with a title showing the tray number. Differences between the SPARCstorage Array 100 and 200 are:
Figure 6-1 shows how the SPARCstorage Array 100 appears in the Disk View window.

Figure 6-1 SPARCstorage Array 100
If one or both of the busses on the tray has no disks, the bus is "stubbed-out" by showing an empty frame. If one or more of the trays have no disks, DiskSuite Tool does not stub-out the tray(s).
If one or more of the trays have no disks, DiskSuite Tool does not stub-out the tray(s).
Figure 6-2 shows how the SPARCstorage Array 200 appears in the Disk View window.
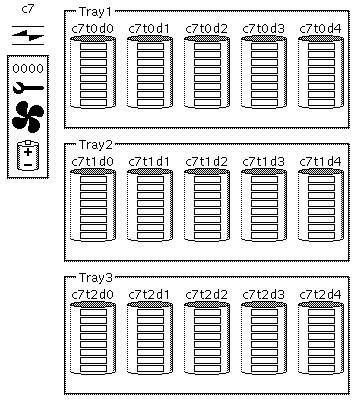
Figure 6-2 SPARCstorage Array 200
You can also use the Disk View window to display the SPARCstorage Array's unique 12-digit identification number, known as the World Wide Name. The last four digits appear just below the controller icon on the canvas (and on the LCD panel on the SPARCstorage Array itself). You can see the entire number by displaying a controller's Information window.
The Disk View window enables you to check at a glance the status of SPARCstorage Array components, including the battery and fan, and to see if a disk is spun up or down.
This task explains how to select objects in the Disk View window. The selection model is hierarchical: selecting an object selects not only the object, but all of its child objects as well.
For SPARCstorage Arrays:
For non-SPARCstorage Array configurations:
Use this task to view the status of SPARCstorage Array disks (spun up or down).
If necessary, display the desired controllers that contain the disks by selecting them from the Controllers window.
Note - You can use DiskSuite Tool to spin down non-SPARCstorage Array disks. However, the Disk View window shows a spun up or spun down status only for SPARCstorage Array disks. Also, any I/O performed on a non-SPARCstorage Array disk that is spun down automatically spins up the disk.
To spin up SPARCstorage Array disks that have been spun down, refer to "How to Start a Disk (DiskSuite Tool)."
DiskSuite Tool indicates the status for a SPARCstorage Array controller's fans and battery with the same icons that appear on the SPARCstorage Array LCD screen:
Note - The Disk View window also shows problems on non-SPARCstorage Array disks. If a wrench icon appears beneath one of these disks, there is a disk problem.
Figure 6-3 shows a controller that has the wrench and battery icons displayed.
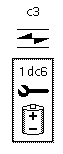
Figure 6-3 SPARCstorage Array Wrench and Battery Icons
Note - One or more failures can occur simultaneously. In this case, multiple icons can appear. The Controller Information window will also contain information on the failures, as will the Problem Log.
For information on resolving problems with SPARCstorage Arrays, refer to the Chapter 7, "Troubleshooting the System."
The last four digits of the World Wide Name appear below each SPARCstorage Array controller.
The entire World Wide Name appears in the Info window as the Serial Number.
This section explains how to use DiskSuite Tool to:
DiskSuite Tool provides an integrated solution for working with SPARCstorage Arrays, enabling you to view the physical layout of the SPARCstorage Array hardware, and to perform various administrative tasks. You must use the DiskSuite Tool Disk View window to perform these tasks; DiskSuite does not provide equivalent command line utilities. To administer a SPARCstorage Array from the command line, use the ssaadm(1M) command.
Caution -

Be sure that no I/O is active on metadevices defined that exist on disks within a SPARCstorage Array. In particular, ensure that ownership of any diskset metadevices has been released since an implicit I/O stream exists while ownership of a diskset is maintained.
The Disk View window appears.
This procedure enables fast writes for synchronous writes only. To enable fast writes for "all" writes, use the previous procedure.
Be sure that no I/O is active on metadevices that exist on disks within a SPARCstorage Array. In particular, ensure that ownership of any diskset metadevices has been released since an implicit I/O stream exists while ownership of a diskset is maintained.
The Disk View window appears.
The Disk View window appears.
This task flushes out all outstanding writes for the selected controller (and all disks), tray (and all disks in that tray), or individual disk(s), from the NVRAM to disk.
The Disk View window appears.
Use this task only if you can no longer access the SPARCstorage Array, such as when a drive has failed. If you can access drives in the SPARCstorage Array, refer to "How to Flush Outstanding Writes From NVRAM (DiskSuite Tool)." Purging fast write data gets rid of any outstanding writes.
The Disk View window appears.
Note - This functionality is currently available only for SPARC systems using SPARCstorage Array disks.
The Disk View window appears.
There is no visual indication that the disk has been reserved. However, if DiskSuite Tool is run on a host other than the host issuing the reserve command, a status of "Reserved" is shown for those disks in the Information window, and a "lock" icon appears in the Disk View canvas.
The Disk View window appears.

Because SPARCstorage Array disks are in trays, to stop one disk you should stop all disks in the tray to ensure proper shutdown. This involves:
Note - Stopping the disk also causes a sync_cache to flush outstanding writes in NVRAM.
In the Disk View window, display the controller. Display the controller's Info window and select Device Mappings to view which objects (metadevices, hot spares, state database replicas) might be using the physical device(s).
For example, unmount any file systems associated with the disk, or stop all I/O to a database using the disk.
For a SPARCstorage Array, a down arrow appears beneath each disk that is stopped, indicating that the disk is spun down. If you stop a SCSI disk, no down arrow appears.
The Disk View window appears. SPARCstorage Array disks that are spun down appear on the canvas with a down arrow beneath the disk.
You can also select multiple controllers using Control-click.
For a SPARCstorage Array disk, the down arrow disappears from beneath the disk, indicating it has spun up. There is no indication for a SCSI disk.
This section explains how to:
DiskSuite Tool gives you the capability for simple performance monitoring of metadevices and physical disks. The goal of performance monitoring is to maximize system performance by making small changes while maintaining data availability. Performance monitoring assumes that you are using a given configuration that you cannot easily or often reconfigure.
Performance analysis, on the other hand, aims to maximize system throughput or minimize latency by trying out various configurations until the "best performance" is achieved. Performance analysis assumes that you can set up multiple configurations and collect a different set of data from each configuration. This requires a different methodology and set of tools to cover such tasks as device configuration, file system management, data collection, test load generation, and the like.
The performance monitoring capability within DiskSuite Tool is best suited for the day-to-day operation of DiskSuite in spotting performance problems associated with hot-spots and bottlenecks. This enables you to monitor general performance trends, look for abrupt changes, and compare data collected for different parts of a configuration. For example, while monitoring a RAID5 metadevice, you might notice one column (slice) that shows much more I/O than the other columns. By moving that column to another disk, you are able to better balance the I/O for the entire metadevice.
Use this task to display a device statistic sheet that shows a "snap-shot" for the current values of the statistical variables.
The MetaDB object, hot spare pools, and slices are not able to show statistics.
For reference information on the Device Statistics window, see the online help.
Note - DiskSuite Tool displays a separate Device Statistics window for each disk selected in the Disk View window. Thus, if you select a controller or tray with many disks, you'll see as many separate Device Statistics windows as disks selected.
Use this task to display instantaneous statistical information in the form of a graph for a device.
The Statistics Graphs window will display statistics and a blank area for the graph of the object. The MetaDB object, hot spare pools, and slices are not able to graph statistics.
The Statistics Graphs window contains two "y-axis" (two vertical scales) of statistics. Thus, you can graph any two of the types of statistics available:
Ops/sec - The number of disk I/O operations per second, measured in terms of reads, writes, or as a total.
Kbytes/sec - The number of kilobytes of disk I/O, measured in terms of reads, writes, or as a total.
Load - The disk load measured either as the percentage of time busy, or as a wait queue, which represents the average number of transactions waiting for service.
If you do not put away a device, the Statistics Graphs window automatically includes it the next time it is opened.
The Statistics Graphs window will display statistics and a blank area for the graph of the object. The MetaDB object, hot spare pools, and slices are not able to graph statistics.
The Statistics Graphs window clears the device from the list.
DiskSuite and SunNet Manager can be configured for cooperative ease of use. DiskSuite has the capability to forward its driver messages using asynchronous SNMP traps via a daemon that monitors the system console log. Messages, such as failures and errors, can then be detected by a SunNet Manager console. When you receive DiskSuite messages within SunNet Manager, you can launch DiskSuite Tool.
For more information on SunNet Manager, see the Site/SunNet/Domain Manager Administration Guide.
SunNet Manager automatically receives DiskSuite console messages. To enable SunNet Manager to launch DiskSuite Tool, follow these steps:
--------------------------------------------

instance elementCommand (
...
(component.sun-server "DiskSuite Tool..."
"/usr/opt/SUNWmd/sbin/metatool")
...

--------------------------------------------
Add this entry to the "component" category.
The -i option reads the modified elements.schema file and reinitializes the SunNet Manager database.
Use this task to launch DiskSuite Tool from SunNet Manger. This task assumes you have followed the steps in the above task, "How to Enable SunNet Manager to Launch DiskSuite Tool (SunNet Manager)."
DiskSuite Tool is displayed for the selected host.
DiskSuite can send SNMP trap data (alerts) to any network management console capable of receiving SNMP messages. This is accomplished through a separate DiskSuite daemon, mdlogd, that you choose to install. Through a configuration file, you specify the trap variables as well as the kinds of messages to look for.
To use the DiskSuite SNMP daemon, you must install the optional SUNWmdn package. See Solstice DiskSuite 4.1 Installation and Product Notes.
This task assumes you have installed the DiskSuite SNMP package, SUNWmdn.
The steps to configure DiskSuite for SNMP support are:
For more information, refer to the mdlogd(4) man page.
When you reboot the system after installing the SUNWmdn package, the following message appears:
-----------------------------------------------------------------

Starting mdlogd ...
        /etc/opt/SUNWmd/mdlogd.cf: no configuration information
        /usr/opt/SUNWmd/sbin/mdlogd: create failed

-----------------------------------------------------------------
DiskSuite displays this message because you have not yet configured the mdlogd.cf file.
(A postinstall script should have taken care of this when you added the package.)
Most likely you will always use port 162 and protocol udp, as these are the defaults for SNMP traps.
For example, use number 1 for a low priority message, number 2 for medium priority, and 3 for high priority.
------------------------------------------------------------------

##ident "@(#)mdlogd.cf 1.1 96/02/15"
# DiskSuite SNMP Trap configuration file.
...
ENTERPRISE = 1.3.6.1.4.1.42
OBJECTID = 1.3.6.1.4.1.860
#
# SubString	Trap Destination      SNMP Trap #   Specific Trap #
#              (host:port:protocol)   0 < n <= 6       0 < n
"NOTICE: md:"  "spin:162:udp"            6             1
"WARNING: md:" "spin:162:udp"            6             2

------------------------------------------------------------------
This example dispatches SNMP traps for DiskSuite errors written to /dev/console to a host named spin.
Here's what the trap generated by the error message "WARNING: md: d6: /dev/dsk/c3t3d0s7 needs maintenance" would look like when received by a SunNet Manager console:
-----------------------------------------------------------

Wed Feb 21 15:40:41 1996 [ spin ] : Trap:
    sequence=2
    receive-time=Wed Feb 21 15:40:41 1996
    version=0
    community=public
    enterprise=Sun Microsystems
    source-time=00:00:00.00
    trap-type=enterprise specific trap: 2
    1.3.6.1.4.1.860 = Feb 21 15:40:41 1996 spin WARNING:
            md: d6: /dev/dsk/c3t3d0s7 needs maintenance

-----------------------------------------------------------
DiskSuite and Storage Manager can be configured for cooperative ease of use. The Storage Manager application contains two tools, Disk Manager and File System Manager, that enable you to manage a server's disk configurations and file systems. For example, you could create a metadevice in DiskSuite Tool, then drag it to File System Manager to create a UFS file system on the metadevice.
You can configure DiskSuite so that it can launch Storage Manager from the DiskSuite Tool Tools menu.
For more information on Storage Manager, refer to Appendix A, "Using Storage Manager."
This task assumes you have installed the Storage Manager packages. Refer to Solstice DiskSuite 4.1 Installation and Product Notes for more information.
Enabling DiskSuite to launch Storage Manager's tools, involves configuring the /usr/opt/SUNWmd/lib/metatool-toolsmenu file. For more information, refer to the metatool-toolsmenu(4) man page.
The supplied metatool-toolsmenu file has two lines already configured to use File System Manager and Disk Manager. Uncomment (remove the leading # sign) the two lines and save the file.
Here is a sample metatool-toolsmenu file, with two entries that enable File System Manager and Disk Manager to be launched from DiskSuite Tool.
----------------------------------------------------------------------------------

#
# metatool `Tools' menu registry file...
#
# Entries are of the form:
#
# :0:<name:<command:
#
# 0 is a format specifier.  `0' is the only valid specifier for metatool.
#
# <name becomes a menu item1.5 in the Metadevice Editor and DiskView Tools menu
# <command is passed to system() when item is chosen from the menu.
#
# ':' is a field delimiter, one of: `+' `|' `:' `^'
#
# sample entries:
	+0+File System Manager...+/opt/SUNWadm/2.2/bin/stomgr -F+
	:0:Disk Manager...:/opt/SUNWadm/2.2/bin/stomgr -D:
#
#

----------------------------------------------------------------------------------
This task assumes you have configured the metatool-toolsmenu file, as explained in the previous task.
---------------

# metatool &

---------------
DiskSuite Tool's menu options now includes a "Tools" item, with File System Manager and Disk Manager selections.