


This chapter describes how to maintain DiskSuite objects, both with the DiskSuite Tool graphical interface and with the command line utilities.
Use the following to proceed directly to the section that provides step-by-step instructions using DiskSuite Tool.
Use the following to proceed directly to the section that provides step-by-step instructions using the command line interface.
This chapter describes maintenance tasks you may need to perform after creating a DiskSuite object, such as:
For general information on DiskSuite, see Solstice DiskSuite 4.1 Reference. Refer to Chapter 2, "Creating DiskSuite Objects," for information on creating metadevices and hot spare pools.
Here are the prerequisites for the steps in this chapter:
To work with "local" metadevices (metadevices not in a diskset configuration), type:
---------------

# metatool &

---------------
To work with metadevices in a diskset, make sure you are the diskset owner and type:
---------------------------------

# metatool -s diskset_name &

---------------------------------
This section contains the tasks that check the status of DiskSuite objects, including state database replicas, metadevices, hot spares, and disksets. Check an object's status before performing any of the tasks below, which are described later in this chapter:
DiskSuite Tool gives you three ways to check the status of a DiskSuite object:
Two commands, metadb(1M) and metastat(1M), check the status of DiskSuite objects.
-------------------------------------

# metadb [-s setname] [-i]

-------------------------------------
In this command,
----------------------------------------------------------------


-s setname   Specifies the name of the diskset on which the
             metadb command will work.

-i           Displays a legend that describes the status flags.

----------------------------------------------------------------


To check metadevices and hot spare pools, use the metastat(1M)
command.
-------------------------------------------------------

# metastat [-s setname] [-p] [-t] [object]

-------------------------------------------------------
In this command,
---------------------------------------------------------------------


-s setname   Specifies the name of the diskset on which
             metastat will work.

-p           Displays the status in a format similar to that of the
             md.tab file.

-t           Displays the time of the last state change.

object       Is the name of the stripe, concatenation,
             concatenated stripe, mirror, RAID5 metadevice,
             trans metadevice, or hot spare pool. If you omit a
             specific object, the status of all metadevices and hot spare pool
             s is displayed.

---------------------------------------------------------------------
For other ways of checking status, see "Using DiskSuite Tool to Check Status."
Table 3-1 MetaDB Object Status Keywords
| Keyword | Meaning | Action |
|---|---|---|
| OK | The MetaDB object (state database) has no errors and is functioning correctly. | None. |
| Attention | The number of good state database replicas is less than three, or at least one replica is broken.
This status is also displayed if the metadevice state database replicas have been created on fewer than three different controllers. |
Add more replicas, preferably spread across different controllers,
or fix broken replicas. If possible, add another controller and create state database replicas on drives attached to the new controller. See "How to Create Additional State Database Replicas (DiskSuite Tool)" to add more state database replicas. See "How to Enable a State Database Replica (DiskSuite Tool)" to fix broken replicas. |
| Urgent | The number of good state database replicas is less than two, or one or more state database replicas are broken. |
Add more replicas,
preferably spread across different controllers.
See "How to Create Additional State Database Replicas (DiskSuite Tool)" to add more state database replicas. See "How to Enable a State Database Replica (DiskSuite Tool)" to fix broken replicas. |
| Critical | There are no good state database replicas. | Create at least three state database replicas from scratch, before rebooting. Otherwise the system will not boot properly. See "How to Create Initial State Database Replicas From Scratch (DiskSuite Tool)." |
After checking the prerequisites, use the metadb(1M) command with the -i option to view the status of state database replicas. Refer to the metadb(1M) man page for more information.
---------------------------------------------------------------------------

# metadb -i
        flags           first blk       block count
     a        u         16              1034            /dev/dsk/c4t3d0s2
     a        u         16              1034            /dev/dsk/c3t3d0s2
     a        u         16              1034            /dev/dsk/c2t3d0s2
 o - state database replica active prior to last mddb configuration change
 u - state database replica is up to date
 l - locator for this state database replica was read successfully
 c - state database replica's location was in /etc/opt/SUNWmd/mddb.cf
 p - state database replica's location was patched in kernel
 m - state database replica is master, this is state database replica selected as input
 W - state database replica has device write errors
 a - state database replica is active, commits are occurring to this state database replica
 M - state database replica had problem with master blocks
 D - state database replica had problem with data blocks
 F - state database replica had format problems
 S - state database replica is too small to hold current data base
 R - state database replica had device read errors

---------------------------------------------------------------------------
The characters in the front of the device name represent the status. All of the state database replicas in this example are active, as indicated by the a flag. A legend of all the flags follows the status.
Uppercase letters indicate a problem status. Lowercase letters indicate an "Okay" status.
Use this procedure to view and interpret metadevice and hot spare pool status information.
For other ways of checking status, see "Using DiskSuite Tool to Check Status."
Table 3-2 General Status Keywords
| Keyword | Meaning | Used By ... |
|---|---|---|
| OK | The metadevice or hot spare pool has no errors and is functioning correctly. | All metadevice types and hot spare pools |
| Attention | The metadevice or hot spare pool has a problem, but there is no immediate danger of losing data. | All metadevice types and hot spare pools |
| Urgent | The metadevice is only one failure away from losing data. | Mirrors/submirrors, RAID5 metadevices, and trans metadevices |
| Critical | Data potentially has been corrupted. For example, all submirrors in a mirror have errors, or a RAID5 metadevice has errors on more than one slice. Template objects, except the hot spare pool template, also show a Critical status if the metadevice configuration is invalid. | Mirrors/submirrors, RAID5 metadevices, trans metadevices, and all template objects. |
Note - If the fan fails on a SPARCstorage Array, all metadevices and slices on that SPARCstorage Array are marked "Critical."
DiskSuite does not report a state change for a concatenation or stripe that experiences errors, unless the concatenation or stripe is used as a submirror. If there is a slice error, or other device problem, DiskSuite returns an error to the requesting application, and outputs it to the console, such as:
-------------------------------------------------

WARNING: md d4: read error on /dev/dsk/c1t3d0s6

-------------------------------------------------
Note - DiskSuite can send SNMP trap data (alerts), such as the message above, to any network management console capable of receiving SNMP messages. Refer to "How to Configure DiskSuite SNMP Support (Command Line)," for more information.
Because concatenations and stripes do not contain replicated data, to recover from slice errors on simple metadevices you must replace the physical disk, recreate the metadevice, and restore data from backup. Refer to "How to Recreate a Stripe or Concatenation After Slice Failure (DiskSuite Tool), or "How to Recreate a Stripe or Concatenation After Slice Failure (Command Line)."
A Mirror object has two Status fields: one for the mirror device itself, and individual Status fields for each submirror. The Status field for a mirror, as explained in Table 3-3, gives a high-level status.
Table 3-3 Mirror Status Keywords
| Keyword | Meaning |
|---|---|
| OK | The mirror has no errors and is functioning correctly. |
| Attention | A submirror has a problem, but there is no immediate danger of losing data. There are still two copies of the data (the mirror is three-way mirror and only one submirror failed), or a hot spare has kicked in. |
| Urgent | The mirror contains only a single good submirror, providing only one copy of the data. The mirror is only one failure away from losing data. |
| Critical | All submirrors have errors and data has potentially been corrupted. |
Table 3-4 shows the Status fields of submirrors, and possible actions to take.
Table 3-4 Submirror Status Keywords
| Keyword | Meaning | Action |
|---|---|---|
| OK | The submirror has no errors and is functioning correctly. | None. |
| Resyncing | The submirror is actively being resynced. | None. An error has occurred and been corrected, the submirror has just been brought back online, or a new submirror has been added. |
| Component Resyncing | A slice in the submirror is actively being resynced. | None. Either a hot spare slice or another slice has replaced an errored slice in the submirror. |
| Attaching | The submirror is being attached. | None. |
| Attached (resyncing) | The entire submirror is being resynced after the attach occurred. | None. |
| Online (scheduled) | The submirror will be brought online the next time you click Commit. | Click the Commit button to enable the submirror. |
| Offline (scheduled) | The submirror will be brought offline the next time you click Commit. | Click the Commit button to offline the submirror. |
| Offlined | The submirror is offline. | When appropriate, bring the submirror back online, for example, after performing maintenance. See "How to Place a Submirror Offline and Online (DiskSuite Tool)." |
| Maintenance | The submirror has an error. | Repair the submirror. You can fix submirrors in the "Errored" state in any order. See "How to Enable a Slice in a Submirror (DiskSuite Tool)," or "How to Replace a Slice in a Submirror (DiskSuite Tool)." |
| Last Erred | The submirror has errors, and data for the mirror has potentially been corrupted. | Fix submirrors in the "Maintenance" state first, then fix the submirror in the "Last Erred" state. See "How to Enable a Slice in a Submirror (DiskSuite Tool)," or "How to Replace a Slice in a Submirror (DiskSuite Tool)." After fixing the error, validate the data. |
Note - DiskSuite does not retain state and hot spare information for simple metadevices that are not submirrors.
Table 3-5 explains the keywords in the Status fields of RAID5 objects, and possible actions to take.
Table 3-5 RAID5 Status Keywords
| Keyword | Meaning | Action |
|---|---|---|
| OK | The RAID5 metadevice has no errors and is functioning correctly. | None. |
| Attached/initialize (resyncing) | The RAID5 metadevice is being resynced after an attach occurred, or after being created. | Normally none. During the initialization of a new RAID5 metadevice, if an I/O error occurs, the device goes into the "Maintenance" state. If the initialization fails, the metadevice is in the "Init Failed" state and the slice is in the "Maintenance" state. If this happens, clear the metadevice and recreate it. |
| Attention | There is a problem with the RAID5 metadevice, but there is no immediate danger of losing data. | Continue to monitor the status of the device. |
| Urgent | The RAID5 metadevice has a slice error and you are only one failure away from losing data. | Fix the errored slice. See "How to Enable a Slice in a RAID5 Metadevice (DiskSuite Tool)," or "How to Replace a RAID5 Slice (DiskSuite Tool)." |
| Critical | The RAID5 metadevice has more than one slice with an error. Data has potentially been corrupted. | To fix the errored slices, see "How to Enable a Slice in a RAID5 Metadevice (DiskSuite Tool),", or "How to Replace a RAID5 Slice (DiskSuite Tool)." You may need to restore data from backup. |
Table 3-6 explains the keywords in the Status fields of Trans Metadevice objects, and possible actions to take.
Table 3-6 Trans Metadevice Status Keywords
| Keyword | Meaning | Action |
|---|---|---|
| OK | The device is functioning properly. If mounted, the file system is logging and will not be checked at boot (that is, the file system will not be checked by fsck at boot). | None. |
| Detach Log (in progress) | The trans metadevice log will be detached when the Trans metadevice is unmounted or at the next reboot. | None. |
| Detach Log | The trans metadevice log will be detached the next time you click the Commit Button. | Click Commit to detach the log. The detach takes place at the next reboot, or when the file system is unmounted and remounted. |
| Attention | There is a problem with the trans but there is no immediate danger of losing data. | Continue to monitor the status of the trans metadevice. |
| Urgent | There is a problem with the trans metadevice and it is only oen failure away from losing data. This state can only exist if the trans metadevice contains a RAID5 metadevice or mirror. | Fix the errored mirror or RAID5 metadevice. See Overview of Replacing and Enabling Slices in Mirrors and RAID5 Metadevices." |
| Critical (log missing) | The trans metadevice does not have a logging device attached. | Attach a logging device. Logging for the file system cannot start until a logging device is attached. |
| Critical (log hard error) | A device error or file system panic has occurred while the deivce was in use. An I/O error is returned for every read or write until the device is closed or unmounted. The first open causes the device to transition to the Error state. | Fix the trans metadevice. See "How to Recover a Trans Metadevice With a File SystemPanic (Command Line)," or "How to Recover a Trans Metadevice With Hard Errors (Command Line)." |
| Critical (error) | The device can be read and written. The file system can be mounted read-only. However, an I/O error is returned for every ready or write that actually gets a device error. The device does not transition back to the Hard Error state, even when a later device error or file system panic occurs. | Fix the trans metadevice. See "How to Recover a Trans Metadevice With a File System Panic (Command Line)," or "How to Recover a Trans Metadevice With Hard Errors (Command Line)." Successfully completing fsck(1M) or newfs(1M) transitions the device into the Okay state. When the device is in the Hard Error or Error state, fsck automatically checks and repairs the file system at boot time. newfs destroys whatever data may be on the device. |
Table 3-7 explains the keywords in the Status fields of Hot Spare Pool objects, and possible actions to take.
Table 3-7 Hot Spare Pool Status Keywords
| Keyword | Meaning | Action |
|---|---|---|
| OK | The hot spares are running and ready to accept data, but are not currently being written to or read from. | None. |
| In-use | Hot spares are currently being written to and read from. | Diagnose how the hot spares are being used. Then repair the slice in the metadevice for which the hot spare is being used. |
| Attention | There is a problem with a hot spare or hot spare pool, but there is no immediate danger of losing data. This status is also displayed if there are no hot spares in the Hot Spare Pool, or if all the hot spares are in use or any or broken. | Diagnose how the hot spares are being used or why they are broken. You can add more hot spares to the hot spare pool if necessary. |
Make sure you have met the prerequisites. Use the metastat(1M) command to view metadevice or hot spare pool status. Refer to the metastat(1M) man pages for more information.
Use the following to find an explanation of the command line output and possible actions to take.
Note - Refer to Table 3-2 for an explanation of DiskSuite's general status keywords.
DiskSuite does not report a state change for a concatenation or a stripe, unless the concatenation or stripe is used as a submirror. Refer to "Stripe and Concatenation Status (DiskSuite Tool)" for more information.
Running metastat(1M) on a mirror displays the state of each submirror, the pass number, the read option, the write option, and the size of the total number of blocks in the mirror. Refer to "How to Change a Mirror's Options (Command Line)" to change a mirror's pass number, read option, or write option.
Here is sample mirror output from metastat.
-----------------------------------------------------------------------

# metastat
d0: Mirror
    Submirror 0: d1
      State: Okay
    Submirror 1: d2
      State: Okay
    Pass: 1
    Read option: roundrobin (default)
    Write option: parallel (default)
    Size: 5600 blocks
d1: Submirror of d0
    State: Okay
    Size: 5600 blocks
    Stripe 0:
        Device              Start Block  Dbase State        Hot Spare
        c0t2d0s7                   0     No    Okay
...

-----------------------------------------------------------------------
For each submirror in the mirror, metastat shows the state, an "invoke" line if there is an error, the assigned hot spare pool (if any), size in blocks, and information about each slice in the submirror.
Table 3-8 explains submirror states.
Table 3-8 Submirror States (Command Line)
| State | Meaning |
|---|---|
| Okay | The submirror has no errors and is functioning correctly. |
| Resyncing | The submirror is actively being resynced. An error has occurred and been corrected, the submirror has just been brought back online, or a new submirror has been added. |
| Needs Maintenance | A slice (or slices) in the submirror has encountered an I/O error or an open error. All reads and writes to and from this slice in the submirror have been discontinued. |
Additionally, for each stripe in a submirror, metastat shows the "Device" (device name of the slice in the stripe); "Start Block" on which the slice begins; "Dbase" to show if the slice contains a state database replica; "State" of the slice; and "Hot Spare" to show the slice being used to hot spare a failed slice.
The slice state is perhaps the most important information when troubleshooting mirror errors. The submirror state only provides general status information, such as "Okay" or "Needs Maintenance." If the submirror reports a "Needs Maintenance" state, refer to the slice state. You take a different recovery action if the slice is in the "Maintenance" or "Last Erred" state. If you only have slices in the "Maintenance" state, they can be repaired in any order. If you have a slices in the "Maintenance" state and a slice in the "Last Erred" state, you must fix the slices in the "Maintenance" state first then the "Last Erred" slice. Refer to "Overview of Replacing and Enabling Slices in Mirrors and RAID5 Metadevices."
Table 3-9 explains the slice states for submirrors and possible actions to take.
Table 3-9 Submirror Slice States (Command Line)
| State | Meaning | Action |
|---|---|---|
| Okay | The slice has no errors and is functioning correctly. | None. |
| Resyncing | The slice is actively being resynced. An error has occurred and been corrected, the submirror has just been brought back online, or a new submirror has been added. | If desired, monitor the submirror status until the resync is done. |
| Maintenance | The slice has encountered an I/O error or an open error. All reads and writes to and from this slice have been discontinued. | Enable or replace the errored slice. See "How to Enable a Slice in a Submirror (Command Line)," or "How to Replace a Slice in a Submirror (Command Line)." Note: The metastat(1M) command will show an invoke recovery message with the appropriate action to take with the metareplace(1M) command. You can also use the metareplace -e command. |
| Last Erred | The slice has encountered an I/O error or an open error. However, the data is not replicated elsewhere due to another slice failure. I/O is still performed on the slice. If I/O errors result, the mirror I/O will fail. | First, enable or replace slices in the "Maintenance" state. See "How to Enable a Slice in a Submirror (Command Line)," or "How to Replace a Slice in a Submirror (Command Line)." Usually, this error results in some data loss, so validate the mirror after it is fixed. For a file system, use the fsck(1M) command to validate the "metadata" then check the user-data. An application or database must have its own method of validating the metadata. |
Running the metastat(1M) command on a RAID5 metadevice shows the status of the metadevice. Additionally, for each slice in the RAID5 metadevice, metastat shows the "Device" (device name of the slice in the stripe); "Start Block" on which the slice begins; "Dbase" to show if the slice contains a state database replica ; "State" of the slice; and "Hot Spare" to show the slice being used to hot spare a failed slice.
Here is sample RAID5 metadevice output from metastat.
-----------------------------------------------------------------------

# metastat
d10: RAID
    State: Okay
    Interlace: 32 blocks
    Size: 10080 blocks
Original device:
    Size: 10496 blocks
        Device              Start Block  Dbase State        Hot Spare
        c0t0d0s1                 330     No    Okay
        c1t2d0s1                 330     No    Okay
        c2t3d0s1                 330     No    Okay

-----------------------------------------------------------------------
Table 3-10 explains RAID5 metadevice states.
Table 3-10 RAID5 States (Command Line)
| State | Meaning |
|---|---|
| Initializing | Slices are in the process of having all disk blocks zeroed. This is
necessary due to the nature of RAID5 metadevices with respect
to data and parity interlace striping.
Once the state changes to the "Okay," the initialization process is complete and you are able to open the device. Up to this point, applications receive error messages. |
| Okay | The device is ready for use and is currently free from errors. |
| Maintenance | A single slice has been marked as errored due to I/O or open errors encountered during a read or write operation. |
The slice state is perhaps the most important information when troubleshooting RAID5 metadevice errors. The RAID5 state only provides general status information, such as "Okay" or "Needs Maintenance." If the RAID5 reports a "Needs Maintenance" state, refer to the slice state. You take a different recovery action if the slice is in the "Maintenance" or "Last Erred" state. If you only have a slice in the "Maintenance" state, it can be repaired without loss of data. If you have a slice in the "Maintenance" state and a slice in the "Last Erred" state, data has probably been corrupted. You must fix the slice in the "Maintenance" state first then the "Last Erred" slice. Refer to "Overview of Replacing and Enabling Slices in Mirrors and RAID5 Metadevices."
Table 3-11 explains the slice states for a RAID5 metadevice and possible actions to take.
Table 3-11 RAID5 Slice States (Command Line)
| State | Meaning | Action |
|---|---|---|
| Initializing | Slices are in the process of having all disk blocks zeroed. This is necessary due to the nature of RAID5 metadevices with respect to data and parity interlace striping. | Normally none. If an I/O error occurs during this process, the device goes into the "Maintenance" state. If the initialization fails, the metadevice is in the "Init Failed" state and the slice is in the "Maintenance" state. If this happens, clear the metadevice and recreate it. |
| Okay | The device is ready for use and is currently free from errors. | None. Slices may be added or replaced, if necessary. |
| Resyncing | The slice is actively being resynced. An error has occurred and been corrected, a slice has been enabled, or a slice has been added. | If desired, monitor the RAID5 metadevice status until the resync is done. |
| Maintenance | A single slice has been marked as errored due to I/O or open errors encountered during a read or write operation. | Enable or replace the errored slice. See "How to Enable a Slice in a RAID5 Metadevice (Command Line)," or "How to Replace a RAID5 Slice (Command Line)." Note: The metastat(1M) command will show an invoke recovery message with the appropriate action to take with the metareplace(1M) command. |
| Maintenance/Last Erred | Multiple slices have encountered errors. The state of the errored slices is either "Maintenance" or "Last Erred." In this state, no I/O is attempted on the slice that is in the "Maintenance" state, but I/O is attempted to the slice marked "Last Erred" with the outcome being the overall status of the I/O request. | Enable or replace the errored slices. See "How to Enable a Slice in a RAID5 Metadevice (Command Line)," or "How to Replace a RAID5 Slice (Command Line)." Note: The metastat(1M) command will show an invoke recovery message with the appropriate action to with the metareplace(1M) command, which must be run with the -f flag. This indicates that data might be fabricated due to multiple errored slices. |
Running the metastat(1M) command on a trans metadevice shows the status of the metadevice.
Here is sample trans metadevice output from metastat:
------------------------------------------------

# metastat
d20: Trans
    State: Okay
    Size: 102816 blocks
    Master Device: c0t3d0s4
    Logging Device: c0t2d0s3
        Master Device       Start Block  Dbase
        c0t3d0s4                   0     No
c0t2d0s3: Logging device for d0
    State: Okay
    Size: 5350 blocks
        Logging Device      Start Block  Dbase
        c0t2d0s3                 250     No

------------------------------------------------
The metastat command also shows master and logging devices. For each device, the following information is displayed: the "Device" (device name of the slice or metadevice); "Start Block" on which the device begins; "Dbase" to show if the device contains a state database replica; and for the logging device, the "State."
Table 3-12 explains trans metadevice states and possible actions to take.
Table 3-12 Trans Metadevice States (Command Line)
| State | Meaning | Action |
|---|---|---|
| Okay | The device is functioning properly. If mounted, the file system is logging and will not be checked at boot. | None. |
| Attaching | The logging device will be attached to the trans metadevice when the trans is closed or unmounted. When this occurs, the device is transitioned to the Okay state. | Refer to the metattach(1M) man page. |
| Detached | The trans metadevice does not have a logging device. All benefits from UFS logging are disabled. | fsck(1M) automatically checks the device at boot logging device. Refer to the metadetach(1M) man page. |
| Detaching | The logging device will be detached from the trans metadevice when the trans is closed or unmounted. When this occurs, the device transitions to the Detached state. | Refer to the metadetach(1M) man page. |
| Hard Error | A device error or file system panic has occurred while the device was in use. An I/O error is returned for every read or write until the device is closed or unmounted. The first open causes the device to transition to the Error state. | Fix the trans metadevice. See "How to Recover a Trans Metadevice With a File System Panic (Command Line)," or "How to Recover a Trans Metadevice With Hard Errors (Command Line)." |
| Error | The device can be read and written. The file system can be mounted read-only. However, an I/O error is returned for every read or write that actually gets a device error. The device does not transition back to the Hard Error state, even when a later device error of the file system panic occurs. | Fix the trans metadevice. See "How to Recover a Trans Metadevice With a File System Panic (Command Line)," or "How to Recover a Trans Metadevice With Hard Errors (Command Line)." Successfully completing fsck(1M) or newfs(1M) transitions the device into the Okay state. When the device is in the Hard Error or Error state, fsck automatically checks and repairs the file system at boot time. newfs destroys whatever data may be on the device. |
Running the metastat(1M) command on a hot spare pool shows the status of the hot spare pool and its hot spares.
Here is sample hot spare pool output from metastat.
--------------------------------------------------------------

# metastat hsp001
hsp001: 1 hot spare
        c1t3d0s2                Available       16800 blocks

--------------------------------------------------------------
Table 3-13 explains hot spare pool states and possible actions to take.
Table 3-13 Hot Spare Pool States (Command Line)
| State | Meaning | Action |
|---|---|---|
| Available | The hot spares are running and ready to accept data, but are not currently being written to or read from. | None. |
| In-use | Hot spares are currently being written to and read from. | Diagnose how the hot spares are being used. Then repair the slice in the metadevice for which the hot spare is being used. |
| Attention | There is a problem with a hot spare or hot spare pool, but there is no immediate danger of losing data. This status is also displayed if there are no hot spares in the Hot Spare Pool or all the hot spares are in use or any are broken. | Diagnose how the hot spares are being used or why they are broken. You can add more hot spares to the hot spare pool if desired. |
Make sure you have met the prerequisites. Use the metaset(1M) command to view diskset status. Refer to the metaset(1M) man page for more information.
Note - Diskset ownership is only shown on the owning host.
-------------------------------------

red# metaset -s relo-red
Set name = relo-red, Set number = 1
Host                Owner
  red                Yes
  blue
Drive               Dbase
  c1t2d0             Yes
  c1t3d0             Yes
  c2t2d0             Yes
  c2t3d0             Yes
  c2t4d0             Yes
  c2t5d0             Yes

-------------------------------------
The metaset(1M) command with the -s option followed by the name of the relo-red diskset displays status information for that diskset. By issuing the metaset command from the owning host, red, it is determined that red is in fact the diskset owner. The metaset command also displays drives in the diskset.
--------------------------------------

red# metaset
Set name = relo-red, Set number = 1
Host                Owner
  red                Yes
  blue
Drive               Dbase
  c1t2d0             Yes
  c1t3d0             Yes
  c2t2d0             Yes
  c2t3d0             Yes
  c2t4d0             Yes
  c2t5d0             Yes
Set name = relo-blue, Set number = 2
Host                Owner
  red
  blue
Drive               Dbase
  c3t2d0             Yes
  c3t3d0             Yes
  c3t4d0             Yes
  c3t5d0             Yes
Set name = rimtic, Set number = 3
Host                Owner
  red
  blue
Drive               Dbase
  c4t2d0             Yes
  c4t3d0             Yes
  c4t4d0             Yes
  c4t5d0             Yes

--------------------------------------
The metaset command by itself displays the status of all disksets. In this example, three disksets named relo-red, relo-blue, and rimtic are configured. Because host red owns the relo-red diskset, metaset shows red as the owner. Host blue owns the other two disksets, relo-blue and rimtic. This could only be determined if metaset were run from host blue.
This section contains the steps to replace and enable slices in DiskSuite objects, including:
Note - To repair and replace physical disks, including those in a SPARCstorage Array, refer to Chapter 7, "Troubleshooting the System."
When you enable (restore) a state database replica with DiskSuite Tool, two things happen. DiskSuite Tool first removes (deletes) the replica, then tries to add it back to the slice. If there is a problem, such as an errored slice, the delete still occurs, and you need to repair the slice before the state database replica can be restored.
Use this task to bring a slice being used by the state database back online. You would use this task after physically replacing an errored slice (disk).
The MetaDB object appears on the canvas.
The Restore button is enabled only if a selected slice does not display the OK status.
For example, if the metadevice contains a mounted file system, unmount the file system.
----------------------------------------------------------------

# ufsdump [option...] [argument...] file-to-back-up...

----------------------------------------------------------------
In this command,
----------------------------------------------------------------------


option           Is a single string of one-letter option names.

argument         Identifies option arguments and may be multiple
                 strings. The options and the arguments that go
                 with them must be in the same order.

file-to-back-up  Identifies the file(s) to back up. These file names
                 must always come last.

----------------------------------------------------------------------
Refer to the ufsdump(1M) man page for more information. If you cannot access the metadevice, you will have to rely on the most current backup.
The metadevice object appears on the canvas.
Refer to "How to Create a Striped Metadevice (DiskSuite Tool)" or "How to Create a Concatenation (DiskSuite Tool)."
Note - If the metadevice is a stripe, the new slice must be the same size as the failed one. If the metadevice is a concatenation, the new slice must have at least the same capacity as the failed slice.
Refer to "Creating File Systems on Metadevices."
-----------------------------------------------------------

# ufsrestore [option...][argument...][filename...]

-----------------------------------------------------------
In this command,
--------------------------------------------------------------


option    Is a single string of one-letter option names. You
          must choose one and only one of these options:
          i, r, R, t, or x.

argument  Follows the option string with the arguments that
          match the options. The option names and the
          arguments that go with them must be in the same
          order.

filename  Specifies files to be restored as arguments to the
          x or t options, and must always come last.

--------------------------------------------------------------

Refer to the ufsrestore(1M) man page for more information.
After checking the prerequisites, and the preliminary information, use the metaclear(1M) and metainit(1M) commands to recreate a stripe or concatenation after a slice has failed. The metastat command does not show slice errors for concatenations and stripes. You will, however, see errors on the system console, such as:
--------------------------------------------------

WARNING: md d35: read error on /dev/dsk/c0t0d0s6

--------------------------------------------------
Refer to the metaclear(1M) and metainit(1M) man pages for more information.
----------------------------------------------------------

# umount /news
# init 0
ok boot -s
...
# ufsdump 0ucf /dev/rmt/0 /news
DUMP: Date of this level 0 dump: Fri Mar 1 15:17:45 1996
...
DUMP: DUMP IS DONE
# metaclear d35
# metainit d35 2 1 c1t0d0s2 1 c1t0d1s2
# newfs /dev/md/rdsk/d35
# mount /dev/md/dsk/d35 /news
# cd /news
# ufsrestore rvf /dev/rmt 0
Verify volume and initialize maps
Media block size is 126
...
Check pointing the restore
# rm restoresymtable
# ls /news

----------------------------------------------------------
Because d35 contains a mounted file system, /news, it is unmounted, then the system is booted into single-user mode. The ufsdump command dumps data to tape, and the concatenation is cleared with the metaclear command. The metainit command recreates the concatenation using a new slice to replace the failed slice. Data is restored via the ufsrestore command, then validated, for example, by using the ls command.
Note - If the metadevice is a stripe, the new slice must be the same size as the failed one. If the metadevice is a concatenation, the new slice must have at least the same capacity as the failed slice.
DiskSuite has the capability to replace and enable slices within mirrors and RAID5 metadevices.
In DiskSuite terms, replacing a slice is a way to substitute an available slice on the system for a selected slice in a submirror or RAID5 metadevice. You can think of this as a "metareplace," as opposed to physically replacing the slice. Enabling a slice means to "activate" or substitute a slice with itself (that is, the slice name is the same).
The following describes the two methods you can use and when you would use them.
Note - When recovering from disk errors, scan /var/adm/messages to see what kind of errors occurred. If the errors are of a transitory nature and the disks themselves do not have problems, try enabling the errored slices. You can also use the format(1M) command to test a disk.
It is appropriate to enable a slice when:
You can enable a slice when:
When you physically replace a drive, be sure to partition it the same as old drive. Note that after the drive has been physically replaced and partitioned like the old one, the task to enable the errored slice(s) is the same as for the first condition described above.
Note - Always check for state database replicas and hot spares on the drive being replaced. Any state database replica shown to be in error should be deleted before replacing the disk and added back (making sure the size is the same) before enabling the slice. You should treat hot spares in the same manner.
You use the DiskSuite "metareplace" slice feature when replacing or swapping an existing slice with a different slice that is available and not in use on the system.
You can use this method when:
Note - DiskSuite Tool enables you to replace an entire submirror if necessary. To do so, you create a new submirror (Concat/Stripe object) and drag it on top of the submirror to be replaced. This task is documented in "How to Replace a Submirror (DiskSuite Tool)."
When a slice in a mirror or RAID5 metadevice device experiences errors, DiskSuite puts the slice in the "Maintenance" state. No further reads or writes are performed to a slice in the "Maintenance" state. Subsequent errors on other slices in the same metadevice are handled differently, depending on the type of metadevice. A mirror may be able to tolerate many slices in the "Maintenance" state and still be read from and written to. A RAID5 metadevice, by definition, can only tolerate a single slice in the "Maintenance" state. When either a mirror or RAID5 metadevice has a slice in the "Last Erred" state, I/O is still attempted to the slice marked "Last Erred." This is because a "Last Erred" slice contains the last good copy of data from DiskSuite's point of view. With a slice in the "Last Erred" state, the metadevice behaves like a normal device (disk) and returns I/O errors to an application. Usually, at this point some data has been lost.
Always replace slices in the "Maintenance" state first, followed by those in the "Last Erred" state. After a slice is replaced and resynced, use the metastat(1M) command to verify its state, then validate the data to make sure it is good.
Mirrors: If slices are in the "Maintenance" state, no data has been lost. You can safely replace or enable the slices in any order. If a slice is in the "Last Erred" state, you cannot replace it until you first replace all the other mirrored slices in the "Maintenance" state. Replacing or enabling a slice in the "Last Erred" state usually means that some data has been lost. Be sure to validate the data on the mirror after repairing it.
RAID5 Metadevices: A RAID5 metadevice can tolerate a single slice failure. You can safely replace a single slice in the "Maintenance" state without losing data. If an error on another slice occurs, it is put into the "Last Erred" state. At this point, the RAID5 metadevice is a read-only device; you need to perform some type of error recovery so that the state of the RAID5 metadevice is non-errored and the possibility of data loss is reduced. If a RAID5 metadevice reaches a "Last Erred" state, there is a good chance it has lost data. Be sure to validate the data on the RAID5 metadevice after repairing it.
When replacing slices in a mirror or a RAID5 metadevice, follow these guidelines:
Note - A submirror or RAID5 metadevice may be using a hot spare in place of an errored slice. When that errored slice is enabled or replaced using the procedures in this section, the hot spare is marked "available" in the hot spare pool, and is ready for use.
Use this task to enable a slice in a submirror that is in the "Errored" state.
The object appears on the canvas. The submirror displays the error status.
The Stripe Information window appears.
The slice status changes from Critical to Enabled. The submirror status changes from Critical (Errored) to Critical (Uncommitted).
A mirror resync begins. The submirror status changes to "Component Resyncing."
Note - If DiskSuite still reports the slice in the "Errored" state after enabling the slice, refer to "How to Replace a Slice in a Submirror (DiskSuite Tool)."
After checking the prerequisites, the overview, and the preliminary information, use the metareplace(1M) command to enable an errored slice in a submirror. metareplace(1M) automatically starts a resync to get the new slice in sync with the rest of the mirror.
---------------------------------

# metareplace -e d11 c1t4d0s7
d11: device c1t4d0s7 is enabled

---------------------------------
The submirror d11 has a slice, c1t4d0s7, which had a soft error. The metareplace command with the -e option enables the errored slice.
Note - If a physical disk is defective, you can either replace it with another available disk (and its slices) on the system as documented in "How to Replace a Slice in a Submirror (Command Line)," or repair/replace the disk, format it, and run metareplace with the -e option as shown in this example.
Use this procedure to replace a slice within a submirror with a new slice. The partitioning information for any disk used by DiskSuite should be saved in a safe place before any errors occur.
Note - Before using this procedure, make sure the replacement slice has been correctly partitioned.
The mirror appears on the canvas. The submirror displays the error status.
Locate an available slice of the same or greater size than the slice that needs replacing.
DiskSuite starts a resync of the replaced submirror.
Note - When dragging the replacement slice to the object, be sure to point the cursor inside the rectangle that contains the device number of the errored slice, instead of other rectangles inside the Concat/Stripe object.
After checking the prerequisites, the overview, and the preliminary information, use the metareplace(1M) command to replace a slice in a submirror.
---------------------------------------------------

# metastat d6
d6: Mirror
    Submirror 0: d16
      State: Okay
    Submirror 1: d26
      State: Needs maintenance
...
d26: Submirror of d6
    State: Needs maintenance
    Invoke: metareplace d6 c0t2d0s2 <new device'>
...
# metareplace d6 c0t2d0s2 c0t2d2s2
d6: device c0t2d0s2 is replaced with c0t2d2s2

---------------------------------------------------
The metastat command confirms that mirror d6 has a submirror, d26, with a slice in the "Needs maintenance" state. The metareplace command replaces the slice as specified in the "Invoke" line of the metastat output with another available slice on the system. The system confirms that the slice is replaced, and starts a resync of the submirror.
To replace an entire submirror, first construct a new stripe or concatenation that is equal to or greater than the size of the submirror that is being replaced. The slice(s) used for the replacement submirror should be on different controllers than the other submirror. Refer to Chapter 3, "Creating DiskSuite Objects," for instructions on how to create a stripe or a concatenation.
The mirror appears on the canvas.
The object appears on the canvas.
The new Concat/Stripe object replaces the errored one.
A resync of the new submirror is initiated.
After checking the prerequisites, the overview, and the preliminary information, use the metadetach(1M), metaclear(1M), metatinit(1M), and metattach(1M) commands to replace an entire submirror.
-----------------------------------------

# metastat d20
d20: Mirror
    Submirror 0: d21
      State: Okay
    Submirror 1: d22
      State: Needs maintenance
...
# metadetach -f d20 d22
d20: submirror d22 is detached
# metaclear d22
d22: Concat/Stripe is cleared
# metainit d22 2 1 c1t0d0s2 1 c1t0d1s2
d22: Concat/Stripe is setup
# metattach d20 d22
d20: components are attached

-----------------------------------------
The metastat command confirms that the two-way mirror d20 has a submirror, d22, in the "Needs maintenance" state. In this case, the entire submirror will be cleared and recreated. The metadetach command detaches the errored submirror from the mirror using the -f option (this forces the detach to occur). The metaclear command clears the submirror. The metainit command recreates submirror d22, with new slices. The metattach command attaches the rebuilt submirror, and a mirror resync begins automatically.
Note - You temporarily lose the capability for data redundancy while the mirror is a one-way mirror.
Use this task to enable a slice in a RAID5 metadevice that is in the "Maintenance" state.
The RAID5 object appears on the canvas.
The RAID Information window appears.
The status of the slice changes to "Enabled" and the status of the RAID5 changes to "Urgent (Uncommitted)."
The RAID status changes to "Urgent-Resyncing," and the slice status changes to "Resyncing."
Note - If DiskSuite still reports the slice in the "Maintenance" state after enabling the slice, refer to "How to Replace a RAID5 Slice (DiskSuite Tool)."
After checking the prerequisites, the overview, and the preliminary information, use the metareplace(1M) command to enable an errored slice in a RAID5 metadevice. metareplace(1M) automatically starts a resync to get the new slice in sync with the rest of the RAID5 metadevice.
--------------------------------

# metareplace -e d20 c2t0d0s2

--------------------------------
The RAID5 metadevice d20 has a slice, c2t0d0s2, which had a soft error. The metareplace command with the -e option enables the slice.
Note - If a disk drive is defective, you can either replace it with another available disk (and its slices) on the system as documented in "How to Replace a RAID5 Slice (Command Line)," or repair/replace the disk, format it, and run metareplace with the -e option.
Use this procedure to replace an errored slice in a RAID5 metadevice in which only one slice is errored.
Caution -

The object appears on the canvas.
The slice must be at least as large as the smallest slice in the device.
During the replacement, the state of the metadevice and the new slice will be "Resyncing." You can continue to use the metadevice while it is in this state.
You might need to select Rescan Configuration from the File menu for the status to be updated.
This task replaces an errored slice of a RAID5 metadevice in which only one slice is errored.
Caution -

After checking the prerequisites, the overview, and the preliminary information, follow this example to replace an errored slice in a RAID5 metadevice. Refer to the metareplace(1M) man page for more information.
----------------------------------------------------------------

# metastat d1
d1: RAID
State: Needs Maintenance
    Invoke: metareplace d1 c0t14d0s6 <new device'>
    Interlace: 32 blocks
    Size: 8087040 blocks
Original device:
    Size: 8087520 blocks
	Device              Start Block  Dbase State        Hot Spare
	c0t9d0s6                 330     No    Okay
	c0t13d0s6                330     No    Okay
	c0t10d0s6                330     No    Okay
	c0t11d0s6                330     No    Okay
	c0t12d0s6                330     No    Okay
	c0t14d0s6                330     No    Maintenance
# metareplace d1 c0t14d0s6 c0t4d0s6
d1: device c0t14d0s6 is replaced with c0t4d0s6
# metatstat d1
d1: RAID
    State: Resyncing
    Resync in progress: 98% done
    Interlace: 32 blocks
    Size: 8087040 blocks
Original device:
    Size: 8087520 blocks
	Device              Start Block  Dbase State        Hot Spare
	c0t9d0s6                 330     No    Okay
	c0t13d0s6                330     No    Okay
	c0t10d0s6                330     No    Okay
	c0t11d0s6                330     No    Okay
	c0t12d0s6                330     No    Okay
	c0t4d0s6                 330     No    Resyncing

----------------------------------------------------------------
The metastat command displays the action to take to recover from the errored slice in the d1 RAID5 metadevice. After locating an available slice, the metareplace command is run, specifying the errored slice first, then the replacement slice. (If no other slices are available, run the metareplace(1M) command with the -e option to attempt to recover from possible soft errors by resyncing the errored device.) If multiple errors exist, the slice in the "Maintenance" state must first be replaced or enabled first. Then the slice in the "Last Erred" state can be repaired. After the metareplace, metastat monitors the progress of the resync. During the replacement, the state of the metadevice and the new slice will be "Resyncing." You can continue to use the metadevice while it is in this state.
Note - You can use the metareplace(1M) command on non-errored devices to change a disk (slice). This can be useful for tuning performance of RAID5 metadevice s.
Note - A submirror or RAID5 metadevice may be using a hot spare in place of an errored slice. When that errored slice is enabled or replaced, the hot spare is marked "available" in the hot spare pool, and is ready for use.
The object appears on the canvas.
After checking the prerequisites, and the preliminary information, use metahs(1M) to replace the hot spare. Refer to the metahs(1M) man page for more information.
----------------------------------------------------------

# metastat hsp003
hsp003: 1 hot spare
        c0t2d0s2                Broken       5600 blocks
# metahs -r hsp003 c0t2d0s2 c3t1d0s2
hsp003: Hotspare c0t2d0s2 is replaced with c3t1d0s2

----------------------------------------------------------
The metastat command makes sure that the hot spare is not in use. The metahs -r command replaces hot spare /dev/dsk/c0t2d0s2 with /dev/dsk/c3t1d0s2 in the hot spare pool hsp003.
-----------------------------------------------------

# metahs -r all c1t0d0s2 c3t1d0s2
hsp001: Hotspare c1t0d0s2 is replaced with c3t1d0s2
hsp002: Hotspare c1t0d0s2 is replaced with c3t1d0s2
hsp003: Hotspare c1t0d0s2 is replaced with c3t1d0s2

-----------------------------------------------------
The keyword all replaces hot spare /dev/dsk/c1t0d0s2 with /dev/dsk/c3t1d0s2 in all its associated hot spare pools.
Use this procedure to enable a hot spare (make it available) after it has been repaired.
The object appears on the canvas.
The Hot Spare Pool Information window appears.
After checking the prerequisites, and the preliminary information, use the metahs(1M) command to bring a hot spare back to the "available" state. For more information, refer to the metahs(1M) man page.
-----------------------

# metahs -e c0t0d0s2

-----------------------
This example places the hot spare /dev/dsk/c0t0d0s2 in the available state after it has been repaired. You do not need to specify a hot spare pool.
Because a trans metadevice is a "layered" metadevice, consisting of a master device and logging device, and because the logging device can be shared among file systems, repairing an errored trans metadevice requires special recovery tasks.
Any device errors or file system panics must be dealt with using the command line utilities.
If a file system detects any internal inconsistencies while it is in use, it will panic the system. If the file system is setup for UFS logging, it notifies the trans metadevice that it needs to be checked at reboot. The trans metadevice transitions itself to the "Hard Error" state. All other trans metadevices sharing the same logging device also go into the "Hard Error" state.
At reboot, fsck checks and repairs the file system and transitions the file system back to the "Okay" state. fsck does this for all trans metadevices listed in the /etc/vfstab file for the affected logging device.
Device errors can cause data loss. Read errors occurring on a logging device can cause significant data loss. For this reason, it is strongly recommended that you mirror the logging device.
If a device error occurs on either the master device or the logging device while the trans metadevice is processing logged data, the device transitions from the "Okay" state to the "Hard Error" state. If the device is either in the "Hard Error" or "Error" state, either a device error has occurred, or a file system panic has occurred.
Note - Any devices sharing the errored logging device also go the "Error" state.
For file systems that fsck cannot repair, run fsck on each trans metadevice whose file systems share the affected logging device.
-------------------------------

# fsck /dev/md/rdsk/trans

-------------------------------
Only after all of the affected trans metadevices have been checked and successfully repaired will fsck reset the state of the errored trans metadevice to "Okay."
Use this procedure to transition a trans metadevice to the "Okay" state.
Refer to "How to Check the Status of Metadevices and Hot Spare Pools (Command Line)" to check the status of a trans metadevice.
If either the master or log devices encounter errors while processing logged data, the device transitions from the "Okay" state to the "Hard Error" state. If the device is in the "Hard Error" or "Error" state, either a device error or file system panic occurred. Recovery from both scenarios is the same.
Note - If a log (logging device) is shared, a failure in any of the slices in a trans metadevice will result in all slices or metadevices associated with the trans metadevice switching to an errored state.
The high-level steps in this procedure are:
-----------

# lockfs

-----------
Affected file systems will be listed with a lock type of hard. Every file system sharing the same logging device will be hard locked.
You can unmount locked file systems even if they were in use when the error occurred. If the affected processes try to access an opened file or directory on the hard locked or unmounted file system, an EIO error is returned.
Before attempting to fix the device error, you may want to recover as much data as possible. If your backup procedure requires a mounted file system (such as tar or cpio), you can mount the file system read-only. If your backup procedure does not require a mounted file system (such as dump or volcopy), you can access the trans metadevice directly.
At this point, any attempt to open or mount the trans metadevice for read/write access starts rolling all accessible data on the logging device to the appropriate master device(s). Any data that cannot be read or written is discarded. However, if you open or mount the trans metadevice for read- only access, the log is simply rescanned and not rolled forward to the master device(s), and the error is not fixed. In other words, all of the data on the master and logging devices remains unchanged until the first read/write open or mount.
Run fsck on all of the trans metadevices sharing the same logging device. When all of these trans metadevices have been repaired by fsck, they then revert to the "Okay" state.
The newfs(1M) command will also transition the file system back to the "Okay" state, but will destroy all of the data on the file system. newfs(1M) is generally used when you plan to restore file systems from backup.
The fsck(1M) or newfs(1M) commands must be run on all of the trans metadevices sharing the same logging device before these devices revert back to the "Okay" state.
------------------------------------------------------------------

# metastat d5
d5: Trans
    State: Hard Error
    Size: 10080 blocks
    Master Device: d4
    Logging Device: c0t0d0s6
d4: Mirror
    State: Okay
...
c0t0d0s6: Logging device for d5
    State: Hard Error
    Size: 5350 blocks
...
# fsck /dev/md/rdsk/d5
** /dev/md/rdsk/d5
** Last Mounted on /fs1
** Phase 1 - Check Blocks and Sizes
** Phase 2 - Check Pathnames
** Phase 3 - Check Connectivity
** Phase 4 - Check Reference Counts
** Phase 5 - Check Cyl groups
WARNING: md: logging device: /dev/dsk/c0t0d0s6 changed state to
Okay
4 files, 11 used, 4452 free (20 frags, 554 blocks, 0.4%
fragmentation)
# metastat d5
d5: Trans
    State: Okay
    Size: 10080 blocks
    Master Device: d4
    Logging Device: c0t0d0s6
d4: Mirror
    State: Okay
...
c0t0d0s6: Logging device for d5
    State: Okay
...

------------------------------------------------------------------
This example fixes a trans metadevice, d5, which has a logging device in the "Hard Error" state. You must run fsck on the trans device itself. This transitions the state of the trans metadevice to "Okay." The metastat confirms that the state is "Okay."
This section contains the tasks to expand, or add space to, a slice (non-metadevice) or a metadevice. For example, if a file system fills up a concatenated metadevice, you can add more slices, then "grow" the file system to the newly added space.
Use this task to create a concatenation from a single slice that has run out of space. You can use this task for a file system or an application, such as a database. The high-level steps in this procedure are:
An unassigned and uncommitted Concat/Stripe object appears on the canvas. The metadevice name is automatically assigned.
If a dialog box appears that the slice is mounted, click Continue.
Mounted file system only: A Commit Warning dialog box appears. Click Really Commit. (As long as the file system has an entry in the /etc/vfstab file, DiskSuite Tool updates the entry to use the metadevice name. If the file system is mounted by hand, you need to use the block metadevice name whenever the file system is mounted.)
Mounted file system only: A GrowFS dialog box appears. Click Grow Now to begin running the growfs(1M) command. A GrowFS Running message appears. If you click Terminate GrowFS, the command is aborted. Otherwise, when the growfs(1M) command finishes, you are returned to the DiskSuite Tool window.
Application using the raw device: Such applications must have their own method, outside of DiskSuite, to recognize the expanded space.
Note - During the expansion, the file system is locked and not available for write access. Write accesses are transparently suspended and are restarted when growfs(1M) unlocks the file system. Read accesses are not affected, though access times are not kept while the lock is in effect.
This example shows a committed concatenation. The initial object consisted of a file system of one slice, c0t0d0s3. Slice c1t3d0s0 was then concatenated, and the growfs(1M) command was run automatically to make the entire space available.
After checking the prerequisites, and the on preliminary information, follow this example to expand a slice containing a mounted file system.
-----------------------------------------------------------------------------------

# umount /docs
# metainit d25 2 1 c0t1d0s2 1 c0t2d0s2
d25: Concat/Stripe is setup
(Edit the /etc/vfstab file so that the file system references the metadevice d25)
# mount /docs

-----------------------------------------------------------------------------------
This example creates a concatenation called d25 out of two slices, /dev/dsk/c0t1d0s2 (which contains a file system mounted on /docs) and /dev/dsk/c0t2d0s2. The file system must first be unmounted.

Next, the entry for the file system in the /etc/vfstab file is changed (or entered for the first time) to reference the metadevice. For example, the following line:
--------------------------------------------------------

/dev/dsk/c0t1d0s2 /dev/rdsk/c0t1d0s2 /docs ufs 2 yes -

--------------------------------------------------------
should be changed to:
----------------------------------------------------

/dev/md/dsk/d25 /dev/md/rdsk/d25 /docs ufs 2 yes -

----------------------------------------------------
Lastly, the file system is remounted.
For a UFS, run the growfs(1M) command on the metadevice. Refer to "How to Grow a File System (Command Line)."
An application, such as a database, that uses the raw metadevice must have its own way of recognizing the metadevice, or of growing the added space.
This task assumes that you are adding an additional stripe to an existing concatenation or stripe. If you need to recreate a concatenated stripe as part of disaster recovery, refer to "How to Recreate a Stripe or Concatenation After Slice Failure (DiskSuite Tool)."
A concatenated stripe enables you to expand an existing stripe or concatenation. For example, if a stripe has run out of space, you can make it into a concatenated stripe, and expand it without having to back up and restore data.
Note - If you drag multiple slices into an existing Concat/Stripe object, you are given the optional of making the slices into a concatenation or a stripe.
DiskSuite Tool displays the Concat/Stripe object on the canvas.
If you drag multiple slices, a dialog box prompts you to choose how you want to add the slices, either as a stripe or a concat. Click either Stripe or Concat.
The additional striped metadevice or concatenated metadevice is added at the bottom of the Concat/Stripe object.
Mounted file system only: A GrowFS dialog box appears. Click Grow Now
to begin running the growfs(1M) command. A GrowFS Running message
appears. If you click Terminate GrowFS, the command is aborted.
Otherwise, when the growfs(1M) command finishes, you are returned to
the DiskSuite Tool window.
Application using the raw device: Such applications must have their own method, outside of DiskSuite, to recognize the expanded space.
This example shows a striped metadevice consisting of two slices to which another slice has been added. The Concat/Stripe object displays the slices in two stripe rectangles labeled stripe 0 (the original stripe) and stripe 1 (the added stripe).
This procedure assumes that you are adding an additional stripe to an existing stripe. If you need to recreate a concatenated stripe using the metainit(1M) command as part of disaster recovery, refer to "How to Recreate a Stripe or Concatenation After Slice Failure (Command Line)."
A concatenated stripe enables you to expand an existing stripe. For example, if a stripe has run out of space, you can make it into a concatenated stripe, and expand it without having to back up and restore data.
Note - If you use DiskSuite Tool to drag multiple slices into an existing striped metadevice, you are given the optional of making the slices into a concatenation or a stripe. When using the metattach(1M) command to add multiple slices to an existing striped metadevice, they must be added as a stripe.
After checking the prerequisites, and the preliminary information, use the metattach(1M) command to create the concatenated stripe . Refer to the metattach(1M) man page for more information.
-----------------------------

# metattach d2 c1t2d0s2
d2: components are attached

-----------------------------
This example attaches a slice to an existing stripe, d2. The system verifies that the slice is attached.
---------------------------------------------

# metattach d25 c1t2d0s2 c1t2d1s2 c1t2d3s2
d25: components are attached

---------------------------------------------
This example takes an existing three-way striped metadevice, d25, and concatenates another three-way stripe. Because no interlace value is given for the attached slices, they inherit the interlace value configured for d25. The system verifies that the Concat/Stripe object has been set up.
Note - Depending on the type of application, by attaching the same number of slices, the metadevice might not experience a performance degradation.
-----------------------------------------------

# metainit d1 3 2 c0t0d0s2 c1t0d0s2 -i 16k \
	2 c1t2d0s2 c1t2d1s0 -i 32k \
	2 c2t0d0s2 c2t0d1s2
d1: Concat/Stripe is setup

-----------------------------------------------
Normally, you would not create a metadevice such as this one from scratch. The example illustrates that d1 is a concatenation of three stripes (the first number 3). The first stripe consists of two slices (the number 2 following the number 3). The -i 16k specifies an interlace of 16 Kbytes. The second stripe (as indicated by the number 2 on the second line) consists of two slices, and uses an interlace of 32 Kbytes. The last stripe consists of a two slices. Because no interlace is specified for the third stripe, it inherits the value from the stripe before it, which in this case is 32 Kbytes.
For a UFS, run the growfs(1M) command on the metadevice. Refer to "How to Grow a File System (Command Line)."
An application, such as a database, that uses the raw metadevice must have its own way of recognizing the metadevice, or of growing the added space.
To prepare a newly created concatenated stripe for a file system, refer to "How to Create a File System on a Metadevice (Command Line)."
Use this task to expand a mirror's submirrors. You need to expand each submirror. You can expand a submirror while it is in use, without having to take it offline.
The object appears on the canvas.
Select a slice or concat/stripe of the appropriate size. Use Control-click to select multiple slices.
The slice or concat/stripe object is added to the bottom of the submirror rectangle.
A Validation dialog box appears. Click OK.
If you have a third submirror, repeat this step.
Mounted file system only: A GrowFS dialog box appears. Click Grow Now
to begin running the growfs(1M) command. A GrowFS Running message
appears. If you click Terminate GrowFS, the command is aborted.
Otherwise, when the growfs(1M) command finishes, you are returned to
the DiskSuite Tool window.
Application using the raw device: Such applications must have their own method, outside of DiskSuite, to recognize the expanded space.
After checking the prerequisites, and the preliminary information, use the metattach(1M) command to attach additional slices to each submirror. Each submirror in a mirror must be expanded. Refer to the metattach(1M) man page for more information.
-----------------------------

# metastat
d8: Mirror
    Submirror 0: d9
      State: Okay
    Submirror 1: d10
      State: Okay
...
# metattach d9 c0t2d0s5
d9: component is attached
# metattach d10 c0t3d0s5
d10: component is attached

-----------------------------
This example shows how to expand a mirrored mounted file system by concatenating two disk drives to the mirror's two submirrors. The mirror is named d8 and contains two submirrors named d9 and d10.
For a UFS, run the growfs(1M) command on the mirror metadevice. Refer to "How to Grow a File System (Command Line)."
An application, such as a database, that uses the raw metadevice must have its own way of growing the added space.
Use this procedure to expand an existing RAID5 metadevice by concatenating another slice. In general, this is a short-term solution to a RAID5 metadevice running out of space. For performance reasons, it is best to have a "pure" RAID5 metadevice.
The object appears on the canvas.
The slice must be at least as large as the smallest slice in the RAID5 metadevice. You can select multiple slices at the same time by using the Control-click technique.
DiskSuite Tool displays the additional slice(s) at the bottom of the object.
Mounted file system only: A GrowFS dialog box appears. Click Grow Now
to begin running the growfs(1M) command. A GrowFS Running message
appears. If you click Terminate GrowFS, the command is aborted.
Otherwise, when the growfs(1M) command finishes, you are returned to
the DiskSuite Tool window.
Application using the raw device: Such applications must have their own method, outside of DiskSuite, to recognize the expanded space.
This example shows a RAID5 metadevice, d3, to which slice /dev/dsk/c3t4d4s0 has been added.
After checking the prerequisites, and the preliminary information, use the metattach(1M) command to attach additional slices to a RAID5 metadevice. Refer to the metattach(1M) man page for more information.
In general, this is a short-term solution to a RAID5 metadevice running out of space. For performance reasons, it is best to have a "pure" RAID5 metadevice.
--------------------------

# metattach d2 c2t1d0s2
d2: column is attached

--------------------------
This example shows the addition of slice /dev/dsk/c2t1d0s2 to an existing RAID5 metadevice named d2.
For a UFS, run the growfs(1M) command on the RAID5 metadevice. Refer to "How to Grow a File System (Command Line)."
An application, such as a database, that uses the raw metadevice must have its own way of growing the added space.
You can expand a master device within a trans metadevice as long as the master device is a metadevice. To expand a master that consists of a slice, you must tear down (clear) the trans, put the slice into a metadevice, then recreate the trans.
Use this procedure to expand a master device that makes up the trans metadevice .
Note - If the master device is a mirror, you need to expand each submirror.
The object appears on the canvas.
Mounted file system: A GrowFS dialog box appears. Click Grow Now to
begin running the growfs(1M) command. A GrowFS Running message
appears. If you click Terminate GrowFS, the command is aborted.
Otherwise, when the growfs(1M) command finishes, you are returned to
the DiskSuite Tool window.
Application using the raw device: Such applications must have their own method, outside of DiskSuite, to recognize the expanded space.
You can expand a master device within a trans device as long as the master is a metadevice. To expand a master that consists of a slice, you must tear down (clear) the trans, put the slice into a metadevice, then recreate the trans.
After checking the prerequisites, and the preliminary information, use the metattach(1M) command to attach additional slices to a master device within the trans metadevice. Refer to the metattach(1M) man page for more information.
Note - If the master device is a mirror, you need to expand each submirror.
-----------------------------

# metastat d10
d10: Trans
    State: Okay
    Size: 102816 blocks
    Master Device: d0
    Logging Device: d1
d0: Mirror
    Submirror 0: d11
      State: Okay
...
    Submirror 1: d12
      State: Okay
...
# metattach d11 c0t2d0s5
d11: component is attached
# metattach d12 c0t3d0s5
d12: component is attached

-----------------------------
This example expands a trans device, d10, whose master device consists of a two-way mirror, d0, which contains two submirrors, d11 and d12. The metattach(1M) command is run on each submirror. The system confirms that each slice was attached.
For a UFS, run the growfs(1M) command on the trans metadevice (not the master device). Refer to "How to Grow a File System (Command Line)."
An application, such as a database, that uses the raw metadevice must have its own way of growing the added space.
This section describes how to grow a UFS that uses a metadevice that was expanded with additional slices.
After checking the prerequisites, and the preliminary information, use the growfs(1M) command to grow a UFS. Refer to the growfs(1M) man page for more information.
----------------------------------------------------------------------------------

# df -k
Filesystem            kbytes    used   avail capacity  Mounted on
...
/dev/md/dsk/d10        69047   65426       0   100%    /home2
...
# growfs -M /home2 /dev/md/rdsk/d10
/dev/md/rdsk/d10:       295200 sectors in 240 cylinders of 15 tracks, 82 sectors
        144.1MB in 15 cyl groups (16 c/g, 9.61MB/g, 4608 i/g)
super-block backups (for fsck -F ufs -o b=#) at:
 32, 19808, 39584, 59360, 79136, 98912, 118688, 138464, 158240, 178016, 197792,
 217568, 237344, 257120, 276896,
# df -k
Filesystem            kbytes    used   avail capacity  Mounted on
...
/dev/md/dsk/d10       138703   65426   59407    53%    /home2
...

----------------------------------------------------------------------------------
A new slice was added to a concatenation, d10, which contains the mounted file system /home2. The growfs command specifies the mount point with the -M option to be /home2, which is expanded onto the raw device /dev/md/rdsk/d10. The file system will span the entire metadevice when the growfs(1M) command is done. Use the df -k command before and after to verify the total disk capacity.
The growfs(1M) command will "write-lock" (see lockfs(1M)) a mounted file system when expanding. The length of time the file system is write-locked can be shortened by expanding the file system in stages. For instance, to expand a 1 Gbyte file system to 2 Gbytes, the file system can be grown in 16 Mbyte stages using the -s option to specify the total size of the new file system at each stage.
During the expansion, the file system is not available for write access because of write-lock. Write accesses are transparently suspended and are restarted when growfs(1M) unlocks the file system. Read accesses are not affected, though access times are not kept while the lock is in effect.
Note - For mirror and trans metadevices, always run the growfs(1M) command on the top-level metadevice, not a submirror or master device, even though space is added to the submirror or master device.
This section describes DiskSuite's metadevice renaming capability.
Note - The metarename command with the -x option can "switch" metadevices that have a parent-child relationship. Refer to "Metadevice Name Switching."
You cannot rename a metadevice that is mounted or open. You cannot rename a trans metadevice that has a logging device attached.
For example, if the metadevice contains a mounted file system, unmount it.
If you do not see the Device Name field on the Info window, then the metadevice is still in use. Make sure you have stopped access to the metadevice.
The metadevice object displays the new metadevice name.
If the metadevice is used for a file system with an entry in the /etc/vfstab file, DiskSuite Tool changes the entry to reference the new metadevice name.
For example, mount the file system.
After checking the prerequisites, and the preliminary information, use the metarename(1M) command to rename a metadevice. Refer to the metarename(1M) man page for more information.
-----------------------------------------------------------------------------------

# umount /home
# metarename d10 d100
d10: has been renamed to d100
(Edit the /etc/vfstab file so that the file system references the new metadevice)
# mount /home

-----------------------------------------------------------------------------------
The metadevice d10 is renamed to metadevice d100. Because d10 contains a mounted file system, the file system must be unmounted before the rename. If the metadevice is used for a file system with an entry in the /etc/vfstab file, the entry must be changed to reference the new metadevice name. For example, the following line:
----------------------------------------------------

/dev/md/dsk/d10 /dev/md/rdsk/d10 /docs ufs 2 yes -

----------------------------------------------------
should be changed to:
------------------------------------------------------

/dev/md/dsk/d100 /dev/md/rdsk/d100 /docs ufs 2 yes -

------------------------------------------------------
Lastly, the file system is remounted.
This section describes maintenance tasks that you perform on mirrors, including unmirroring a file system, attaching and detaching submirrors, and offlining and onlining submirrors.
Use this procedure to unmirror a file system that can be unmounted while the system is running. To unmirror root (/), /opt, /usr, or swap, or any other file system that cannot be unmounted while the system is running, refer to "How to Unmirror a File System That Cannot be Unmounted (Command Line)."
A mirror with no submirrors in the "OK" state must be repaired first.
The object appears on the canvas.
The mirror is split into its constituent submirrors, which appear on the canvas.
You must change the device name for the file system. To retain access to the data, change from the mirror to one of the submirrors. (The submirror is either a stripe or concatenated metadevice.) To remove access to the data, completely remove the entry for the file system.
When the file system is remounted, it is on the stripe or concatenation.
Be sure to choose the submirror that you will not be using.
Use this procedure to unmirror a file system that can be unmounted while the system is running. To unmirror root (/), /opt, /usr, or swap, or any other file system that cannot be unmounted while the system is running. use the command line procedure.
After checking the prerequisites, and the preliminary information, use the metadetach(1M) and metaclear(1M) commands to unmirror a file system. For more information refer to the metadetach(1M) and metaclear(1M) man pages.
The high-level steps to unmirror a mirror are:
---------------------------------------------------------------------------------

# metastat d4
d4: Mirror
    Submirror 0: d2
      State: Okay
    Submirror 1: d3
      State: Okay
...
# umount /var
# metadetach d4 d2
d4: submirror d2 is detached
# metaclear -r d4
d4: Mirror is cleared
d3: Concat/Stripe is cleared
(Edit the /etc/vfstab file so that the entry for /var is changed from d4 to d2)
# mount /var

---------------------------------------------------------------------------------
/var is made of a two-way mirror named d4; its submirrors are d2 and d3, made of slices /dev/dsk/c0t0d0s0 and /dev/dsk/c1t0d0s0, respectively. The metastat(1M) command verifies that at least one submirror is in the "Okay" state. (A mirror with no submirrors in the "Okay" state must be repaired first.) The file system is unmounted then submirror d2 is detached. The metaclear -r command deletes the mirror and the other submirror, d3.
Next, the entry for /var in the /etc/vfstab file is changed to reference the submirror. For example, if d4 were the mirror and d2 the submirror, the following line:
-----------------------------------------------------

/dev/md/dsk/d4  /dev/md/rdsk/d4  /var ufs  2  yes -

-----------------------------------------------------
should be changed to:
-----------------------------------------------------

/dev/md/dsk/d2  /dev/md/rdsk/d2  /var ufs  2  yes -

-----------------------------------------------------
By using the submirror name, you can continue to have the file system mounted on a metadevice. Lastly, /var is remounted.
Note - By using d2 instead of d4 in the /etc/vfstab file, you have unmirrored the mirror. Because d2 consists of a single slice, you can mount the file system on the slice name (/dev/dsk/c0t0d0s0) if you do not want the device to support a metadevice.
Use this task to unmirror file systems that cannot be unmounted during normal system operation, including root (/), /usr, /opt, and swap.
The high-level steps for this procedure are:
---------------------------------

# metadetach d0 d20
d0: submirror d20 is detached
# metaroot /dev/dsk/c0t3d0s0
# reboot
...
# metaclear -r d0
d0: Mirror is cleared
d10: Concat/Stripe is cleared
# metaclear d20
d20: Concat/Stripe is cleared

---------------------------------
In this example, root (/) is a two-way mirror named d0; its submirrors are d10 and d20, which are made of slices /dev/dsk/c0t3d0s0 and /dev/dsk/c1t3d0s0, respectively. The metastat command verifies that at least one submirror is in the "Okay" state. (A mirror with no submirrors in the "Okay" state must first be repaired.) Submirror d20 is detached to make d0 a one-way mirror. The metaroot command is then run, using the rootslice that the system is going to boot from. This edits the /etc/system and /etc/vfstab files to remove information specifying the mirroring of root (/). After a reboot, the metaclear -r command deletes the mirror and the other submirror, d10. The last metaclear command clears submirrror d20.
-------------------------------------------------------------------------------

# metastat d1
d1: Mirror
    Submirror 0: d11
      State: Okay
    Submirror 1: d21
      State: Okay
...
# metadetach d1 d21
d1: submirror d21 is detached
(Edit the /etc/vfstab file to change the entry for swap from metadevice to slice name)
# reboot
...
# metaclear -r d1
d1: Mirror is cleared
d11: Concat/Stripe is cleared
# metaclear d21
d21: Concat/stripe is cleared

-------------------------------------------------------------------------------
In this example, swap is made of a two-way mirror named d1; its submirrors are d11 and d21, which are made of slices /dev/dsk/c0t3d0s1 and /dev/dsk/c1t3d0s1, respectively. The metastat command verifies that at least one submirror is in the "Okay" state. (A mirror with no submirrors in the "Okay" state must first be repaired.) Submirror d21 is detached to make d1 a one-way mirror. Next, the /etc/vfstab file must be edited to change the entry for swap to reference the slice that is in submirror d21. For example, if d1 was the mirror, and d21 the submirror containing slice /dev/dsk/c0t3d0s1, the following line:
--------------------------------

/dev/md/dsk/d1 - - swap - no -

--------------------------------
should be changed to:
-----------------------------------

/dev/dsk/c0t3d0s1 - - swap - no -

-----------------------------------
After a reboot, the metaclear -r command deletes the mirror and the other submirror, d11. The final metaclear command clears submirrror d21.
Before starting, identify the concatenation or stripe to be used as the submirror. It must be the same size (or larger) as the existing submirror in the mirror. If you have not yet created either, refer to "Creating Stripes and Concatenations."
The object appears on the canvas.
A resync of the new submirror is initiated.
This example shows a a mirror, d2, to which a submirror, d7 has been attached. The mirror automatically syncs the data on new submirror.
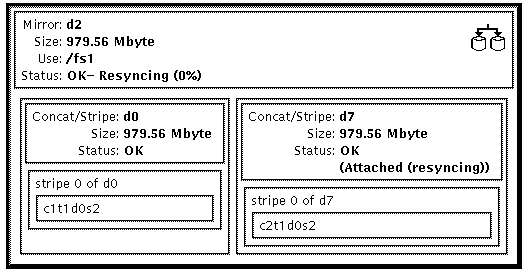
After checking the prerequisites, and the preliminary information, use the metattach(1M) command to attach a submirror to a mirror. Refer to the metattach(1M) man page for more information.
Before starting, identify the concatenation or stripe to be used as the submirror. It must be the same size (or larger) as the existing submirror in the mirror. If you have not yet created either, refer to "Creating Stripes and Concatenations."
---------------------------------------

# metastat d30
d30: mirror
    Submirror 0: d60
      State: Okay
...
# metattach d30 d70
d30: submirror d70 is attached
# metastat d30
d30: mirror
    Submirror 0: d60
      State: Okay
    Submirror 1: d70
      State: Resyncing
    Resync in progress: 41 % done
    Pass: 1
    Read option: roundrobin (default)
    Write option: parallel (default)
    Size: 2006130 blocks
...

---------------------------------------
This example shows the attaching of a submirror, d70, to a one-way mirror, d30, creating a two-way mirror. The mirror d30 initially consists of submirror d60. d70 is a concatenated metadevice. You verify that the status of the mirror is "Okay" with the metastat(1M) command, then attach the submirror. When the metattach(1M) command is run, the new submirror is resynced with the existing mirror. When you attach an additional submirror to the mirror, the system displays a message. To verify that the mirror is resyncing, use the metastat(1M) command.
You might want to detach a submirror if you were going to reuse the underlying disks. You can detach that submirror without disrupting service from the system.
The object appears on the canvas.
If this is a two-way mirror, the mirror's status changes to "Urgent."
After checking the prerequisites, and the preliminary information, use the metadetach(1M) command to detach a submirror from a mirror. Refer to the metadetach(1M) man page for more information.
-----------------------

# metastat
d5: mirror
    Submirror 0: d50
...
# metadetach d5 d50
d5: submirror d50 is detached

-----------------------
In this example, mirror d5 has a submirror, d50, which is detached with the metadetach(1M) command. The underlying slices from d50 are going to be reused elsewhere. When you detach a submirror from a mirror, the system displays a confirmation message.
Placing a submirror offline and online is useful when repairing physical disks. For example, if a disk in a SCSI chain fails, all other metadevices in the chain could be taken offline while the broken disk is replaced. Metadevices are brought online after the replacement disk is installed.
When you take a submirror offline, DiskSuite keeps track of all I/O to the mirror. When you bring the submirror back online, DiskSuite performs an optimized resync of the data, and only has to resync changes, not the entire submirrror.
Note - A submirror that has been taken offline can only be mounted read-only.
The steps to place a submirror offline and online are essentially the same.
The object appears on the canvas.
The Mirror Information window appears.
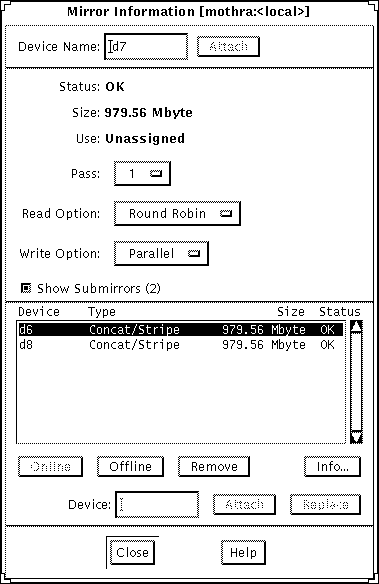
The status of the submirror changes to "Offline (Scheduled)," or "Online (Scheduled)."
If you are bringing a mirror offline, the mirror status changes to "Offline." If you are bringing a mirror online, DiskSuite starts a resync operation.
After checking the prerequisites, and the preliminary information, use the metaoffline(1M) command to offline a submirror, or the metaonline(1M) command to online a submirror. Refer to the metaoffline(1M) or metaonline(1M)man pages for more information.
--------------------------------

# metaoffline d10 d11
d10: submirror d11 is offlined

--------------------------------
This takes submirror d11 offline from mirror d10. Reads will continue to be made from the other submirror. The mirror will be out of sync as soon as the first write is made. This inconsistency is corrected when the offlined submirror is brought back online.
-------------------------------

# metaonline d10 d11
d10: submirror d11 is onlined

-------------------------------
When ready (for example, after replacing a disk), the submirror d11 is brought back online.
The metaonline(1M) command can only be used when a submirror was taken offline by the metaoffline(1M) command. After the metaonline(1M) command runs, DiskSuite automatically begins resyncing the submirror with the mirror.
Note - The metaoffline(1M) command's functionality is similar to that offered by metadetach(1M) however metaoffline(1M) does not sever the logical association between the submirror and the mirror.
This section describes maintenance tasks for disksets, including reserving and releasing disksets, and adding hosts and disks to a diskset.
Disksets can be reserved safely or forcibly. When one host in a diskset reserves the diskset, the other host in the diskset cannot access data on drives in the diskset.
Note - If you are fairly certain that the hosts in the diskset are communicating, it is normally a good idea to perform a safe reservation.
Make sure you have met the prerequisites and have read the preliminary information. Use the metaset(1M) to reserve a diskset safely or forcibly. For more information, refer to the metaset(1M) man page.
Note - If another host has ownership of the diskset, it will panic due to a SCSI reservation conflict.
-------------------------------------

red# metaset
...
Set name = relo-red, Set number = 2
Host                Owner
  red
  blue
...
red# metaset -s relo-red -t
red# metaset
...
Set name = relo-red, Set number = 2
Host                Owner
  red                Yes
  blue
...

-------------------------------------
In this example, host red communicates with host blue and ensures that host blue has released any reservation of the diskset before host red attempts to reserve the set.
Note - In this example, if host blue owned the set relo-red, the "Owner" column in the above output would still have been blank. The metaset(1M) command only shows whether the issuing host owns the diskset, and not the other host.
--------------------------------

# metaset -s relo-red -t -f

--------------------------------
In this example, host red does not communicate with host blue. Instead, the drives in the diskset are reserved without warning. If host blue had the diskset reserved, it would now panic due to reservation loss.
Releasing a diskset is useful when performing maintenance on the drives in the set. When a diskset is released, it cannot be accessed by the host. If both hosts in a diskset release the set, neither host in the diskset can access metadevices or hot spare pools defined in the set.
--------------------------------

# metaset -s diskset -r

--------------------------------
In this command,
-------------------------------------------------------------------


-s diskset    Specifies the name of a diskset on which metaset
              will work.

-r            Releases ownership of a diskset. The reservation of
              all the disks within the set is removed. The
              metadevices set up within the set are no longer
              accessible.

-------------------------------------------------------------------
------------

# metaset

------------
-------------------------------------

red# metaset -s relo-red -r
red# metaset -s relo-red
Set name = relo-red, Set number = 1
Host                Owner
  red
  blue
Drive               Dbase
  c1t0d1             Yes
  c1t2d0             No
  c1t3d0             No
  c1t4d1             No
  c2t2d0             Yes
  c3t0d1             Yes
  c3t2d0             No
  c3t3d0             No
  c3t4d1             No

-------------------------------------
This example releases the diskset relo-red. Note that there is no owner of the diskset. Viewing status from host red could be misleading. A host can only determine if it does or does not own a diskset. For example, if host blue were to reserve the diskset, it would not appear so from host red; only host blue would be able to determine the reservation in this case.
You can add drives to a diskset after it has been defined.
------------------------------------------------

# metaset -s diskset -a drivename ...

------------------------------------------------
In this command,
-------------------------------------------------------------------


-s diskset    Specifies the name of a diskset on which metaset
              will work.

-a            Adds drives to the named diskset.

drivename...  Specifies the drives to add to the diskset. Drive
              names are in the form cxtxdx; no "sx" slice
              identifiers are at the end of the name. The
              drivename must have the same major and minor
              names on all hosts in the diskset.

-------------------------------------------------------------------
When drives are added to a diskset, DiskSuite re-balances the metadevice state database replicas across the remaining drives. Refer to "Creating Disksets" for more information.
Caution -

------------

# metaset

------------
---------------------------------------

red# metaset -s relo-red -a c2t5d0
red# metaset
Set name = relo-red, Set number = 1
Host                Owner
  red                Yes
  blue
Drive               Dbase
  c1t2d0             Yes
  c1t3d0             Yes
  c2t2d0             Yes
  c2t3d0             Yes
  c2t4d0             Yes
  c2t5d0             No

---------------------------------------
This example adds drive c2t5d0 to diskset relo-red.
Note - If you add or delete drives to a diskset while DiskSuite Tool is running, a dialog box appears stating that the configuration has changed. Either reload the configuration by selecting Rescan Configuration from the File menu, or exit DiskSuite Tool then restart it.
DiskSuite supports a maximum of two hosts per diskset. You can add another host to an existing diskset that only has one host.
------------------------------------------------

# metaset -s diskset -a -h host ...

------------------------------------------------
In this command,
-------------------------------------------------------------------


-s diskset    Specifies the name of a diskset on which metaset
              will work.

-a            Adds hosts to the named diskset.

-h host...    Specifies one or more hostnames to be added to the
              diskset. Adding the first host creates the set. The
              hostname is the same name found in
              /etc/nodename.

-------------------------------------------------------------------
------------

# metaset

------------
----------------------------------------

red# metaset -s relo-red -a -h blue
red# metaset -s relo-red
Set name = relo-red, Set number = 1

Host                Owner
  red                Yes
  blue

Drive               Dbase
  c1t0d1             Yes
  c1t2d0             No
  c1t3d0             No
  c1t4d1             No
  c2t2d0             Yes
  c3t0d1             Yes
  c3t2d0             No
  c3t3d0             No
  c3t4d1             No

----------------------------------------
This example adds host blue to the diskset relo-red.