Quickview
- Walk through the steps of creating a GCM app.
In this document
This document describes how to write an Android application and the server-side logic, using the client and server helper libraries provided by GCM.
Creating a Google API project
To create a Google API project:
- Open the Google APIs Console page.
- If you haven't created an API project yet, this page will prompt you to do so:

Note: If you already have existing projects, the first page you see will be the Dashboard page. From there you can create a new project by opening the project drop-down menu (upper left corner) and choosing Other projects > Create.
- Click Create project. Your browser URL will change to something like:
- Take note of the value after
#project:(4815162342 in this example). This is your project number, and it will be used later on as the GCM sender ID.
https://code.google.com/apis/console/#project:4815162342
Enabling the GCM Service
To enable the GCM service:
- In the main Google APIs Console page, select Services.
- Turn the Google Cloud Messaging toggle to ON.
- In the Terms of Service page, accept the terms.
Obtaining an API Key
To obtain an API key:
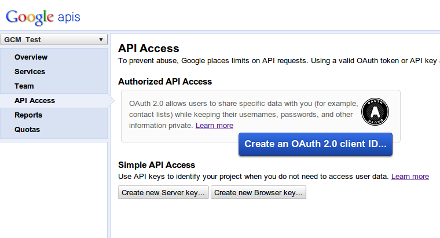
- In the main Google APIs Console page, select API Access. You will see a screen that resembles the following:
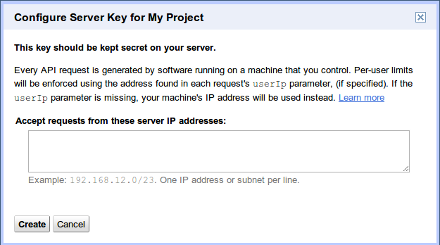
- Click Create new Server key. Either a server key or a browser key should work. The advantage to using a server key is that it allows you to whitelist IP addresses. The following screen appears:
- Click Create:
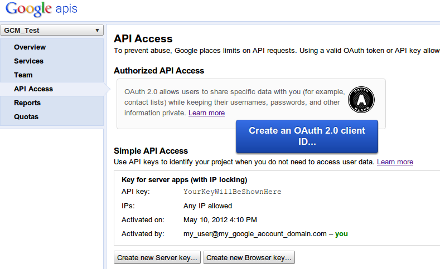
Take note of the API key value (YourKeyWillBeShownHere) in this example, as it will be used later on.
Note: If you need to rotate the key, click Generate new key. A new key will be created while the old one will still be active for up to 24 hours. If you want to get rid of the old key immediately (for example, if you feel it was compromised), click Delete key.
Install the Helper Libraries
To perform the steps described in the following sections, you must first install the
helper libraries.
From the SDK Manager, install Extras > Google Cloud Messaging for Android Library. This creates a gcm directory under YOUR_SDK_ROOT/extras/google/ containing these subdirectories: gcm-client, gcm-server, samples/gcm-demo-client, samples/gcm-demo-server, and samples/gcm-demo-appengine.
Note: If you don't see Extras > Google Cloud Messaging for Android Library in the SDK Manager, make sure you are running version 20 or higher. Be sure to restart the SDK Manager after updating it.
Writing the Android Application
This section describes the steps involved in writing an Android application that uses GCM.
Step 1: Copy the gcm.jar file into your application classpath
To write your Android application, first copy the gcm.jar file from the SDK's gcm-client/dist directory to your application classpath.
Step 2: Make the following changes in the application's Android manifest
- GCM requires Android 2.2 or later, so if your application cannot work without GCM, add the following line, where xx is the latest target SDK version:
- Declare and use a custom permission so only this application can receive GCM messages:
- Add the following permissions:
- Add the following broadcast receiver:
- Add the following intent service:
<uses-sdk android:minSdkVersion="8" android:targetSdkVersion="xx"/>
<permission android:name="my_app_package.permission.C2D_MESSAGE" android:protectionLevel="signature" />
<uses-permission android:name="my_app_package.permission.C2D_MESSAGE" />
This permission must be called my_app_package.permission.C2D_MESSAGE (where my_app_package is the package name of your app as defined by the manifest tag), otherwise it will not work.
Note: This permission is not required if you are targeting your application to 4.1 or above (i.e., minSdkVersion 16)
<!-- App receives GCM messages. -->
<uses-permission android:name="com.google.android.c2dm.permission.RECEIVE" />
<!-- GCM connects to Google Services. -->
<uses-permission android:name="android.permission.INTERNET" />
<!-- GCM requires a Google account. -->
<uses-permission android:name="android.permission.GET_ACCOUNTS" />
<!-- Keeps the processor from sleeping when a message is received. -->
<uses-permission android:name="android.permission.WAKE_LOCK" />
<receiver android:name="com.google.android.gcm.GCMBroadcastReceiver" android:permission="com.google.android.c2dm.permission.SEND" >
  <intent-filter>
    <action android:name="com.google.android.c2dm.intent.RECEIVE" />
    <action android:name="com.google.android.c2dm.intent.REGISTRATION" />
    <category android:name="my_app_package" />
  </intent-filter>
</receiver>
This broadcast receiver is responsible for handling the 2 intents that can be sent by GCM (com.google.android.c2dm.intent.RECEIVE and com.google.android.c2dm.intent.REGISTRATION) and should be defined in the manifest (rather than programmatically) so that these intents can be received even if the application is not running. By setting the com.google.android.c2dm.permission.SEND permission, you are ensuring that only intents sent by the GCM system framework are sent to the receiver (a regular application cannot issue intents with that permission).
Notice that android:name in the category tag must be replaced by your application's package name (and the category tag is not required for applications targeted to minSdkVersion 16 and higher).
<service android:name=".GCMIntentService" />
This intent service will be called by the GCMBroadcastReceiver (which is provided by the GCM library), as shown in the next step. It must be a subclass of com.google.android.gcm.GCMBaseIntentService, must contain a public constructor, and should be named my_app_package.GCMIntentService (unless you use a subclass of GCMBroadcastReceiver that overrides the method used to name the service).
The intent service must also define its sender ID(s). It does this as follows:
- If the value is static, the service's default constructor should call
super(senderIds). - If the value is dynamic, the service should override the
getSenderIds()method.
Step 3: Write the my_app_package.GCMIntentService class
Next write the my_app_package.GCMIntentService class, overriding the following callback methods (which are called by GCMBroadcastReceiver):
onRegistered(Context context, String regId): Called after a registration intent is received, passes the registration ID assigned by GCM to that device/application pair as parameter. Typically, you should send theregidto your server so it can use it to send messages to this device.onUnregistered(Context context, String regId): Called after the device has been unregistered from GCM. Typically, you should send theregidto the server so it unregisters the device.onMessage(Context context, Intent intent): Called when your server sends a message to GCM, and GCM delivers it to the device. If the message has a payload, its contents are available as extras in the intent.onError(Context context, String errorId): Called when the device tries to register or unregister, but GCM returned an error. Typically, there is nothing to be done other than evaluating the error (returned by errorId) and trying to fix the problem.-
onRecoverableError(Context context, String errorId): Called when the device tries to register or unregister, but the GCM servers are unavailable. The GCM library will retry the operation using exponential backup, unless this method is overridden and returns false. This method is optional and should be overridden only if you want to display the message to the user or cancel the retry attempts.
Note: The methods above run in the intent service's thread and hence are free to make network calls without the risk of blocking the UI thread.
Step 4: Write your application's main activity
Add the following import statement in your application's main activity:import com.google.android.gcm.GCMRegistrar;
In the onCreate() method, add the following code:
GCMRegistrar.checkDevice(this);
GCMRegistrar.checkManifest(this);
final String regId = GCMRegistrar.getRegistrationId(this);
if (regId.equals("")) {
  GCMRegistrar.register(this, SENDER_ID);
} else {
  Log.v(TAG, "Already registered");
}
The checkDevice() method verifies that the device supports GCM and throws an exception if it does not (for instance, if it is an emulator that does not contain the Google APIs). Similarly, the checkManifest() method verifies that the application manifest contains meets all the requirements described in Writing the Android Application (this method is only necessary when you are developing the application; once the application is ready to be published, you can remove it).
Once the sanity checks are done, the device calls GCMRegsistrar.register() to register the device, passing the SENDER_ID you got when you signed up for GCM. But since the GCMRegistrar singleton keeps track of the registration ID upon the arrival of registration intents, you can call GCMRegistrar.getRegistrationId() first to check if the device is already registered.
Note: It is possible that the device was successfully registered to GCM but failed to send the registration ID to your server, in which case you should retry. See Advanced Topics for more details on how to handle this scenario.
Writing the Server-side Application
To write the server-side application:
- Copy the
gcm-server.jarfile from the SDK'sgcm-server/distdirectory to your server classpath. - Create a servlet (or other server-side mechanism) that can be used by the Android application to send the registration ID received by GCM . The application might also need to send other information—such as the user's email address or username—so that the server can associate the registration ID with the user owning the device.
- Similarly, create a servlet used to unregister registration IDs.
- When the server needs to send a message to the registration ID, it can use the
com.google.android.gcm.server.Senderhelper class from the GCM library. For example:
import com.google.android.gcm.server.*;

Sender sender = new Sender(myApiKey);
Message message = new Message.Builder().build();
MulticastResult result = sender.send(message, devices, 5);
The snippet above does the following:
- Creates a
Senderobject using your project's API key. - Creates a message using a given registration ID (the message builder also has methods to set all message parameters such as the collapse key and payload data).
- Sends the message with a maximum of 5 retry attempts (in case the GCM servers are unavailable), and stores the response on result.
It's now necessary to parse the result and take the proper action in the following cases:
- If the message was created but the result returned a canonical registration ID, it's necessary to replace the current registration ID with the canonical one.
- If the returned error is
NotRegistered, it's necessary to remove that registration ID, because the application was uninstalled from the device.
Here's a code snippet that handles these 2 conditions:
if (result.getMessageId() != null) {
 String canonicalRegId = result.getCanonicalRegistrationId();
 if (canonicalRegId != null) {
   // same device has more than on registration ID: update database
 }
} else {
 String error = result.getErrorCodeName();
 if (error.equals(Constants.ERROR_NOT_REGISTERED)) {
   // application has been removed from device - unregister database
 }
}