In this document
- Overview
- Android Virtual Devices and the Emulator
- Starting and Stopping the Emulator
- Installing Applications on the Emulator
- Using Hardware Acceleration
- SD Card Emulation
- Working with Emulator Disk Images
- Emulator Networking
- Using the Emulator Console
- Emulator Limitations
- Troubleshooting Emulator Problems
See also
The Android SDK includes a virtual mobile device emulator that runs on your computer. The emulator lets you prototype, develop and test Android applications without using a physical device.
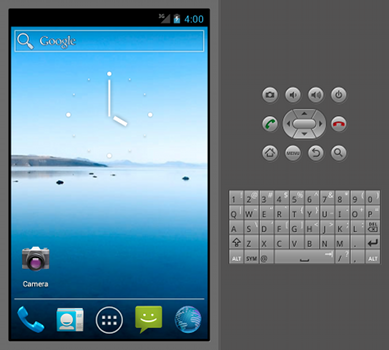
The Android emulator mimics all of the hardware and software features of a typical mobile device, except that it cannot place actual phone calls. It provides a variety of navigation and control keys, which you can "press" using your mouse or keyboard to generate events for your application. It also provides a screen in which your application is displayed, together with any other active Android applications.
To let you model and test your application more easily, the emulator utilizes Android Virtual Device (AVD) configurations. AVDs let you define certain hardware aspects of your emulated phone and allow you to create many configurations to test many Android platforms and hardware permutations. Once your application is running on the emulator, it can use the services of the Android platform to invoke other applications, access the network, play audio and video, store and retrieve data, notify the user, and render graphical transitions and themes.
The emulator also includes a variety of debug capabilities, such as a console from which you can log kernel output, simulate application interrupts (such as arriving SMS messages or phone calls), and simulate latency effects and dropouts on the data network.
Overview
The Android emulator is an application that provides a virtual mobile device on which you can run your Android applications. It runs a full Android system stack, down to the kernel level, that includes a set of preinstalled applications (such as the dialer) that you can access from your applications. You can choose what version of the Android system you want to run in the emulator by configuring AVDs, and you can also customize the mobile device skin and key mappings. When launching the emulator and at runtime, you can use a variety of commands and options to control its behavior.
The Android system images available through the Android SDK Manager contain code for the Android Linux kernel, the native libraries, the Dalvik VM, and the various Android packages (such as the Android framework and preinstalled applications). The emulator provides dynamic binary translation of device machine code to the OS and processor architecture of your development machine.
The Android emulator supports many hardware features likely to be found on mobile devices, including:
- An ARMv5 CPU and the corresponding memory-management unit (MMU)
- A 16-bit LCD display
- One or more keyboards (a Qwerty-based keyboard and associated Dpad/Phone buttons)
- A sound chip with output and input capabilities
- Flash memory partitions (emulated through disk image files on the development machine)
- A GSM modem, including a simulated SIM Card
- A camera, using a webcam connected to your development computer.
- Sensors like an accelerometer, using data from a USB-connected Android device.
The following sections describe the emulator and its use for development of Android applications in more detail.
Android Virtual Devices and the Emulator
To use the emulator, you first must create one or more AVD configurations. In each configuration, you specify an Android platform to run in the emulator and the set of hardware options and emulator skin you want to use. Then, when you launch the emulator, you specify the AVD configuration that you want to load.
Each AVD functions as an independent device, with its own private storage for user data, SD card, and so on. When you launch the emulator with an AVD configuration, it automatically loads the user data and SD card data from the AVD directory. By default, the emulator stores the user data, SD card data, and cache in the AVD directory.
To create and manage AVDs you use the AVD Manager UI or the android tool
that is included in the SDK.
For complete information about how to set up AVDs, see Managing Virtual Devices.
Starting and Stopping the Emulator
During development and testing of your application, you install and run your application in the Android emulator. You can launch the emulator as a standalone application from a command line, or you can run it from within your Eclipse development environment. In either case, you specify the AVD configuration to load and any startup options you want to use, as described in this document.
You can run your application on a single instance of the emulator or, depending on your needs, you can start multiple emulator instances and run your application in more than one emulated device. You can use the emulator's built-in commands to simulate GSM phone calling or SMS between emulator instances, and you can set up network redirection that allows emulators to send data to one another. For more information, see Telephony Emulation, SMS Emulation, and Emulator Networking
To start an instance of the emulator from the command line, navigate to the
tools/ folder of the SDK. Enter emulator command
like this:
emulator -avd <avd_name> [<options>]
This initializes the emulator, loads an AVD configuration and displays the emulator window. For more information about command line options for the emulator, see the Android Emulator tool reference.
Note: You can run multiple instances of the emulator concurrently, each with its own AVD configuration and storage area for user data, SD card, and so on.
If you are working in Eclipse, the ADT plugin for Eclipse installs your application and starts the emulator automatically, when you run or debug the application. You can specify emulator startup options in the Run/Debug dialog, in the Target tab. When the emulator is running, you can issue console commands as described later in this document.
If you are not working in Eclipse, see Installing Applications on the Emulator for information about how to install your application.
To stop an emulator instance, just close the emulator's window.
For a reference of the emulator's startup commands and keyboard mapping, see the Android Emulator tool reference.
Installing Applications on the Emulator
If you don't have access to Eclipse or the ADT Plugin, you can install your application on the
emulator using the adb utility. Before
installing the application, you need to build and package it into an .apk as described
in Building and
Running Apps. Once the application is installed, you can start the emulator from the command
line as described previously, using any startup options necessary.
When the emulator is running, you can also connect to the emulator instance's
console to issue commands as needed.
As you update your code, you periodically package and install it on the emulator.
The emulator preserves the application and its state data across restarts,
in a user-data disk partition. To ensure that the application runs properly
as you update it, you may need to delete the emulator's user-data partition.
To do so, start the emulator with the -wipe-data option.
For more information about the user-data partition and other emulator storage,
see Working with Emulator Disk Images.
Using Hardware Acceleration
In order to make the Android emulator run faster and be more responsive, you can configure it to take advantage of hardware acceleration, using a combination of configuration options, specific Android system images and hardware drivers.
Configuring Graphics Acceleration
Caution: As of SDK Tools Revision 17, the graphics acceleration feature for the emulator is experimental; be alert for incompatibilities and errors when using this feature.
Graphics acceleration for the emulator takes advantage of your development computer's graphics hardware, specifically its graphics processing unit (GPU), to make screen drawing faster. To use the graphics acceleration feature, you must have the following versions of the Android development tools installed:
- Android SDK Tools, Revision 17 or higher
- Android SDK Platform API 15, Revision 3 or higher
Use the Android SDK Manager to install these components:
Note: Not all applications are compatible with graphics hardware
acceleration. In particular, the Browser application and applications using the WebView component are not compatible with graphics acceleration.
To configure an AVD to use graphics acceleration:
- Make sure you have the required SDK components installed (listed above).
- Start the AVD Manager and create a new AVD with the Target value of Android 4.0.3 (API Level 15), revision 3 or higher.
- If you want to have graphics acceleration enabled by default for this AVD, in the
Hardware section, click New, select GPU emulation
and set the value to Yes.
Note: You can also enable graphics acceleration when you start an emulator using command line options as describe in the next section.
- Name the AVD instance and select any other configuration options.
Caution: Do not select the Snapshot: Enabled option. Snapshots are not supported for emulators with graphics acceleration enabled.
- Click Create AVD to save the emulator configuration.
If you set GPU emulation to Yes for your AVD, then graphics acceleration is automatically enabled when you run it. If you did not enable GPU emulation when you created the AVD, you can still enable it at runtime.
To enable graphics acceleration at runtime for an AVD:
- If you are running the emulator from the command line, just include the
-gpu onoption:emulator -avd <avd_name> -gpu on
Note: You must specify an AVD configuration that uses Android 4.0.3 (API Level 15, revision 3) or higher system image target. Graphics acceleration is not available for earlier system images.
- If you are running the emulator from Eclipse, run your Android application using an AVD with
the
-gpu onoption enabled:- In Eclipse, click your Android project folder and then select Run > Run Configurations...
- In the left panel of the Run Configurations dialog, select your Android project run configuration or create a new configuration.
- Click the Target tab.
- Select the AVD you created in the previous procedure.
- In the Additional Emulator Command Line Options field, enter:
-gpu on - Run your Android project using this run configuration.
Configuring Virtual Machine Acceleration
Caution: As of SDK Tools Revision 17, the virtual machine acceleration feature for the emulator is experimental; be alert for incompatibilities and errors when using this feature.
Many modern CPUs provide extensions for running virtual machines (VMs) more efficiently. Taking advantage of these extensions with the Android emulator requires some additional configuration of your development system, but can significantly improve the execution speed. Before attempting to use this type of acceleration, you should first determine if your development system’s CPU supports one of the following virtualization extensions technologies:
- Intel Virtualization Technology (VT, VT-x, vmx) extensions
- AMD Virtualization (AMD-V, SVM) extensions (only supported for Linux)
The specifications from the manufacturer of your CPU should indicate if it supports virtualization extensions. If your CPU does not support one of these virtualization technologies, then you cannot use virtual machine acceleration.
Note: Virtualization extensions are typically enabled through your computer's BIOS and are frequently turned off by default. Check the documentation for your system's motherboard to find out how to enable virtualization extensions.
Once you have determined that your CPU supports virtualization extensions, make sure you can work within these additional requirements of running an emulator inside an accelerated virtual machine:
- x86 AVD Only - You must use an AVD that is uses an x86 system image target. AVDs that use ARM-based system images cannot be accelerated using the emulator configurations described here.
- Not Inside a VM - You cannot run a VM-accelerated emulator inside another virtual machine, such as a VirtualBox or VMWare-hosted virtual machine. You must run the emulator directly on your system hardware.
- Other VM Drivers - If you are running another virtualization technology on your system such as VirtualBox or VMWare, you may need to unload the driver for that virtual machine hosting software before running an accelerated emulator.
- OpenGL® Graphics - Emulation of OpenGL ES graphics may not perform at the same level as an actual device.
To use virtual machine acceleration with the emulator, you need the following version of Android development tools. Use the Android SDK Manager to install these components:
- Android SDK Tools, Revision 17 or higher
- Android x86-based system image
If your development environment meets all of the requirements for running a VM-accelerated emulator, you can use the AVD Manager to create an x86-based AVD configuration:
- In the Android SDK Manager, make sure you have an x86-based System Image
installed for your target Android version. If you do not have an x86 System
Image installed, select one in the Android SDK Manager and install it.
Tip: System images are listed under each API Level in the SDK Manager. An x86 system image may not be available for all API levels.
- Start the AVD Manager and create a new AVD with an x86 value for the CPU/ABI field. You may need to select a specific Target value, or select a Target value and then select a specific CPU/ABI option.
- Name the emulator instance and select any other configuration options.
- Click Create AVD to save the emulator configuration.
Configuring VM Acceleration on Windows
Virtual machine acceleration for Windows requires the installation of the Intel Hardware Accelerated Execution Manager (Intel HAXM). The software requires an Intel CPU with Virtualization Technology (VT) support and one of the following operating systems:
- Windows 7 (32/64-bit)
- Windows Vista (32/64-bit)
- Windows XP (32-bit only)
To install the virtualization driver:
- Start the Android SDK Manager, select Extras and then select Intel Hardware Accelerated Execution Manager.
- After the download completes, execute
<sdk>/extras/intel/Hardware_Accelerated_Execution_Manager/IntelHAXM.exe. - Follow the on-screen instructions to complete installation.
- After installation completes, confirm that the virtualization driver is operating correctly by
opening a command prompt window and running the following command:
sc query intelhaxm
You should see a status message including the following information:
SERVICE_NAME: intelhaxm
       ...
       STATE              : 4  RUNNING
       ...
To run an x86-based emulator with VM acceleration:
- If you are running the emulator from the command line, just specify an x86-based AVD:
emulator -avd <avd_name>
Note: You must provide an x86-based AVD configuration name, otherwise VM acceleration will not be enabled.
- If you are running the emulator from Eclipse, run your Android application with an x86-based
AVD:
- In Eclipse, click your Android project folder and then select Run > Run Configurations...
- In the left panel of the Run Configurations dialog, select your Android project run configuration or create a new configuration.
- Click the Target tab.
- Select the x86-based AVD you created previously.
- Run your Android project using this run configuration.
You can adjust the amount of memory available to the Intel HAXM kernel extension by re-running its installer.
You can stop using the virtualization driver by uninstalling it. Re-run the installer or use the Control Panel to remove the software.
Configuring VM Acceleration on Mac
Virtual machine acceleration on a Mac requires the installation of the Intel Hardware Accelerated Execution Manager (Intel HAXM) kernel extension to allow the Android emulator to make use of CPU virtualization extensions. The kernel extension is compatible with Mac OS X Snow Leopard (version 10.6.0) and higher.
To install the Intel HAXM kernel extension:
- Start the Android SDK Manager, select Extras and then select Intel Hardware Accelerated Execution Manager.
- After the download completes, execute
<sdk>/extras/intel/Hardware_Accelerated_Execution_Manager/IntelHAXM.dmg. - Double click the IntelHAXM.mpkg icon to begin installation.
- Follow the on-screen instructions to complete installation.
- After installation completes, confirm that the new kernel extension is operating correctly by
opening a terminal window and running the following command:
kextstat | grep intel
You should see a status message containing the following extension name, indicating that the kernel extension is loaded:
com.intel.kext.intelhaxm
To run an x86-based emulator with VM acceleration:
- If you are running the emulator from the command line, just specify an x86-based AVD:
emulator -avd <avd_name>
Note: You must provide an x86-based AVD configuration name, otherwise VM acceleration will not be enabled.
- If you are running the emulator from Eclipse, run your Android application with an x86-based
AVD:
- In Eclipse, click your Android project folder and then select Run > Run Configurations...
- In the left panel of the Run Configurations dialog, select your Android project run configuration or create a new configuration.
- Click the Target tab.
- Select the x86-based AVD you created previously.
- Run your Android project using this run configuration.
You can adjust the amount of memory available to the Intel HAXM kernel extension by re-running the installer.
You can stop using the virtualization kernel driver by uninstalling it. Before removing it, shut down any running x86 emulators. To unload the virtualization kernel driver, run the following command in a terminal window:
sudo /System/Library/Extensions/intelhaxm.kext/Contents/Resources/uninstall.sh
Configuring VM Acceleration on Linux
Linux-based systems support virtual machine acceleration through the KVM software package. Follow instructions for installing KVM on your Linux system, and verify that KVM is enabled. In addition to following the installation instructions, be aware of these configuration requirements:
- Running KVM requires specific user permissions, make sure you have sufficient permissions according to the KVM installation instructions.
- If you use another virtualization technology in your Linux platform, unload its kernel driver
before running the x86 emulator. For example, the VirtualBox driver program is
vboxdrv.
To run an x86-based emulator with VM acceleration:
- If you are running the emulator from the command line, start the emulator with an x86-based
AVD and include the KVM options:
emulator -avd <avd_name> -qemu -m 512 -enable-kvm
Note: You must provide an x86-based AVD configuration name, otherwise VM acceleration will not be enabled.
- If you are running the emulator from Eclipse, run your Android application with an x86-based
AVD and include the KVM options:
- In Eclipse, click your Android project folder and then select Run > Run Configurations...
- In the left panel of the Run Configurations dialog, select your Android project run configuration or create a new configuration.
- Click the Target tab.
- Select the x86-based AVD you created previously.
- In the Additional Emulator Command Line Options field, enter:
-qemu -m 512 -enable-kvm
- Run your Android project using this run configuration.
Important: When using the -qemu command line option, make sure
it is the last parameter in your command. All subsequent options are interpreted as qemu-specific
parameters.
SD Card Emulation
You can create a disk image and then load it to the emulator at startup, to simulate the presence of a user's SD card in the device. To do this, you can specify an SD card image when you create an AVD, or you can use the mksdcard utility included in the SDK.
The following sections describe how to create an SD card disk image, how to copy files to it, and how to load it in the emulator at startup.
Note that you can only load a disk image at emulator startup. Similarly, you can not remove a simulated SD card from a running emulator. However, you can browse, send files to, and copy/remove files from a simulated SD card either with adb or the emulator.
The emulator supports emulated SDHC cards, so you can create an SD card image of any size up to 128 gigabytes.
Creating an SD card image
There are several ways of creating an SD card image. The easiest way is to use the
AVD Manager to create a new SD card by specifying a size when you create an AVD.
You can also use the android command line tool when creating an AVD. Just add the
-c option to your command:
android create avd -n <avd_name> -t <targetID> -c <size>[K|M]
The -c option can also be used to to specify a path to an SD card
image for the new AVD. For more information, see Managing Virtual Devices
from the Command Line.
You can also use the mksdcard tool, included in the SDK, to create a FAT32 disk image that you can load in the emulator at startup. You can access mksdcard in the tools/ directory of the SDK and create a disk image like this:
mksdcard <size> <file>
For example:
mksdcard 1024M sdcard1.iso
For more information, see mksdcard.
Copying files to an SD card image
Once you have created the disk image, you can copy files to it prior to
loading it in the emulator. To copy files, you can mount the image as a loop
device and then copy the files to it, or you can use a utility such as mtools to
copy the files directly to the image. The mtools package is available for Linux,
Mac, and Windows.
Alternatively, you can use the adb push command to move files onto an SD card image
while it is loaded in an emulator. For more information see the adb push documentation.
Loading an SD card image
By default, the emulator loads the SD card image that is stored with the active
AVD (see the -avd startup option).
Alternatively, you can start the emulator with the
-sdcard flag and specify the name and path of your image (relative
to the current working directory):
emulator -sdcard <filepath>
Working with Emulator Disk Images
The emulator uses mountable disk images stored on your development machine to simulate flash (or similar) partitions on an actual device. For example, it uses a disk image containing an emulator-specific kernel, the Android system, a ramdisk image, and writeable images for user data and simulated SD card.
To run properly, the emulator requires access to a specific set of disk image files. By default, the Emulator always looks for the disk images in the private storage area of the AVD in use. If no images exist there when the Emulator is launched, it creates the images in the AVD directory based on default versions stored in the SDK.
Note: The default storage location for
AVDs is in ~/.android/avd on OS X and Linux, C:\Documents and
Settings\<user>\.android\ on Windows XP, and
C:\Users\<user>\.android\
on Windows Vista.
To let you use alternate or custom versions of the image files, the emulator provides startup options that override the default locations and filenames of the image files. When you use one of these options, the emulator searches for the image file under the image name or location that you specify; if it can not locate the image, it reverts to using the default names and location.
The emulator uses three types of image files: default image files, runtime image files, and temporary image files. The sections below describe how to override the location/name of each type of file.
Default image files
When the emulator launches, but does not find an existing user data image in the active AVD's storage area, it creates a new one from a default version included in the SDK. The default user data image is read-only. The image files are read-only.
The emulator provides the -system <dir> startup option to
let you override the location where the emulator looks for the default
user data image.
The emulator also provides a startup option that lets you override the name
of the default user data image, as described in the following table. When you use the
option, the emulator looks in the default directory, or in a custom location
(if you specified -system <dir>).
| Name | Description | Comments |
|---|---|---|
userdata.img |
The initial user-data disk image | Override using -initdata <file>. Also see
-data <file>, below. |
Runtime images: user data and SD card
At runtime, the emulator reads and writes data to two disk images: a user-data image and (optionally) an SD card image. These images emulate the user-data partition and removable storage media on actual device.
The emulator provides a default user-data disk image. At startup, the emulator creates the default image as a copy of the system user-data image (user-data.img), described above. The emulator stores the new image with the files of the active AVD.
The emulator provides startup options to let you override the actual names and storage locations of the runtime images to load, as described in the following table. When you use one of these options, the emulator looks for the specified file(s) in the current working directory, in the AVD directory, or in a custom location (if you specified a path with the filename).
| Name | Description | Comments |
|---|---|---|
userdata-qemu.img |
An image to which the emulator writes runtime user-data for a unique user. | Override using -data <filepath>, where <filepath> is the
path the image, relative to the current working directory. If you supply a filename only,
the emulator looks for the file in the current working directory. If the file at <filepath> does
not exist, the emulator creates an image from the default userdata.img, stores it under the name you
specified, and persists user data to it at shutdown. |
sdcard.img |
An image representing an SD card inserted into the emulated device. | Override using -sdcard <filepath>, where <filepath> is the
path the image, relative to the current working directory. If you supply a filename only,
the emulator looks for the file in the current working directory. |
User-Data Image
Each emulator instance uses a writeable user-data image to store user- and session-specific data. For example, it uses the image to store a unique user's installed application data, settings, databases, and files.
At startup, the emulator attempts to load a user-data image stored during a previous session. It looks for the file in the current working directory, in the AVD directory described in a previous section and at the custom location/name that you specified at startup.
- If it finds a user-data image, it mounts the image and makes it available to the system for reading and writing of user data.
- If it does not find one, it creates an image by copying the system user-data
image (userdata.img), described above. At device power-off, the system persists
the user data to the image, so that it will be available in the next session.
Note that the emulator stores the new disk image at the location/name that you
specify in
-datastartup option.
Note: Because of the AVD configurations used in the emulator,
each emulator instance gets its own dedicated storage. There is no longer a need
to use the -d option to specify an instance-specific storage area.
SD Card
Optionally, you can create a writeable disk image that the emulator can use to simulate removeable storage in an actual device. For information about how to create an emulated SD card and load it in the emulator, see SD Card Emulation
You can also use the android tool to automatically create an SD Card image for you, when creating an AVD. For more information, see Managing Virtual Devices with AVD Manager.
Temporary Images
The emulator creates two writeable images at startup that it deletes at device power-off. The images are:
- A writable copy of the Android system image
- The
/cachepartition image
The emulator does not permit renaming the temporary system image or persisting it at device power-off.
The /cache partition image is initially empty, and is used by
the browser to cache downloaded web pages and images. The emulator provides an
-cache <file>, which specifies the name of the file in which
to persist the /cache image at device power-off. If <file>
does not exist, the emulator creates it as an empty file.
You can also disable the use of the cache partition by specifying the
-nocache option at startup.
Emulator Networking
The emulator provides versatile networking capabilities that you can use to set up complex modeling and testing environments for your application. The sections below introduce the emulator's network architecture and capabilities.
Network Address Space
Each instance of the emulator runs behind a virtual router/firewall service that isolates it from your development machine's network interfaces and settings and from the internet. An emulated device can not see your development machine or other emulator instances on the network. Instead, it sees only that it is connected through Ethernet to a router/firewall.
The virtual router for each instance manages the 10.0.2/24 network address space — all addresses managed by the router are in the form of 10.0.2.<xx>, where <xx> is a number. Addresses within this space are pre-allocated by the emulator/router as follows:
| Network Address | Description |
|---|---|
| 10.0.2.1 | Router/gateway address |
| 10.0.2.2 | Special alias to your host loopback interface (i.e., 127.0.0.1 on your development machine) |
| 10.0.2.3 | First DNS server |
| 10.0.2.4 / 10.0.2.5 / 10.0.2.6 | Optional second, third and fourth DNS server (if any) |
| 10.0.2.15 | The emulated device's own network/ethernet interface |
| 127.0.0.1 | The emulated device's own loopback interface |
Note that the same address assignments are used by all running emulator instances. That means that if you have two instances running concurrently on your machine, each will have its own router and, behind that, each will have an IP address of 10.0.2.15. The instances are isolated by a router and can not see each other on the same network. For information about how to let emulator instances communicate over TCP/UDP, see Connecting Emulator Instances.
Also note that the address 127.0.0.1 on your development machine corresponds to the emulator's own loopback interface. If you want to access services running on your development machine's loopback interface (a.k.a. 127.0.0.1 on your machine), you should use the special address 10.0.2.2 instead.
Finally, note that each emulated device's pre-allocated addresses are specific to the Android emulator and will probably be very different on real devices (which are also very likely to be NAT-ed, i.e., behind a router/firewall)
Local Networking Limitations
Android applications running in an emulator can connect to the network available on your workstation. However, they connect through the emulator, not directly to hardware, and the emulator acts like a normal application on your workstation. This means that the emulator, and thus your Android applications, are subject to some limitations:
- Communication with the emulated device may be blocked by a firewall program running on your machine.
- Communication with the emulated device may be blocked by another (physical) firewall/router to which your machine is connected.
The emulator's virtual router should be able to handle all outbound TCP and UDP connections/messages on behalf of the emulated device, provided your development machine's network environment allows it to do so. There are no built-in limitations on port numbers or ranges except the one imposed by your host operating system and network.
Depending on the environment, the emulator may not be able to support other protocols (such as ICMP, used for "ping") might not be supported. Currently, the emulator does not support IGMP or multicast.
Using Network Redirection
To communicate with an emulator instance behind its virtual router, you need to set up network redirection on the virtual router. Clients can then connect to a specified guest port on the router, while the router directs traffic to/from that port to the emulated device's host port.
To set up the network redirection, you create a mapping of host and guest ports/addresses on the the emulator instance. There are two ways to set up network redirection: using emulator console commands and using the ADB tool, as described below.
Setting up Redirection through the Emulator Console
Each emulator instance provides a control console the you can connect to, to
issue commands that are specific to that instance. You can use the
redir console command to set up redirection as needed for an
emulator instance.
First, determine the console port number for the target emulator instance. For example, the console port number for the first emulator instance launched is 5554. Next, connect to the console of the target emulator instance, specifying its console port number, as follows:
telnet localhost 5554Once connected, use the redir command to work with redirection.
To add a redirection, use:
add <protocol>:<host-port>:<guest-port>
where <protocol> is either tcp or udp,
and <host-port> and <guest-port> sets the
mapping between your own machine and the emulated system, respectively.
For example, the following command sets up a redirection that handles all incoming TCP connections to your host (development) machine on 127.0.0.1:5000 and will pass them through to the emulated system's 10.0.2.15:6000.:
redir add tcp:5000:6000
To delete a redirection, you can use the redir del command. To
list all redirection for a specific instance, you can use redir
list. For more information about these and other console commands, see
Using the Emulator Console.
Note that port numbers are restricted by your local environment. this typically
means that you cannot use host port numbers under 1024 without special
administrator privileges. Also, you won't be able to set up a redirection for a
host port that is already in use by another process on your machine. In that
case, redir generates an error message to that effect.
Setting Up Redirection through ADB
The Android Debug Bridge (ADB) tool provides port forwarding, an alternate way for you to set up network redirection. For more information, see Forwarding Ports in the ADB documentation.
Note that ADB does not currently offer any way to remove a redirection, except by killing the ADB server.
Configuring the Emulator's DNS Settings
At startup, the emulator reads the list of DNS servers that your system is currently using. It then stores the IP addresses of up to four servers on this list and sets up aliases to them on the emulated addresses 10.0.2.3, 10.0.2.4, 10.0.2.5 and 10.0.2.6 as needed.
On Linux and OS X, the emulator obtains the DNS server addresses by parsing
the file /etc/resolv.conf. On Windows, the emulator obtains the
addresses by calling the GetNetworkParams() API. Note that this
usually means that the emulator ignores the content of your "hosts" file
(/etc/hosts on Linux/OS X, %WINDOWS%/system32/HOSTS
on Windows).
When starting the emulator at the command line, you can also use the
-dns-server <serverList> option to manually specify the
addresses of DNS servers to use, where <serverList> is a comma-separated
list of server names or IP addresses. You might find this option useful if you
encounter DNS resolution problems in the emulated network (for example, an
"Unknown Host error" message that appears when using the web browser).
Using the Emulator with a Proxy
If your emulator must access the Internet through a proxy server, you can use
the -http-proxy <proxy> option when starting the emulator, to
set up the appropriate redirection. In this case, you specify proxy information
in <proxy> in one of these formats:
http://<machineName>:<port>
or
http://<username>:<password>@<machineName>:<port>
The -http-proxy option forces the emulator to use the specified
HTTP/HTTPS proxy for all outgoing TCP connections. Redirection for UDP is not
currently supported.
Alternatively, you can define the environment variable
http_proxy to the value you want to use for
<proxy>. In this case, you do not need to specify a value for
<proxy> in the -http-proxy command — the
emulator checks the value of the http_proxy environment variable at
startup and uses its value automatically, if defined.
You can use the -verbose-proxy option to diagnose proxy
connection problems.
Interconnecting Emulator Instances
To allow one emulator instance to communicate with another, you must set up the necessary network redirection as illustrated below.
Assume that your environment is
- A is you development machine
- B is your first emulator instance, running on A
- C is your second emulator instance, also running on A
and you want to run a server on B, to which C will connect, here is how you could set it up:
- Set up the server on B, listening to
10.0.2.15:<serverPort> - On B's console, set up a redirection from
A:localhost:<localPort>toB:10.0.2.15:<serverPort> - On C, have the client connect to
10.0.2.2:<localPort>
For example, if you wanted to run an HTTP server, you can select
<serverPort> as 80 and <localPort> as
8080:
- B listens on 10.0.2.15:80
- On B's console, issue
redir add tcp:8080:80 - C connects to 10.0.2.2:8080
Sending a Voice Call or SMS to Another Emulator Instance
The emulator automatically forwards simulated voice calls and SMS messages from one instance to another. To send a voice call or SMS, use the dialer application or SMS application, respectively, from one of the emulators.
To initiate a simulated voice call to another emulator instance:
- Launch the dialer application on the originating emulator instance.
- As the number to dial, enter the console port number of the instance you'd like to call. You can determine the console port number of the target instance by checking its window title, where the console port number is reported as "Android Emulator (<port>).
- Press "Dial". A new inbound call appears in the target emulator instance.
To send an SMS message to another emulator instance, launch the SMS application (if available). Specify the console port number of the target emulator instance as as the SMS address, enter the message text, and send the message. The message is delivered to the target emulator instance.
You can also connect to an emulator instance's console to simulate an incoming voice call or SMS. For more information, see Telephony Emulation and SMS Emulation.
Using the Emulator Console
Each running emulator instance provides a console that lets you query and control the emulated device environment. For example, you can use the console to manage port redirection, network characteristics, and telephony events while your application is running on the emulator. To access the console and enter commands, use telnet to connect to the console's port number.
To connect to the console of any running emulator instance at any time, use this command:
telnet localhost <console-port>
An emulator instance occupies a pair of adjacent ports: a console port and an adb port.
The port numbers differ by 1, with the adb port having the higher port number. The console
of the first emulator instance running on a given machine uses console port 5554 and adb
port 5555. Subsequent instances use port numbers increasing by two — for example, 5556/5557,
5558/5559, and so on. Up to 16 concurrent emulator instances can run a console facility.
To connect to the emulator console, you must specify a valid console port. If multiple emulator instances are running, you need to determine the console port of the emulator instance you want to connect to. You can find the instance's console port listed in the title of the instance window. For example, here's the window title for an instance whose console port is 5554:
Android Emulator (5554)
Alternatively, you can use the adb devices command, which prints a list of running emulator instances and their console port numbers. For more information, see Querying for Emulator/Device Instances in the adb documentation.
Note: The emulator listens for connections on ports 5554-5587 and accepts connections only from localhost.
Once you are connected to the console, you can then enter help [command] to see a list of console commands and learn about specific commands.
To exit the console session, use quit or exit.
The following sections below describe the major functional areas of the console.
Port Redirection
You can use the console to add and remove port redirection while the emulator is running. After you connect to the console, manage port redirection by entering the following command:
redir <list|add|del>
The redir command supports the subcommands listed in the table below.
| Subcommand | Description | Comments |
|---|---|---|
list |
List the current port redirection. | |
add <protocol>:<host-port>:<guest-port> |
Add a new port redirection. |
|
del <protocol>:<host-port> |
Delete a port redirection. | The meanings of <protocol> and <host-port> are listed in the previous row. |
Geo Location Provider Emulation
You can use the console to set the geographic location reported to the applications running
inside an emulator. Use the geo command to send a simple GPS fix to the
emulator, with or without NMEA 1083 formatting:
geo <fix|nmea>
The geo command supports the subcommands listed in the table below.
| Subcommand | Description | Comments |
|---|---|---|
fix <longitude> <latitude> [<altitude>] |
Send a simple GPS fix to the emulator instance. | Specify longitude and latitude in decimal degrees. Specify altitude in meters. |
nmea <sentence> |
Send an NMEA 0183 sentence to the emulated device, as if it were sent from an emulated GPS modem. | <sentence> must begin with '$GP'. Only '$GPGGA' and '$GPRCM' sentences are currently supported. |
You can issue the geo command as soon as an emulator instance is running. The
emulator sets the location you enter by creating a mock location provider. This provider responds to
location listeners set by applications, and also supplies the location to the LocationManager. Any application can query the location manager to obtain the
current GPS fix for the emulated device by calling:
LocationManager.getLastKnownLocation("gps")
For more information about the Location Manager, see LocationManager.
Hardware Events Emulation
The event console commands sends hardware events to the emulator. The syntax for this
command is as follows:
event <send|types|codes|text>
The event command supports the subcommands listed in the table below.
| Subcommand | Description | Comments |
|---|---|---|
send <type>:<code>:<value> [...] |
Send one or more events to the Android kernel. | You can use text names or integers for <type> and <value>. |
types |
List all <type> string aliases supported by the event subcommands. |
|
codes <type> |
List all <codes> string aliases supported by the event
subcommands for the specified <type>. |
|
event text <message> |
Simulate keypresses to send the specified string of characters as a message, | The message must be a UTF-8 string. Unicode posts will be reverse-mapped according to the current device keyboard. Unsupported characters will be discarded silently. |
Device Power Characteristics
The power command controls the power state reported by the emulator to applications. The
syntax for this command is as follows:
power <display|ac|status|present|health|capacity>
The event command supports the subcommands listed in the table below.
| Subcommand | Description | Comments |
|---|---|---|
display |
Display battery and charger state. | |
ac <on|off> |
Set AC charging state to on or off. | |
status <unknown|charging|discharging|not-charging|full> |
Change battery status as specified. | |
present <true|false> |
Set battery presence state. | |
health <unknown|good|overheat|dead|overvoltage|failure> |
Set battery health state. | |
power health <percent> |
Set remaining battery capacity state (0-100). |
Network Status
You can use the console to check the network status and current delay and speed characteristics. To do so, connect to the console and use the netstatus command. Here's an example of the command and its output.
network status
Network Delay Emulation
The emulator lets you simulate various network latency levels, so that you can test your application in an environment more typical of the actual conditions in which it will run. You can set a latency level or range at emulator startup or you can use the console to change the latency, while the application is running in the emulator.
To set latency at emulator startup, use the -netdelay emulator option with a
supported <delay> value, as listed in the table below. Here are some
examples:
emulator -netdelay gprs
emulator -netdelay 40 100
To make changes to network delay while the emulator is running, connect to the console and use
the netdelay command with a supported <delay> value from the table
below.
network delay gprs
The format of network <delay> is one of the following (numbers are milliseconds):
| Value | Description | Comments |
|---|---|---|
gprs | GPRS | (min 150, max 550) |
edge | EDGE/EGPRS | (min 80, max 400) |
umts | UMTS/3G | (min 35, max 200) |
none | No latency | (min 0, max 0) |
<num> |
Emulate an exact latency (milliseconds). | |
<min>:<max> |
Emulate an specified latency range (min, max milliseconds). |
Network Speed Emulation
The emulator also lets you simulate various network transfer rates. You can set a transfer rate or range at emulator startup or you can use the console to change the rate, while the application is running in the emulator.
To set the network speed at emulator startup, use the -netspeed emulator option with a supported
<speed> value, as listed in the table below. Here are some examples:
emulator -netspeed gsm
emulator -netspeed 14.4 80
To make changes to network speed while the emulator is running, connect to the console and use
the netspeed command with a supported <speed> value from the table
below.
network speed 14.4 80
The format of network <speed> is one of the following (numbers are
kilobits/sec):
| Value | Description | Comments |
|---|---|---|
gsm |
GSM/CSD | (Up: 14.4, down: 14.4) |
hscsd |
HSCSD | (Up: 14.4, down: 43.2) |
gprs |
GPRS | (Up: 40.0, down: 80.0) |
edge |
EDGE/EGPRS | (Up: 118.4, down: 236.8) |
umts |
UMTS/3G | (Up: 128.0, down: 1920.0) |
hsdpa |
HSDPA | (Up: 348.0, down: 14400.0) |
full |
no limit | (Up: 0.0, down: 0.0) |
<num> |
Set an exact rate used for both upload and download. | |
<up>:<down> |
Set exact rates for upload and download separately. |
Telephony Emulation
The Android emulator includes its own GSM emulated modem that lets you simulate telephony functions in the emulator. For example, you can simulate inbound phone calls, establish data connections and terminate them. The Android system handles simulated calls exactly as it would actual calls. The emulator does not support call audio.
You can use the gsm command to access the emulator's telephony functions after connecting
to the console. The syntax for this command is as follows:
gsm <call|accept|busy|cancel|data|hold|list|voice|status>
The gsm command supports the subcommands listed in the table below.
| Subcommand | Description | Comments |
|---|---|---|
call <phonenumber> |
Simulate an inbound phone call from <phonenumber>. | |
accept <phonenumber> |
Accept an inbound call from <phonenumber> and change the call's state "active". | You can change a call's state to "active" only if its current state is "waiting" or "held". |
busy <phonenumber> |
Close an outbound call to <phonenumber> and change the call's state to "busy". | You can change a call's state to "busy" only if its current state is "waiting". |
cancel <phonenumber> |
Terminate an inbound or outbound phone call to/from <phonenumber>. | |
data <state> |
Change the state of the GPRS data connection to <state>. | Supported <state> values are:
|
hold |
Change the state of a call to "held". | You can change a call's state to "held" only if its current state is "active" or "waiting". |
list |
List all inbound and outbound calls and their states. | |
voice <state> |
Change the state of the GPRS voice connection to <state>. | Supported <state> values are:
|
status |
Report the current GSM voice/data state. | Values are those described for the voice and data commands. |
SMS Emulation
The Android emulator console lets you generate an SMS message and direct it to an emulator instance. Once you connect to an emulator instance, you can generate an emulated incoming SMS using the following command:
sms send <senderPhoneNumber> <textmessage>
where <senderPhoneNumber> contains an arbitrary numeric string.
The console forwards the SMS message to the Android framework, which passes it through to an application that handles that message type.
VM State
You can use the vm command to control the VM on an emulator instance. The syntax for
this command is as follows:
vm <start|stop|status>
The vm command supports the subcommands listed in the table below.
| Subcommand | Description | Comments |
|---|---|---|
start |
Start the VM on the instance. | |
stop |
Stop the VM on the instance. | |
start |
Display the current status of the VM (running or stopped). |
Emulator Window
You can use the window command to manage the emulator window. The syntax for this
command is as follows:
window <scale>
The vm command supports the subcommands listed in the table below.
| Subcommand | Description | Comments |
|---|---|---|
scale <scale> |
Scale the emulator window. | A number between 0.1 and 3 that sets the scaling factor. You can also specify scale as a DPI value if you add the suffix "dpi" to the scale value. A value of "auto" tells the emulator to select the best window size. |
Terminating an Emulator Instance
You can terminate an emulator instance through the console, using the kill command.
Emulator Limitations
The functional limitations of the emulator include:
- No support for placing or receiving actual phone calls. You can simulate phone calls (placed and received) through the emulator console, however.
- No support for USB connections
- No support for device-attached headphones
- No support for determining network connected state
- No support for determining battery charge level and AC charging state
- No support for determining SD card insert/eject
- No support for Bluetooth
Troubleshooting Emulator Problems
The adb utility sees the emulator as an actual physical device. For this reason, you
might have to use the -d flag with some common adb commands, such as
install. The -d flag lets you specify which of several connected devices to use
as the target of a command. If you don't specify -d, the emulator targets the first
device in its list. For more information about adb, see Android Debug Bridge.
For emulators running on Mac OS X, if you see an error Warning: No DNS servers found
when starting the emulator, check to see whether you have an /etc/resolv.conf file. If
not, please run the following line in a command window:
ln -s /private/var/run/resolv.conf /etc/resolv.conf
See Frequently Asked Questions for more troubleshooting information.