Contents
Previous Next
Creating a New Virtual Machine from the VMware Management Interface
You can create new virtual machines from the VMware Management Interface. The process sets up a new configuration for each virtual machine you create in this fashion. You do not need to use the New Virtual Machine Wizard in order to do this. Creating a virtual machine using the management interface is similar to following the typical path when creating a virtual machine with the New Virtual Machine Wizard, although the management interface configures the virtual machine with bridged networking. You can change the type of networking to network address translation (NAT) or host-only networking after you create the virtual machine.
The virtual machines you create are located on the host to which you are currently logged on, even if the browser you are using is running on a remote client.
As with any other virtual machine, you can change any configuration settings in the virtual machine settings editor in the console (VM > Settings); most settings can be configured in the management interface.
A virtual machine created with the management interface is private. If you want to make this virtual machine available to all users, change the setting in the virtual machine settings editor. For more information, see
Only You Can See Virtual Machines You Create.
Note: Before you create the virtual machine, you should check the installation notes for the guest operating system you intend to install in it. You can find this information in the
VMware Guest Operating System Installation Guide available from the Help menu or from the VMware Web site at
www.vmware.com/support/guestnotes/doc/index.html.
To create a virtual machine from the VMware Management Interface, complete the following steps.
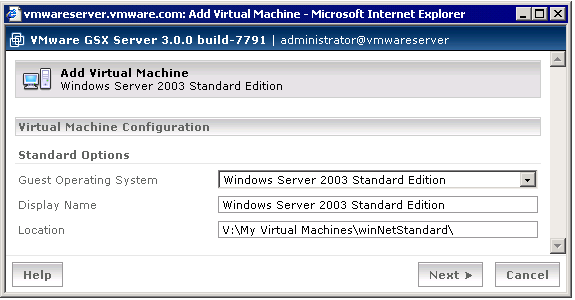
1. On the Status Monitor page, click Add Virtual Machine. The Add Virtual Machine page appears.
2. In the Guest Operating System list, select the guest operating system for the new virtual machine. A name for the virtual machine appears in the Display Name field; a default path to the configuration file appears in the Location field.
Note: If you are creating a Red Hat Enterprise Linux 4 virtual machine, select Other Linux 2.6.x Kernel.
If you want, you can change the display name for the new virtual machine. In the Display Name field, type a descriptive name of the new virtual machine. This name appears in the Display Name column in the management interface and in the VMware Virtual Machine Console.
If you want, you can change the path to the new virtual machine. In the Location field, type the path to the new virtual machine's configuration file on the host machine.
Each virtual machine must have its own directory. All associated files, such as the configuration file and the disk files, are placed in this directory.
After you make your selections, click Next to continue.
3. Allocate memory to the virtual machine. The default setting in the Memory field depends on the guest operating system you have selected. You may need to change it to meet the demands of applications you plan to run in the virtual machine. The amount of memory you specify must be a multiple of four. You may change this setting later.
Caution: You cannot allocate more than 2000MB of memory to a virtual machine if it is stored on a file system that cannot support files larger than 2GB, such as FAT16. You will not be able to power on such a virtual machine. Further, you cannot allocate more than 2000MB of memory to a virtual machine if it is stored on a FAT32 file system, even though it does support files up to 4GB in size.
After you make your selection, click Next. The Disk page appears.
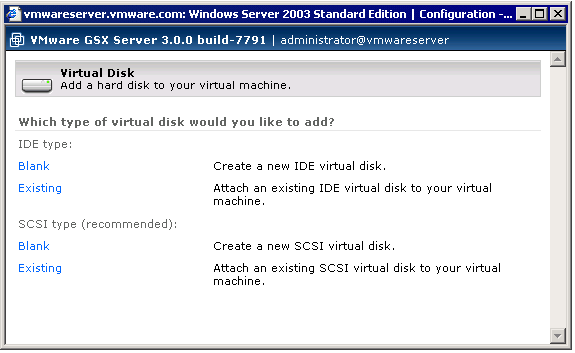
4. Choose whether you want to add a new virtual disk to the virtual machine or use an existing one.
After you create or add the virtual disk, proceed with the next step.
5. After you finish configuring the virtual disk, click Next. GSX Server creates the virtual machine and preallocates all the virtual disk space. The new virtual machine appears on the Status Monitor page.
6. The Hardware tab for this virtual machine appears.
You can change any of the default settings GSX Server assigned to the virtual machine (such as the network adapter and any removable devices) or configuration items you specified as you create the virtual machine. To change any hardware, see
Configuring a Virtual Machine's Hardware.
Creating a New Virtual Disk
1. To create a new virtual disk, decide whether you want the disk to be IDE or SCSI. The wizard suggests the recommended type. Then under IDE type or SCSI type, click Blank. The Virtual Disk Configuration page appears.
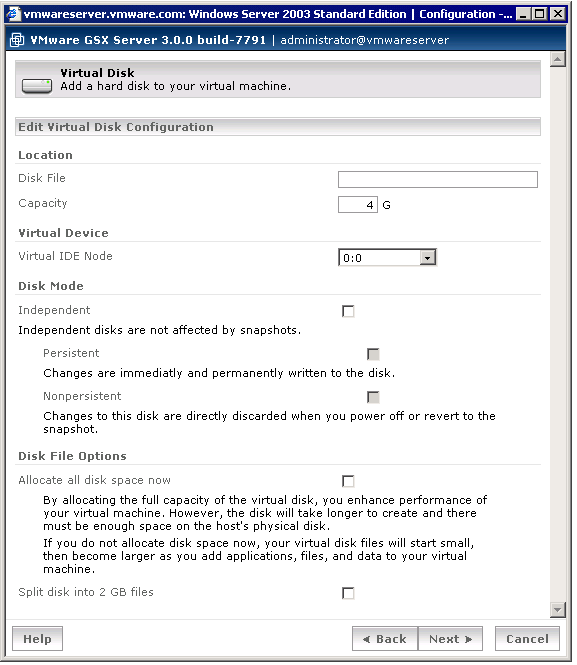
2. In the Disk File field, enter the location and name of the virtual disk. Make sure the virtual disk has a .vmdk extension.
3. In the Capacity field, specify the size of the virtual disk in Gigabytes (GB). By default, GSX Server preallocates the space for the virtual disk when you create it.
The virtual disk can be as small as 0.1GB (100MB). A SCSI virtual disk can be as large as 256GB; an IDE virtual disk can be as large as 128GB. The default is 4GB.
4. Specify the virtual device node in the Virtual IDE Node or Virtual SCSI Node list as appropriate.
5. Decide if you want to make this virtual disk an independent disk. Under Disk Mode, check Independent, then check Persistent or Nonpersistent.
Independent disks are not included in a snapshot.
Caution: The independent disk option should be used only by advanced users who need it for special-purpose configurations.
You have two options for an independent disk. You can make the disk Persistent, which means that changes are immediately and permanently written to the disk. Or you can make the disk Nonpersistent, which means that changes to the disk are discarded when you power off or reset the virtual machine.
6. Decide if you want to preallocate the virtual disk space. Allocating all the space at the time you create the virtual disk gives somewhat better performance and ensures you do not run out of disk space on the host, but it requires as much disk space as the size you specify for the virtual disk. You cannot shrink a preallocated disk. To preallocate the virtual disk, check the Allocate all disk space now box.
If you do not preallocate the disk, the virtual disk's files start small and grow as needed.
You may also specify whether you want the virtual disk created as one large file or split into a set of 2GB files. You should split the virtual disk it is stored on a FAT32 file system or a file system that cannot support files larger than 2GB, such as FAT16. To do this, check Split into 2GB files.
If you later decide you want to enlarge a virtual disk, change the virtual disk from preallocated to growable (or vice versa), or split a virtual disk that was created in a single file (or vice versa), you can use the VMware Virtual Disk Manager to expand or convert the virtual disk. For more information, see
Using VMware Virtual Disk Manager.
Using an Existing Virtual Disk
1. To add an existing virtual disk, decide whether the disk is IDE or SCSI. Then under IDE type or SCSI type, click Blank. The Virtual Disk Configuration page appears.
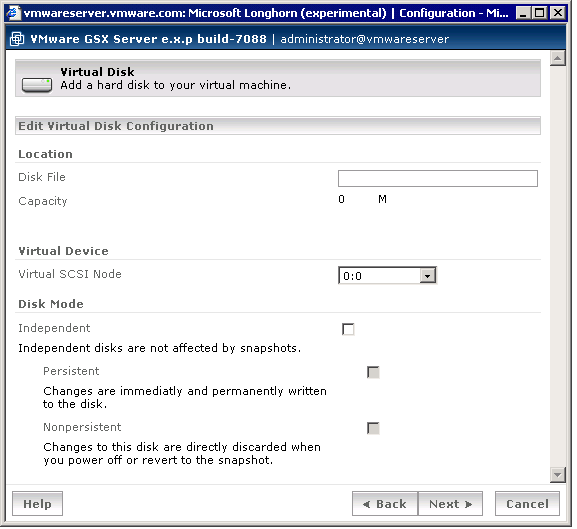
2. In the Disk File field, enter the location for the virtual disk.
3. Specify the virtual device node in the Virtual IDE Node or Virtual SCSI Node list as appropriate.
4. Decide if you want to make this virtual disk an independent disk. Under Disk Mode, check Independent, then check Persistent or Nonpersistent.
Independent disks are not included in the snapshot.
Caution: The independent disk option should be used only by advanced users who need it for special-purpose configurations.
You have two options for an independent disk. You can make the disk Persistent, which means that changes are immediately and permanently written to the disk. Or you can make the disk Nonpersistent, which means that changes to the disk are discarded when you power off or reset the virtual machine.