When designing your application to support a wide range of screen sizes, you can reuse your fragments in different layout configurations to optimize the user experience based on the available screen space.
For example, on a handset device it might be appropriate to display just one fragment at a time for a single-pane user interface. Conversely, you may want to set fragments side-by-side on a tablet which has a wider screen size to display more information to the user.
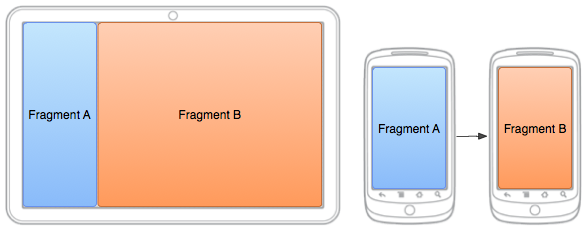
Figure 1. Two fragments, displayed in different configurations for the same activity on different screen sizes. On a large screen, both fragment fit side by side, but on a handset device, only one fragment fits at a time so the fragments must replace each other as the user navigates.
The FragmentManager class provides methods that allow you to add,
remove, and replace fragments to an activity at runtime in order to create a dynamic experience.
Add a Fragment to an Activity at Runtime
Rather than defining the fragments for an activity in the layout file—as shown in the
previous lesson with the <fragment> element—you can add
a fragment to the activity during the activity runtime. This is necessary
if you plan to change fragments during the life of the activity.
To perform a transaction such as add or
remove a fragment, you must use the FragmentManager to create a
FragmentTransaction, which provides APIs to add, remove, replace,
and perform other fragment transactions.
If your activity allows the fragments to be removed and replaced, you should add the
initial fragment(s) to the activity during the activity's
onCreate() method.
An important rule when dealing with fragments—especially those that you add at
runtime—is that the fragment must have a container View in the layout in
which the fragment's layout will reside.
The following layout is an alternative to the layout shown in the previous lesson that shows only one fragment at a time. In order to replace
one fragment with another, the activity's layout
includes an empty FrameLayout that acts as the fragment container.
Notice that the filename is the same as the layout file in the previous lesson, but the layout
directory does not have the large qualifier, so this layout is used when the
device screen is smaller than large because the screen does not fit both fragments at
the same time.
res/layout/news_articles.xml:
<FrameLayout xmlns:android="http://schemas.android.com/apk/res/android"
    android:id="@+id/fragment_container"
    android:layout_width="match_parent"
    android:layout_height="match_parent" />
Inside your activity, call getSupportFragmentManager() to get a FragmentManager using the Support Library APIs. Then call beginTransaction() to create a FragmentTransaction and call add() to add a fragment.
You can perform multiple fragment transaction for the activity using the same FragmentTransaction. When you're ready to make the changes, you must call
commit().
For example, here's how to add a fragment to the previous layout:
import android.os.Bundle;
import android.support.v4.app.FragmentActivity;

public class MainActivity extends FragmentActivity {
    @Override
    public void onCreate(Bundle savedInstanceState) {
        super.onCreate(savedInstanceState);
        setContentView(R.layout.news_articles);

        // Check that the activity is using the layout version with
        // the fragment_container FrameLayout
        if (findViewById(R.id.fragment_container) != null) {

            // However, if we're being restored from a previous state,
            // then we don't need to do anything and should return or else
            // we could end up with overlapping fragments.
            if (savedInstanceState != null) {
                return;
            }

            // Create an instance of ExampleFragment
            HeadlinesFragment firstFragment = new HeadlinesFragment();

            // In case this activity was started with special instructions from an Intent,
            // pass the Intent's extras to the fragment as arguments
            firstFragment.setArguments(getIntent().getExtras());

            // Add the fragment to the 'fragment_container' FrameLayout
            getSupportFragmentManager().beginTransaction()
                    .add(R.id.fragment_container, firstFragment).commit();
        }
    }
}
Because the fragment has been added to the FrameLayout container at
runtime—instead of defining it in the activity's layout with a <fragment>
element—the activity can remove the fragment and replace it with a different one.
Replace One Fragment with Another
The procedure to replace a fragment is similar to adding one, but requires the replace() method instead of add().
Keep in mind that when you perform fragment transactions, such as replace or remove one, it's
often appropriate to allow the user to navigate backward and "undo" the change. To allow the user
to navigate backward through the fragment transactions, you must call addToBackStack() before you commit the
FragmentTransaction.
Note: When you remove or replace a fragment and add the transaction to the back stack, the fragment that is removed is stopped (not destroyed). If the user navigates back to restore the fragment, it restarts. If you do not add the transaction to the back stack, then the fragment is destroyed when removed or replaced.
Example of replacing one fragment with another:
// Create fragment and give it an argument specifying the article it should show
ArticleFragment newFragment = new ArticleFragment();
Bundle args = new Bundle();
args.putInt(ArticleFragment.ARG_POSITION, position);
newFragment.setArguments(args);

FragmentTransaction transaction = getSupportFragmentManager().beginTransaction();

// Replace whatever is in the fragment_container view with this fragment,
// and add the transaction to the back stack so the user can navigate back
transaction.replace(R.id.fragment_container, newFragment);
transaction.addToBackStack(null);

// Commit the transaction
transaction.commit();
The addToBackStack() method
takes an optional string parameter that specifies a unique name for the transaction. The name isn't
needed unless you plan to perform advanced fragment operations using the FragmentManager.BackStackEntry APIs.