This lesson teaches you to
- Design Landscape Layouts
- Make Text and Controls Easy to See
- Design for High-Density Large Screens
- Design to Handle Large Bitmaps
You should also read
When your application is running on a television set, you should assume that the user is sitting about ten feet away from the screen. This user environment is referred to as the 10-foot UI. To provide your users with a usable and enjoyable experience, you should style and lay out your UI accordingly..
This lesson shows you how to optimize layouts for TV by:
- Providing appropriate layout resources for landscape mode.
- Ensuring that text and controls are large enough to be visible from a distance.
- Providing high resolution bitmaps and icons for HD TV screens.
Design Landscape Layouts
TV screens are always in landscape orientation. Follow these tips to build landscape layouts optimized for TV screens:
- Put on-screen navigational controls on the left or right side of the screen and save the vertical space for content.
- Create UIs that are divided into sections, by using Fragments
and use view groups like
GridViewinstead ofListViewto make better use of the horizontal screen space. - Use view groups such as
RelativeLayoutorLinearLayoutto arrange views. This allows the Android system to adjust the position of the views to the size, alignment, aspect ratio, and pixel density of the TV screen. - Add sufficient margins between layout controls to avoid a cluttered UI.
For example, the following layout is optimized for TV:
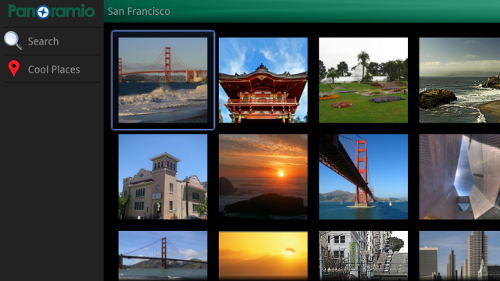
In this layout, the controls are on the lefthand side. The UI is displayed within a
GridView, which is well-suited to landscape orientation.
In this layout both GridView and Fragment have the width and height set
dynamically, so they can adjust to the screen resolution. Controls are added to the left side Fragment programatically at runtime.
The layout file for this UI is res/layout-land-large/photogrid_tv.xml.
(This layout file is placed in layout-land-large because TVs have large screens with landscape orientation. For details refer to
Supporting Multiple Screens.)
<RelativeLayout
    android:layout_width="fill_parent"
    android:layout_height="fill_parent" >

    <fragment
        android:id="@+id/leftsidecontrols"
        android:layout_width="0dip"
        android:layout_marginLeft="5dip"
        android:layout_height="match_parent" />

    <GridView
        android:id="@+id/gridview"
        android:layout_width="wrap_content"
        android:layout_height="wrap_content" />

</RelativeLayout>
To set up action bar items on the left side of the screen, you can also include the Left navigation bar library in your application to set up action items on the left side of the screen, instead of creating a custom Fragment to add controls:
LeftNavBar bar = (LeftNavBarService.instance()).getLeftNavBar(this);
When you have an activity in which the content scrolls vertically, always use a left navigation bar; otherwise, your users have to scroll to the top of the content to switch between the content view and the ActionBar. Look at the Left navigation bar sample app to see how to simple it is to include the left navigation bar in your app.
Make Text and Controls Easy to See
The text and controls in a TV application's UI should be easily visible and navigable from a distance. Follow these tips to make them easier to see from a distance :
- Break text into small chunks that users can quickly scan.
- Use light text on a dark background. This style is easier to read on a TV.
- Avoid lightweight fonts or fonts that have both very narrow and very broad strokes. Use simple sans-serif fonts and use anti-aliasing to increase readability.
- Use Android's standard font sizes:
<TextView android:id="@+id/atext" android:layout_width="wrap_content" android:layout_height="wrap_content" android:gravity="center_vertical" android:singleLine="true" android:textAppearance="?android:attr/textAppearanceMedium"/> - Ensure that all your view widgets are large enough to be clearly visible to someone sitting 10 feet away from the screen (this distance is greater for very large screens). The best way to do this is to use layout-relative sizing rather than absolute sizing, and density-independent pixel units instead of absolute pixel units. For example, to set the width of a widget, use wrap_content instead of a pixel measurement, and to set the margin for a widget, use dip instead of px values.
Design for High-Density Large Screens
The common HDTV display resolutions are 720p, 1080i, and 1080p. Design your UI for 1080p, and then allow the Android system to downscale your UI to 720p if necessary. In general, downscaling (removing pixels) does not degrade the UI (Notice that the converse is not true; you should avoid upscaling because it degrades UI quality).
To get the best scaling results for images, provide them as 9-patch image elements if possible. If you provide low quality or small images in your layouts, they will appear pixelated, fuzzy, or grainy. This is not a good experience for the user. Instead, use high-quality images.
For more information on optimizing apps for large screens see Designing for multiple screens.
Design to Handle Large Bitmaps
The Android system has a limited amount of memory, so downloading and storing high-resolution images can often cause out-of-memory errors in your app. To avoid this, follow these tips:
- Load images only when they're displayed on the screen. For example, when displaying multiple images in
a
GridVieworGallery, only load an image whengetView()is called on the View'sAdapter. - Call
recycle()onBitmapviews that are no longer needed. - Use
WeakReferencefor storing references toBitmapobjects in an in-memoryCollection. - If you fetch images from the network, use
AsyncTaskto fetch them and store them on the SD card for faster access. Never do network transactions on the application's UI thread. - Scale down really large images to a more appropriate size as you download them; otherwise, downloading the image
itself may cause an "Out of Memory" exception. Here is sample code that scales down images while downloading:
  // Get the source image's dimensions
  BitmapFactory.Options options = new BitmapFactory.Options();
  // This does not download the actual image, just downloads headers.
  options.inJustDecodeBounds = true;
  BitmapFactory.decodeFile(IMAGE_FILE_URL, options);
  // The actual width of the image.
  int srcWidth = options.outWidth;
  // The actual height of the image.
  int srcHeight = options.outHeight;

  // Only scale if the source is bigger than the width of the destination view.
  if(desiredWidth > srcWidth)
    desiredWidth = srcWidth;

  // Calculate the correct inSampleSize/scale value. This helps reduce memory use. It should be a power of 2.
  int inSampleSize = 1;
  while(srcWidth / 2 > desiredWidth){
    srcWidth /= 2;
    srcHeight /= 2;
    inSampleSize *= 2;
  }

  float desiredScale = (float) desiredWidth / srcWidth;

  // Decode with inSampleSize
  options.inJustDecodeBounds = false;
  options.inDither = false;
  options.inSampleSize = inSampleSize;
  options.inScaled = false;
  // Ensures the image stays as a 32-bit ARGB_8888 image.
  // This preserves image quality.
  options.inPreferredConfig = Bitmap.Config.ARGB_8888;

  Bitmap sampledSrcBitmap = BitmapFactory.decodeFile(IMAGE_FILE_URL, options);

  // Resize
  Matrix matrix = new Matrix();
  matrix.postScale(desiredScale, desiredScale);
  Bitmap scaledBitmap = Bitmap.createBitmap(sampledSrcBitmap, 0, 0,
      sampledSrcBitmap.getWidth(), sampledSrcBitmap.getHeight(), matrix, true);
  sampledSrcBitmap = null;

  // Save
  FileOutputStream out = new FileOutputStream(LOCAL_PATH_TO_STORE_IMAGE);
  scaledBitmap.compress(Bitmap.CompressFormat.JPEG, 100, out);
  scaledBitmap = null;